Friday, August 31, 2012

Holo Month Day 11: Ozotic 509

Whoohooo! I managed to survive my first week of work. We had an intensive crash course this week (my brain's suffering from information overload now) and I hope I manage to pass the test they made us take just now! In celebration of my first week of work, I have Ozotic 509 to show you!

Ozotic 509 is a sheer silver holographic polish that can be built up to be worn on its own or used as a holo top coat. I've been contemplating getting 509 for quite a while now, since I do own quite a few similar polishes (read: Glitter Gal Silver and a holo SF top coat franken) but after hearing about Ozotic discontinuing their 500 series, I decided to grab a bottle just in case.

Here, I have one coat of 509 to show you how sheer it is.


It is sheer with one coat but otherwise, it's still blingtastic.


Since I have rather short nails, I only needed two coats of 509 in the pictures below, to get away with almost no VNL.


Here's a slightly blurry shot so the holoness burns even brighter!


I mentioned earlier on that 509 could function as a holographic topcoat so here, I have one coat of 509 layered over a random black polish, OPI Ski Teal We Drop, Essie School of Hard Rocks and Misa Coffee Pick Me Up.


Formula-wise,when I painted 509 to be worn on its own, I thought its formula was divine. Not to thin, not too thick and so easy to control. However, for use as a holo top coat, I have to admit that it was a little too thick for my liking. It is holo max, don't get me wrong but it also significantly dulled the base colour of the four polishes and made them appear more silvery.

I'd suggest adding a couple drops of thinner if you're intending to use 509 as a holo top coat. I do prefer my holo top coats to apply thinner so I'm stickingto my holo top coat franken (Spectraflair + clear polish) for now. I have heard that 509 is great for frankening holo polishes though so if you have a bottle to spare, that's something you can do.

This polish does remind a lot of Glitter Gal Silver in terms of consistency and appearance but considering I paid almost the same price for both and Ozotic's bottle is 14ml vs Glitter Gal's 9ml, I'd say Ozotic wins base on price point. Otherwise, I have no preference between the two.

If I'm not mistaken, Star Trinkets should still have 509 in stock so you can head down and grab yourself a bottle before it runs out!

Tuesday, August 28, 2012

Holo Month Day 10: My Fabulous Private Jet (Franken)

I was having a conversation with Susan and Annette on twitter just the other day and we were discussing how I recently bought so many holo polishes and I jokingly said I could do an entire month's worth of posts just on holo goodness. Well, since I already started out with the first eight Layla holograms, I thought why not? If I could have my way, I'd be posting every single day for holo month but since I just started work, you'll have to be contented with say, three posts a week? As I'm typing this, I have my audit notes (which I'm supposed to be studying) on my desk. It's only Day 2 of work and yet it was an eleven hour day for me. And I have three more days of training to go, with a test on Friday and on the weekend, I have some e-learning to do. Whoever said there'd be no more learning and tests after we graduated was CLEARLY LYING.

Oh well. I digress. So, continuing on my holo rampage, today I have a franken to show you.
OPI My Private Jet was my first polish love. I saw it on notebookdoodles (it's such a shame she doesn't update the blog anymore) a long while back and I suspect her's was the holographic brown version. We'll go into all the different versions in a bit but back to the polish, it was love at first sight. 
Now onto the different version, God knows how many they are but so far, I've counted the original holographic, charcoal holographic, brown holographic, teal flash and the latest yucky brown with silver flecks.

Sadly, by the time I fell in love with MPJ, I wasn't lucky enough to get my polished claws on any of the holographic versions and could only get the yucky brown version. But oh no, I WILL NOT SETTLE. And this is where a little spectraflair comes in.


I know that my fabulous franken doesn't exactly glow in this picture but just you wait!


TADAH!


The addition of some spectraflair made the base colour of MPJ a little paler and more grey though but hey, that kinda makes it looks more like the charcoal holo version!


Just a short and sweet post today. Why complicate things with words when pictures can paint a thousands words? ;)

Stay tuned for more holographic awesomeness!

Sunday, August 26, 2012

China Glaze Wicked Collection Halloween 2012

Hello my fellow polish lovers! I'm interrupting Holo Month to present you with quick swatches of the entire China Glaze Wicked Halloween 2012 collection!


Living in Singapore, my family and neighbourhood didn't really celebrate Halloween and I was so bummed because as a kid, I know I would have enjoy all the candy "treats"!

Honestly, I never thought much about the history of Halloween until I watch an episode of Supernatural, which featured the very Sam Hain that Halloween is all about. I guess they changed and glorified things in the show, as they got someone to actually portray Sam Hain, to tell the story of Halloween but in truth, Samhain is a Gaelic harvest festival that has also been associated with All Saints' Day.

Ahhh, how I digressed! You can read up more on Samhain here if you're interested!

Moving on to swatches! :)

First up is 
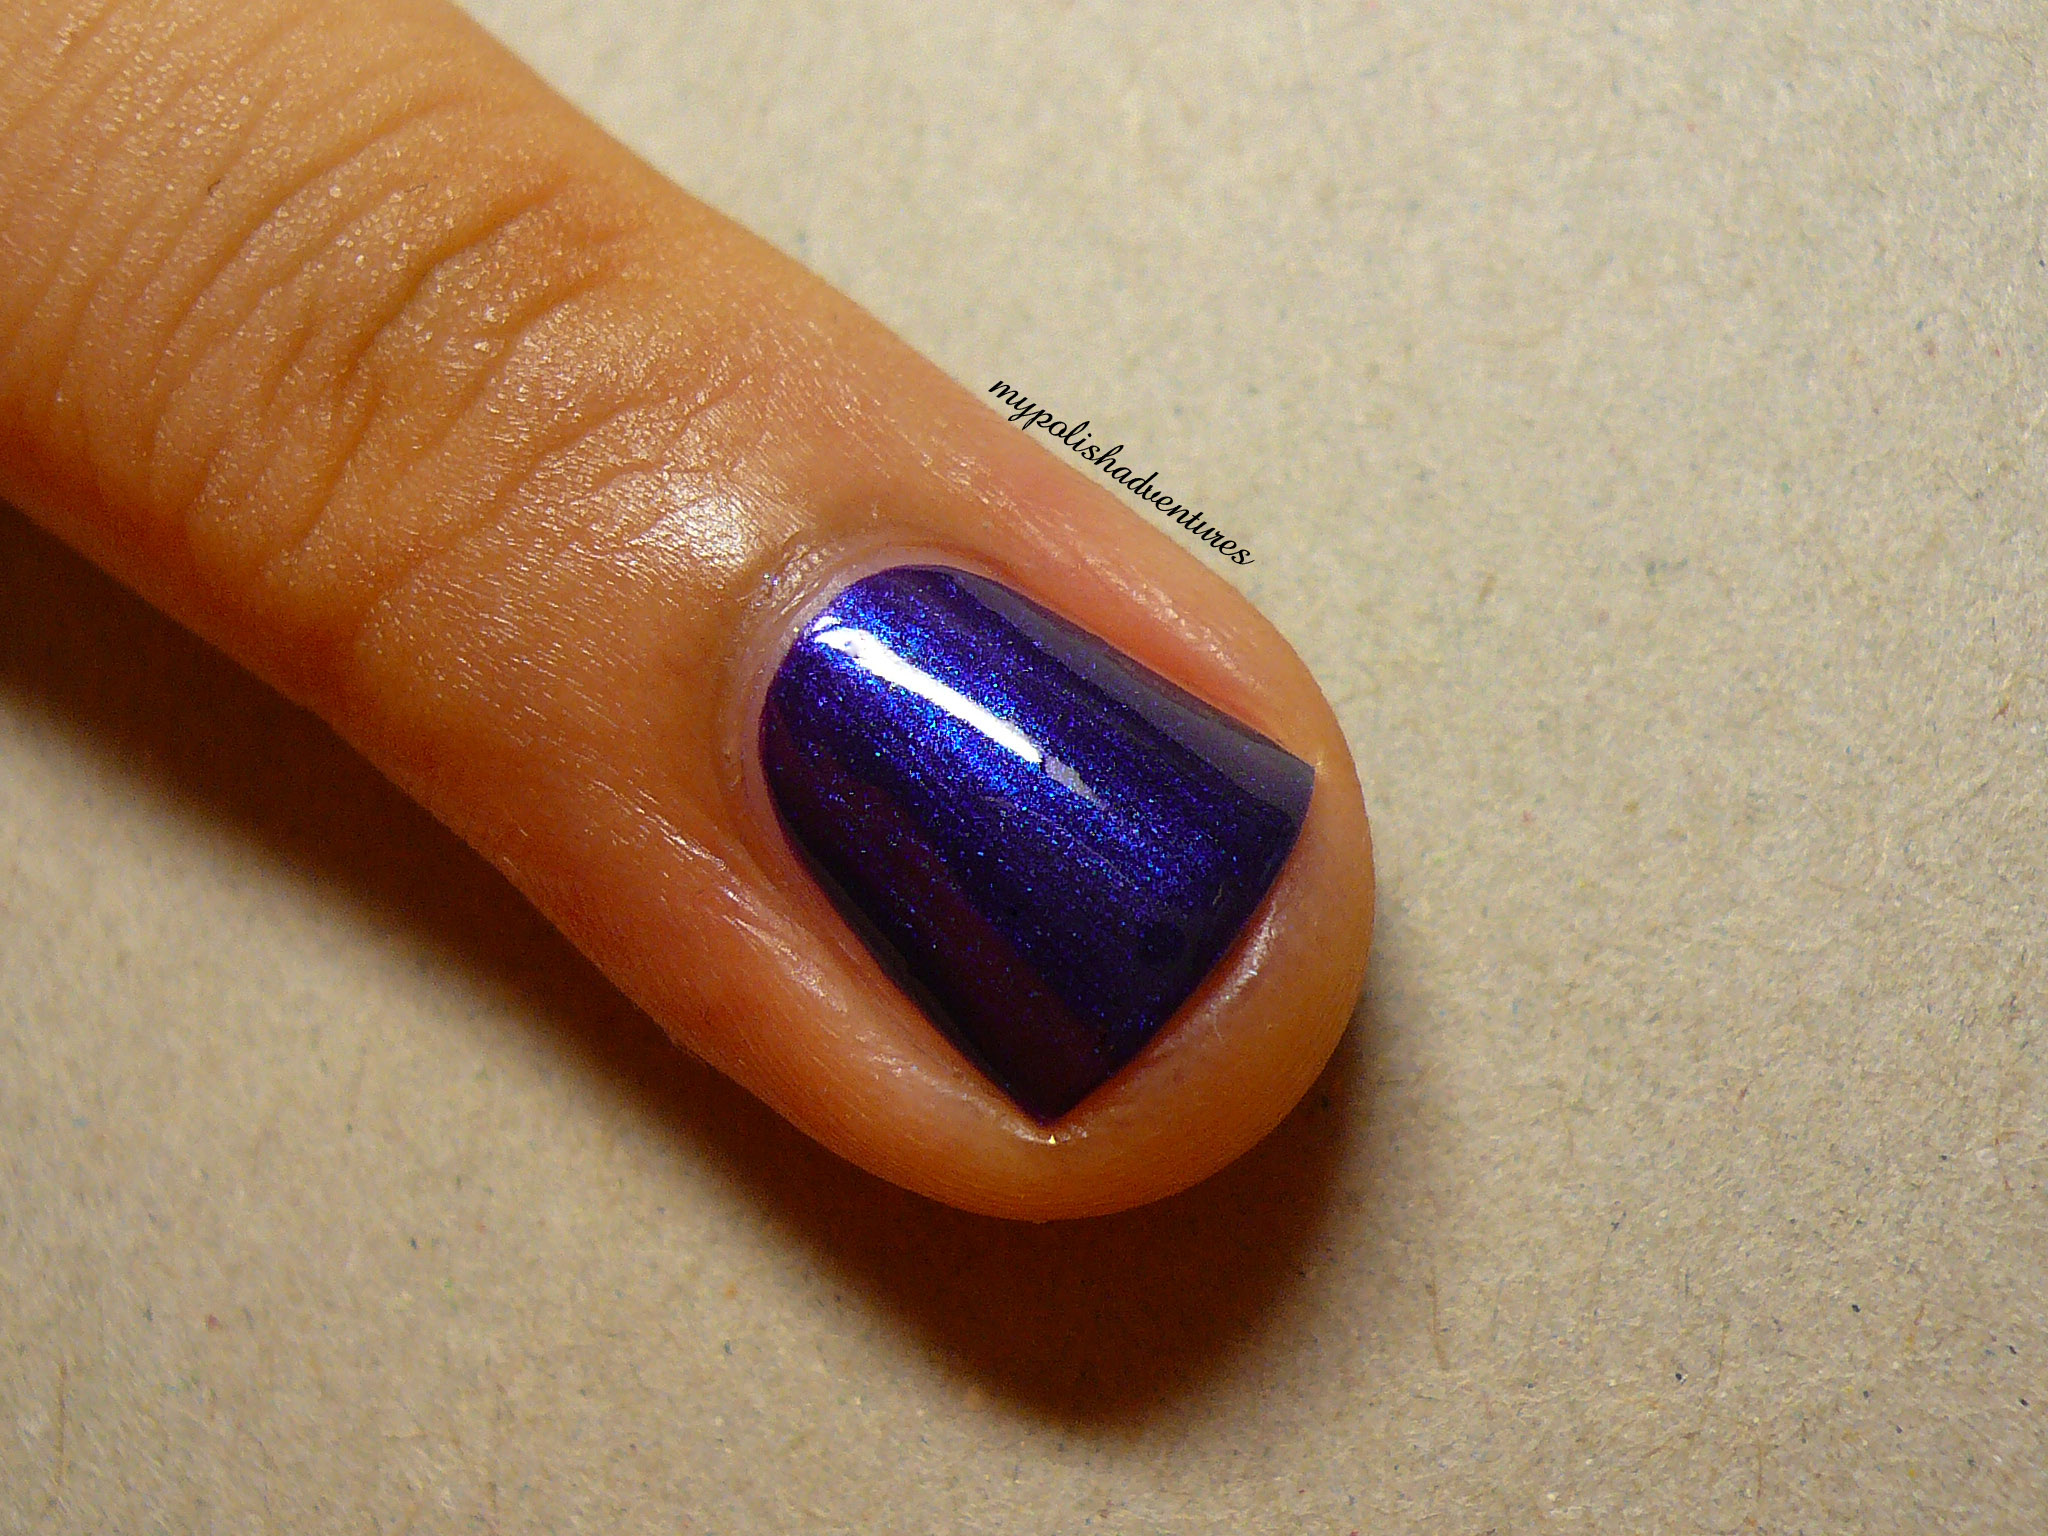
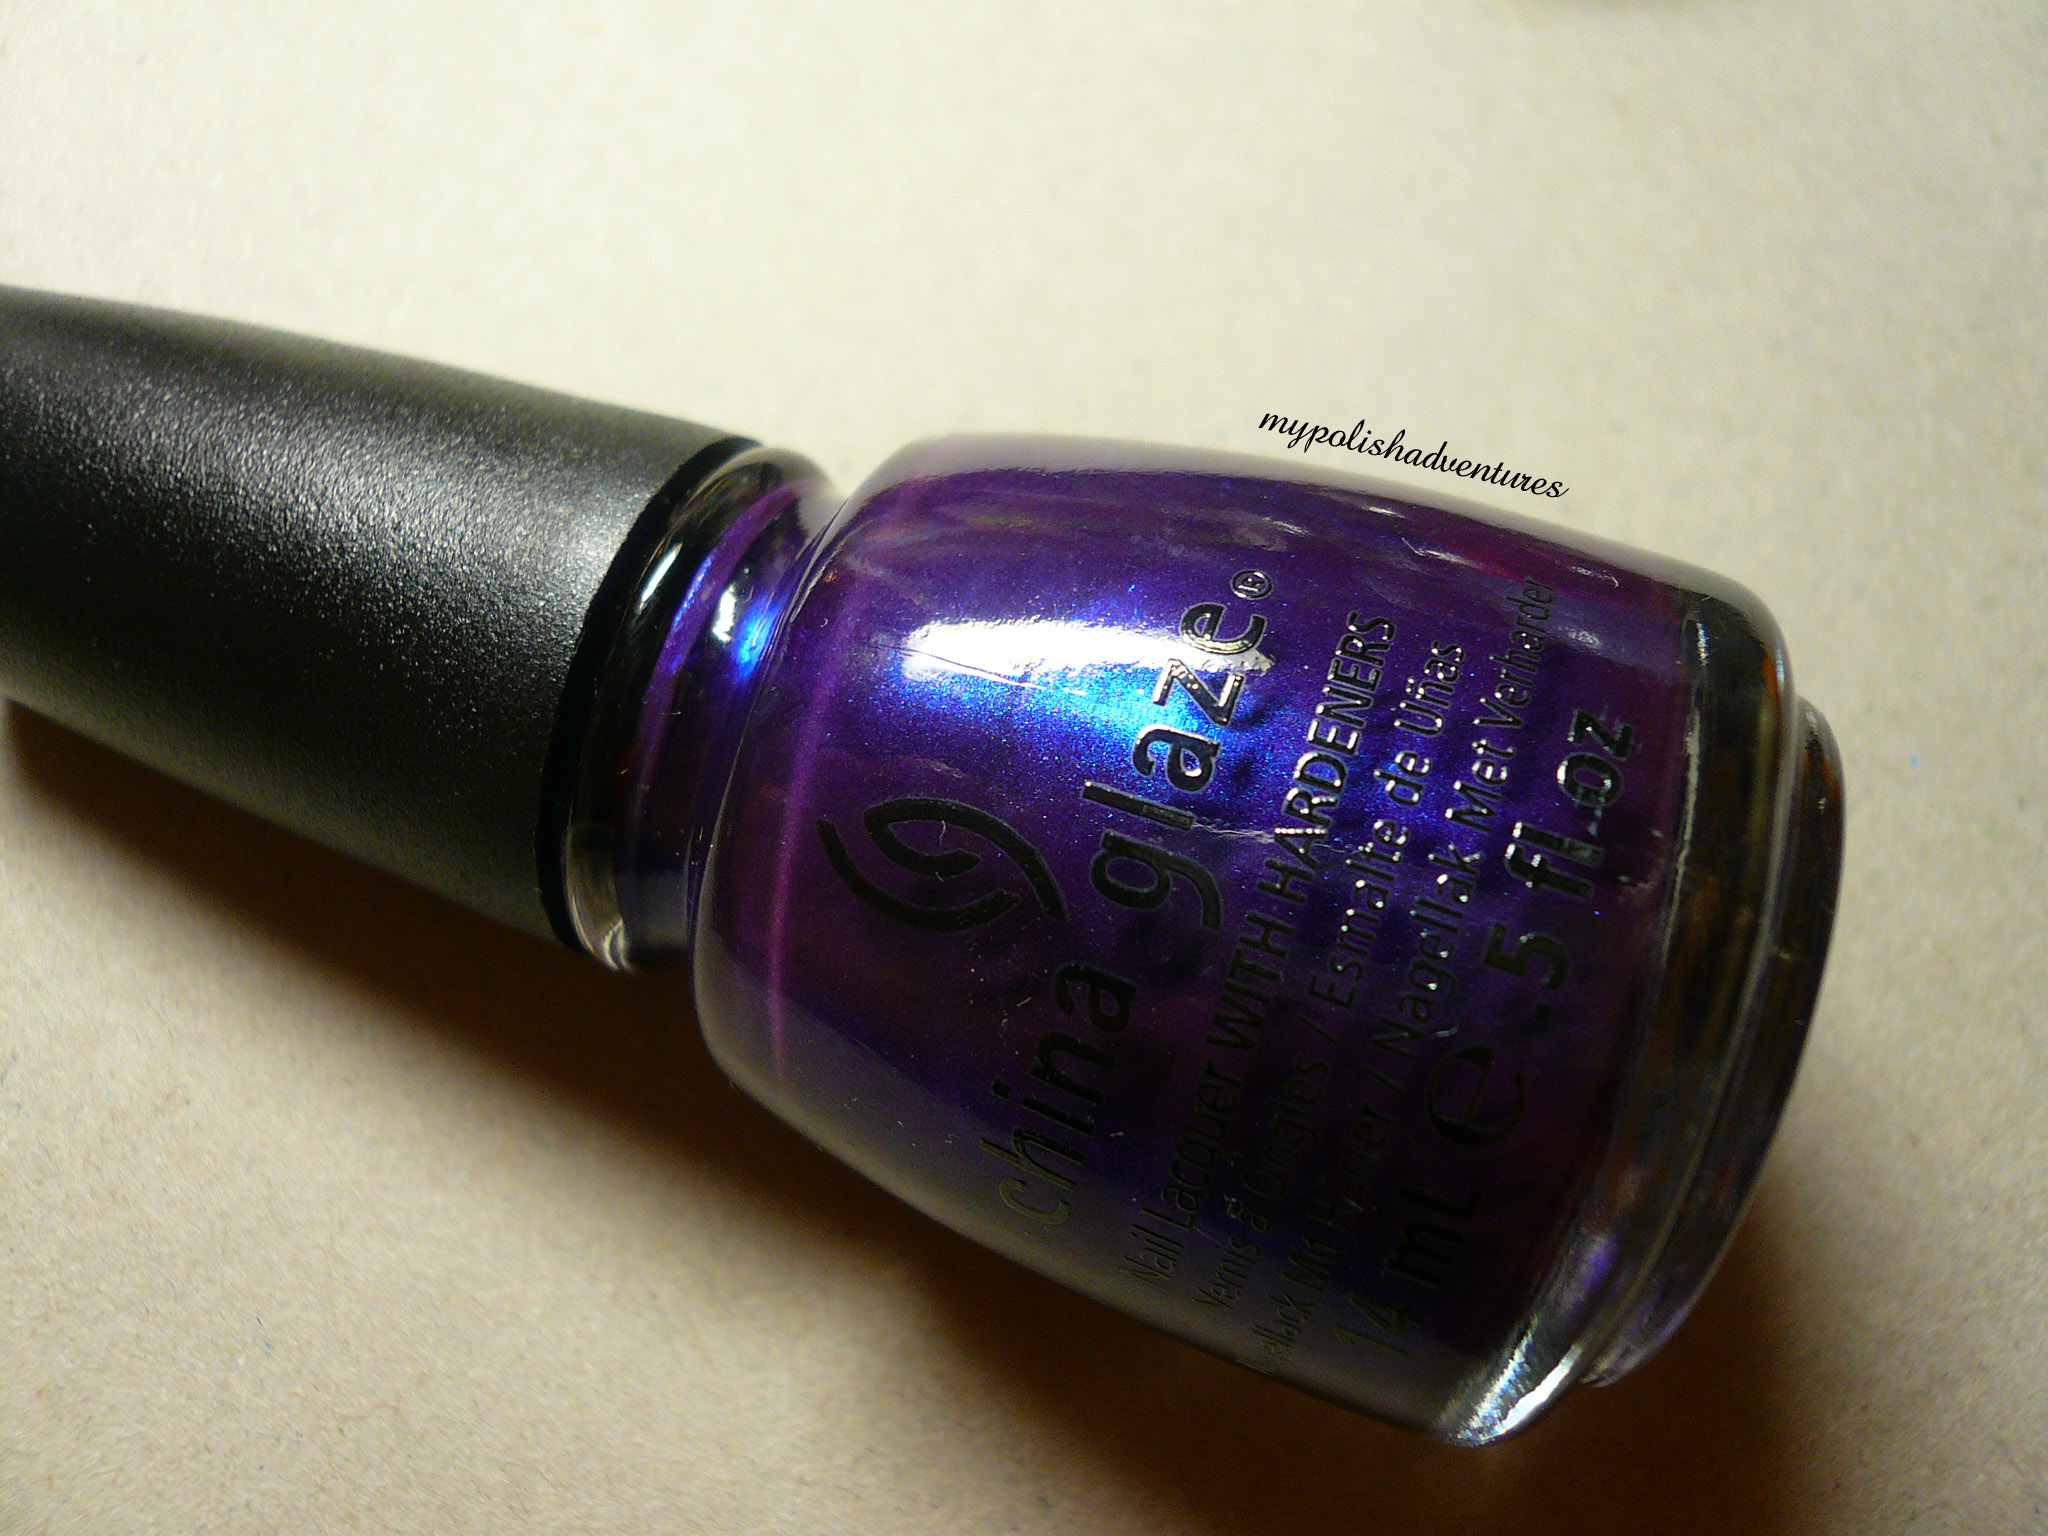
Bizarre Blurple, which is a duochrome shade that has a more evident blue to purple shift in the bottle than on the nails.


On the nail, Bizarre Blurple is a subtle shimmery shade that reminds me of Mickey Mouse's pointy hat in Fantasia! I did pay more attention with the application of Bizarre Blurple as this one seemed to leave evidence of your brush strokes.


This was two coats. As you can see, the purple shift can't really be seen on the nails! :(


Here's another bottle shot to show you that it does shift to purple. It really is a beauty in the bottle!


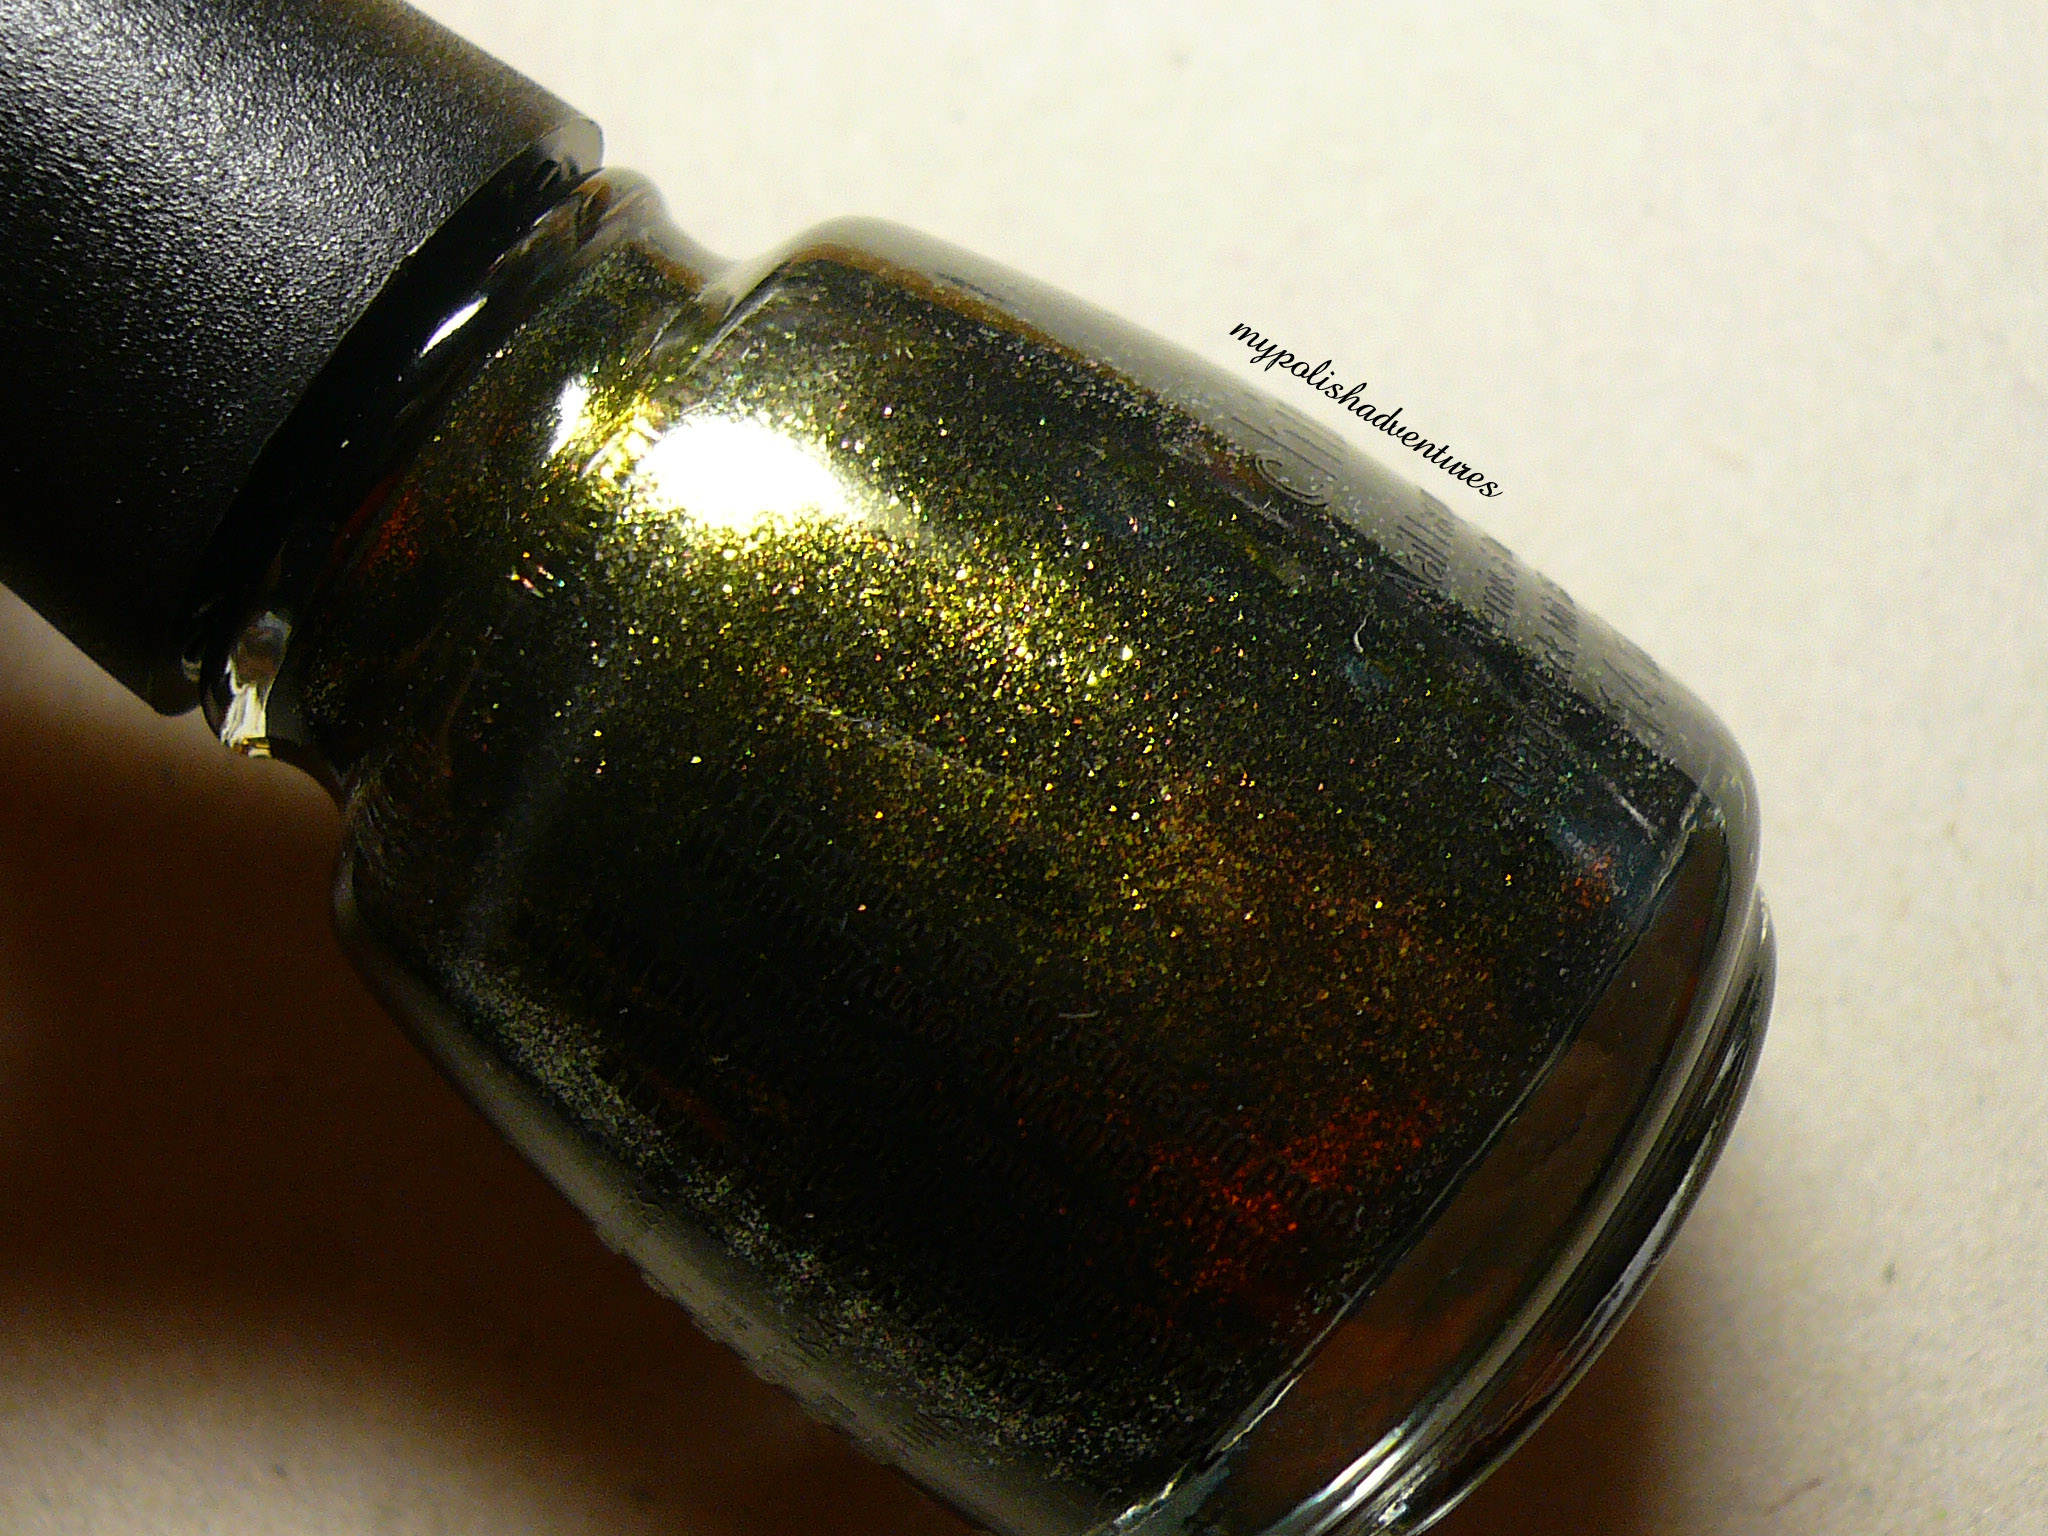
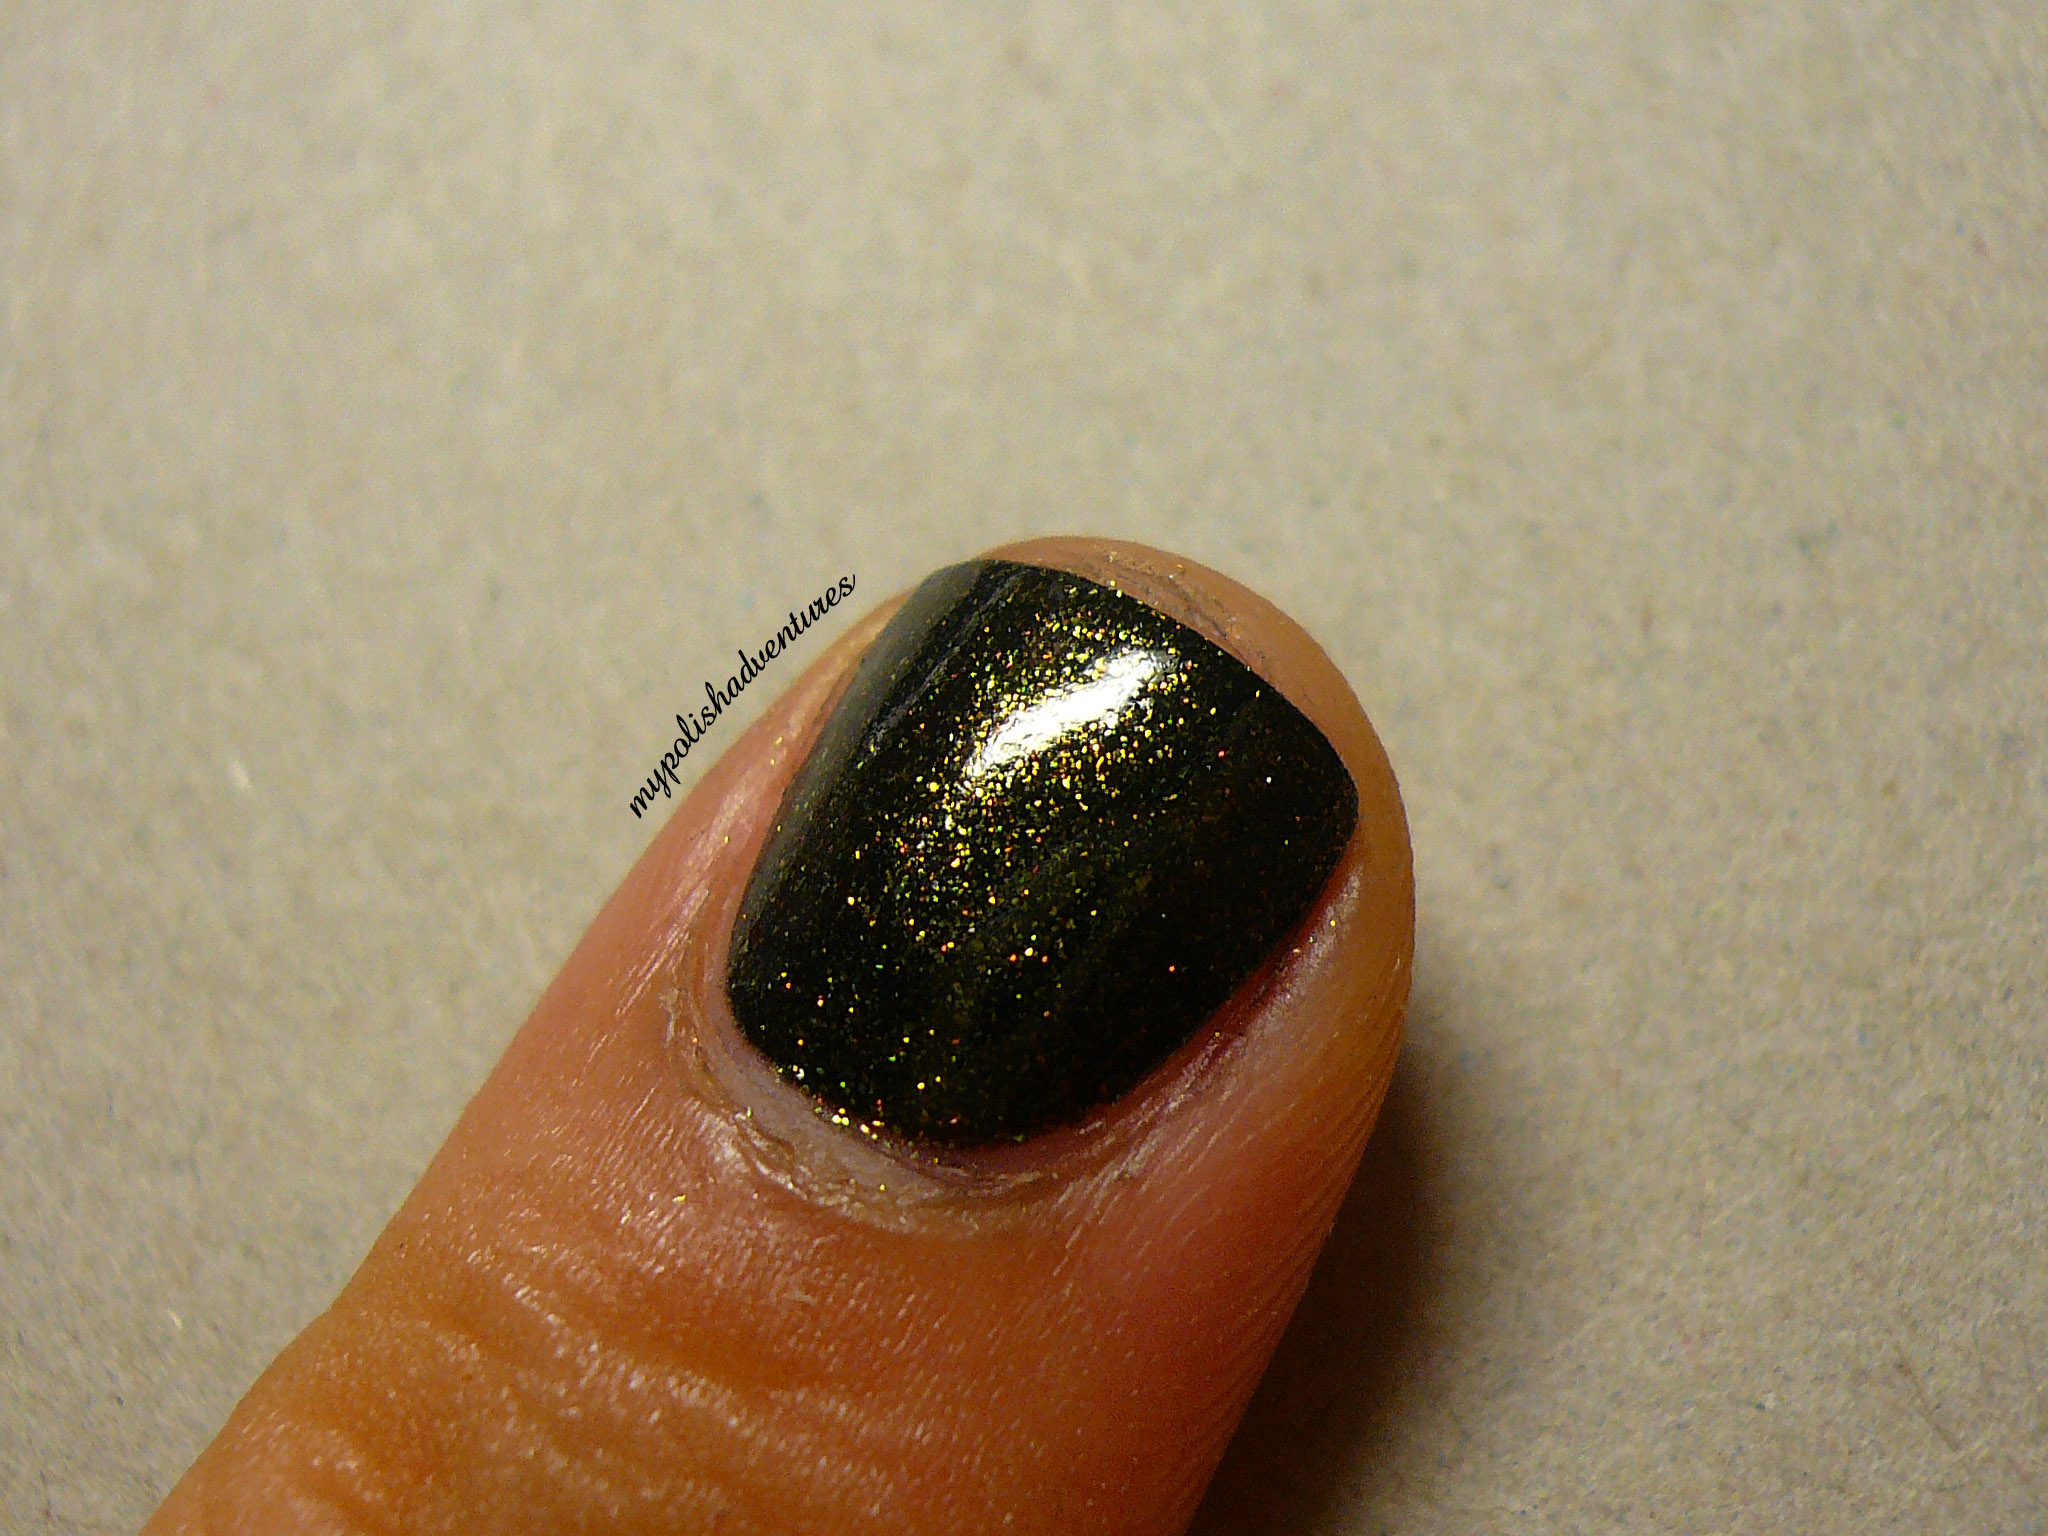
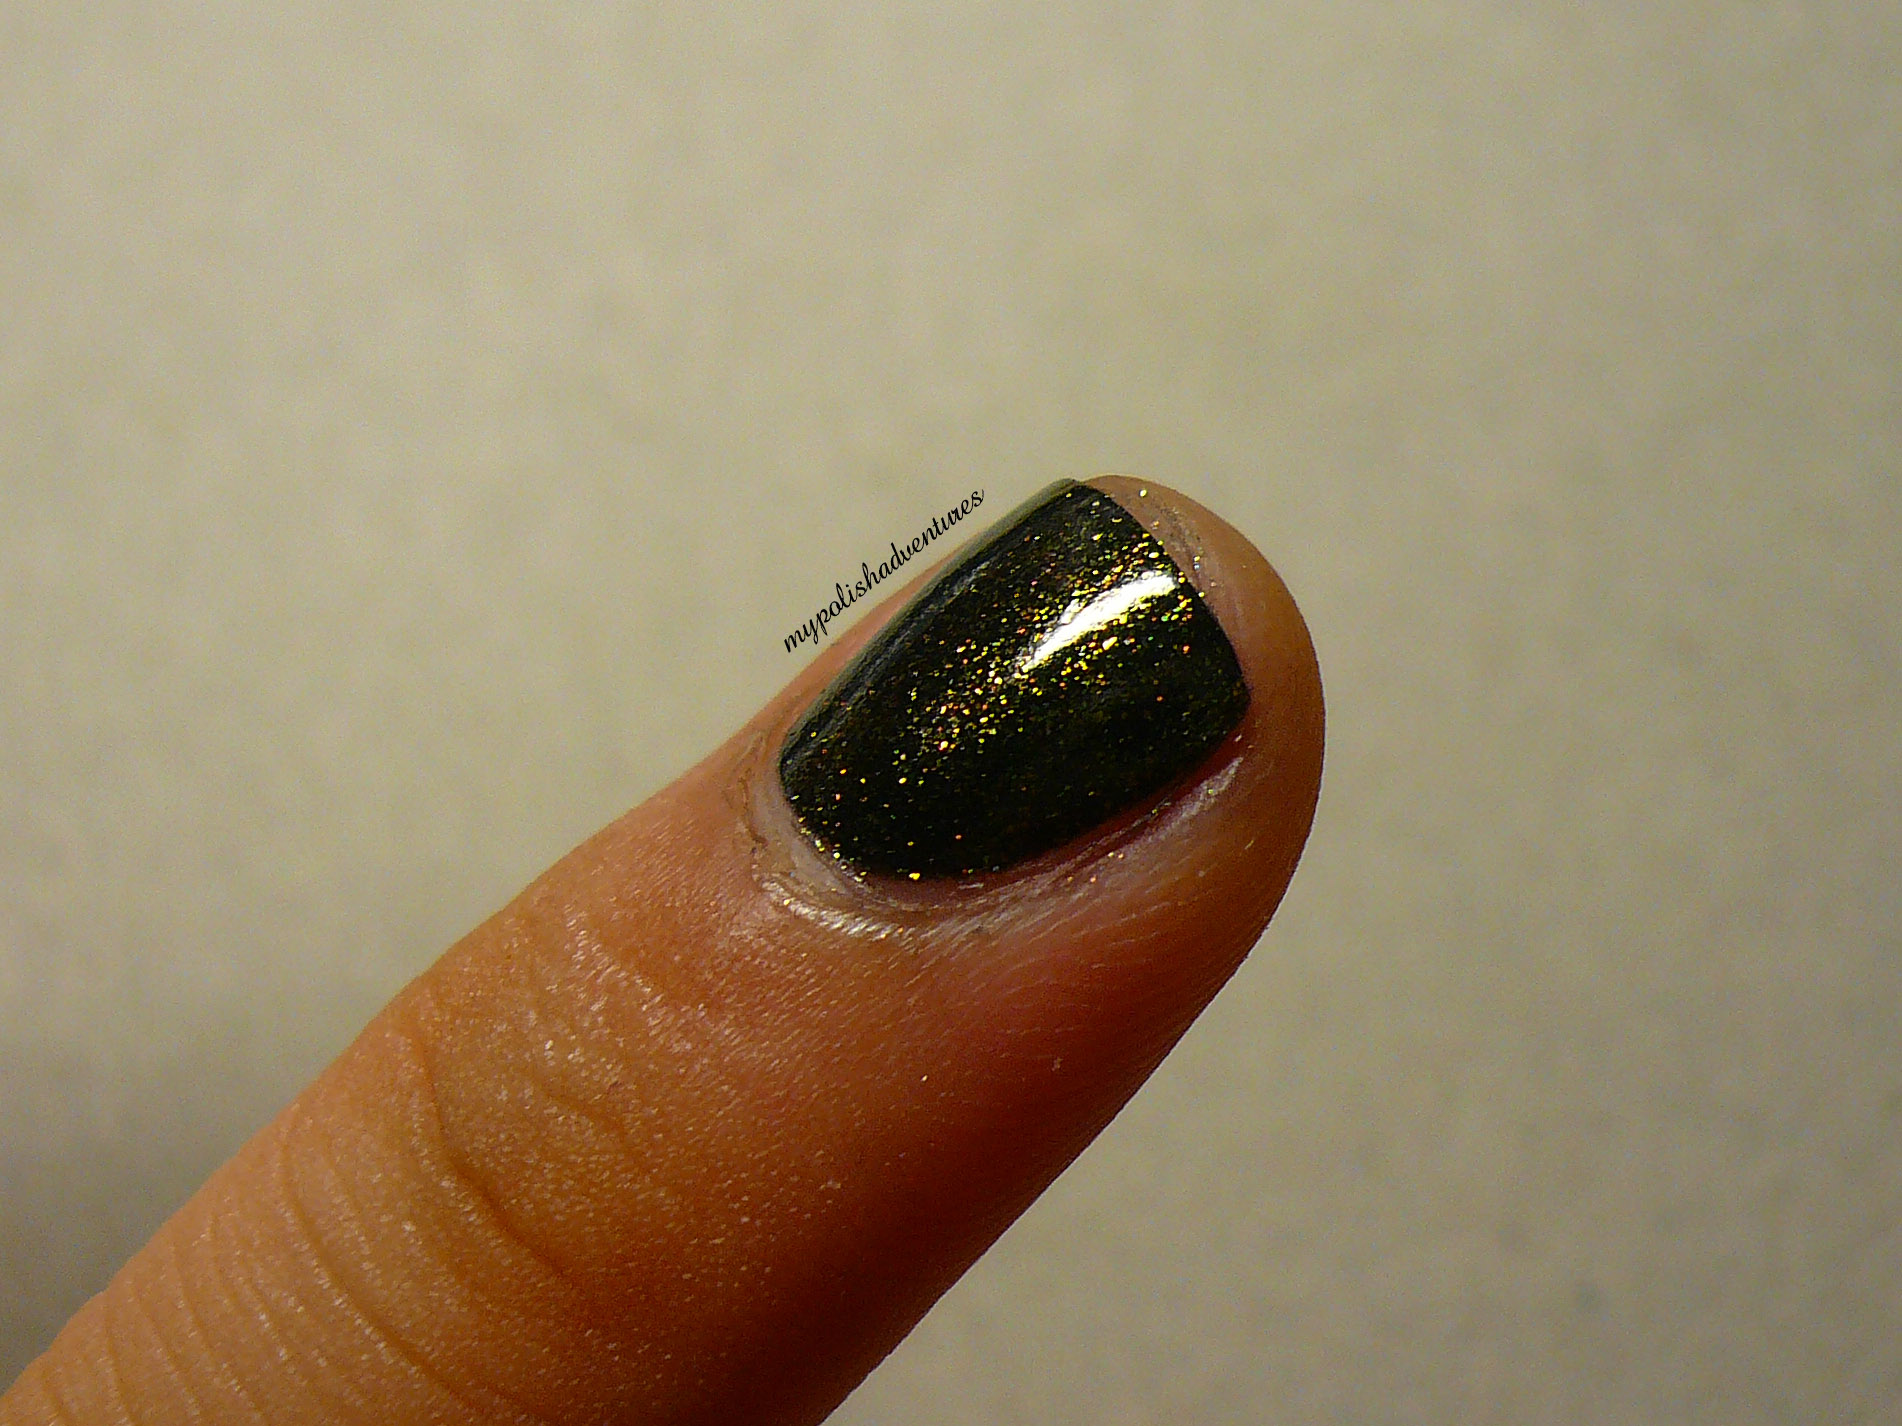
Next up, we have Cast A Spell, an olive green polish with gold and the occasional red glitter swimming inside.


This polish does remind me of OPI At Your Que-bec and Call, except with glitter instead of shimmer. Needless to say, as a green polish lover, I love this baby but admittedly, this isn't a revolutionary colour. Cast A Spell was quite pigmented and this was two coats.


You *have* to click on the pictures to enlarge them and see how purdy the glitters are!


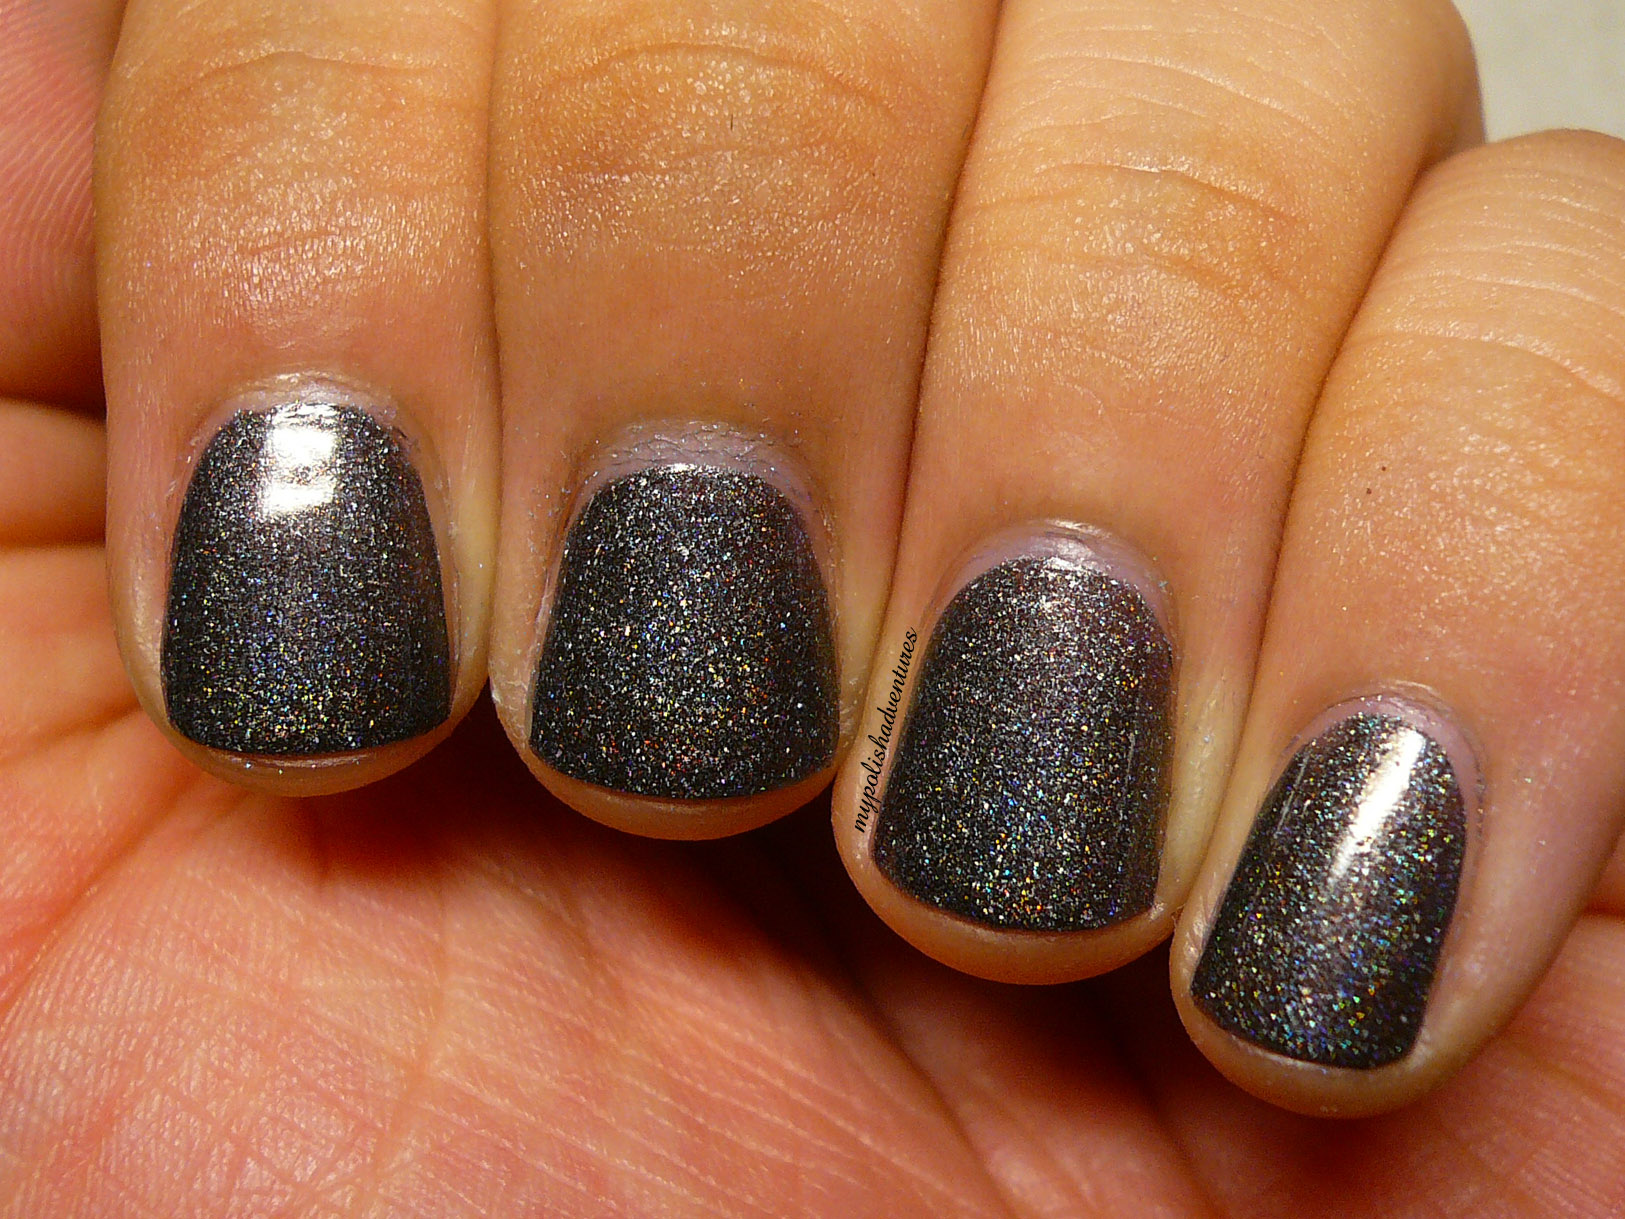
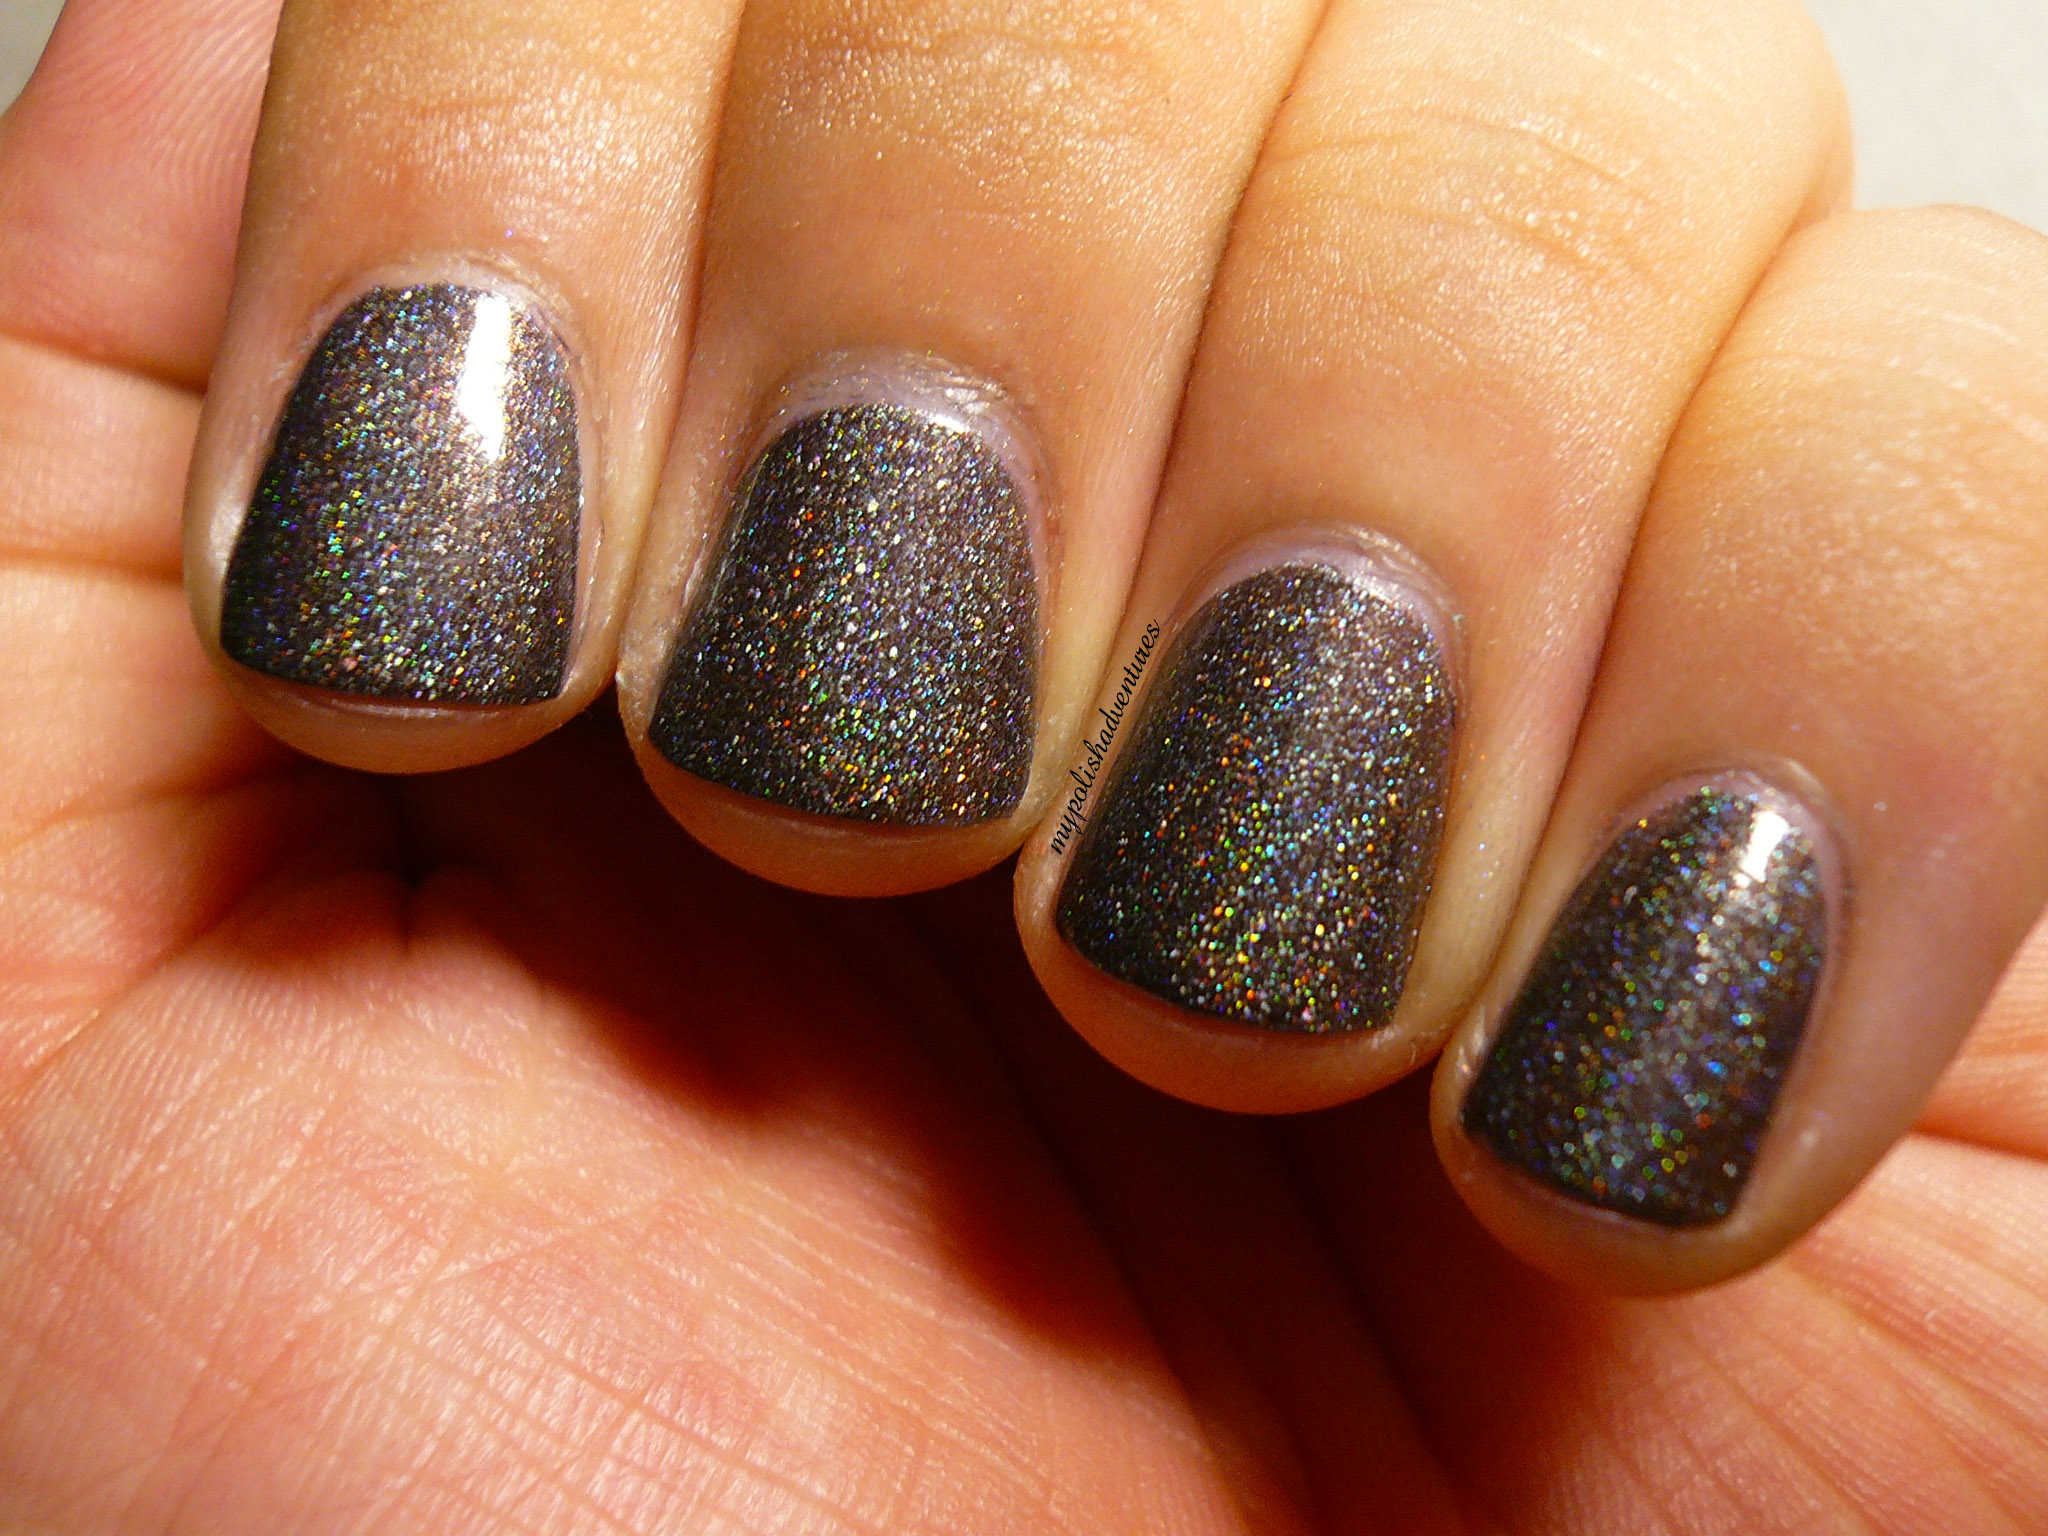
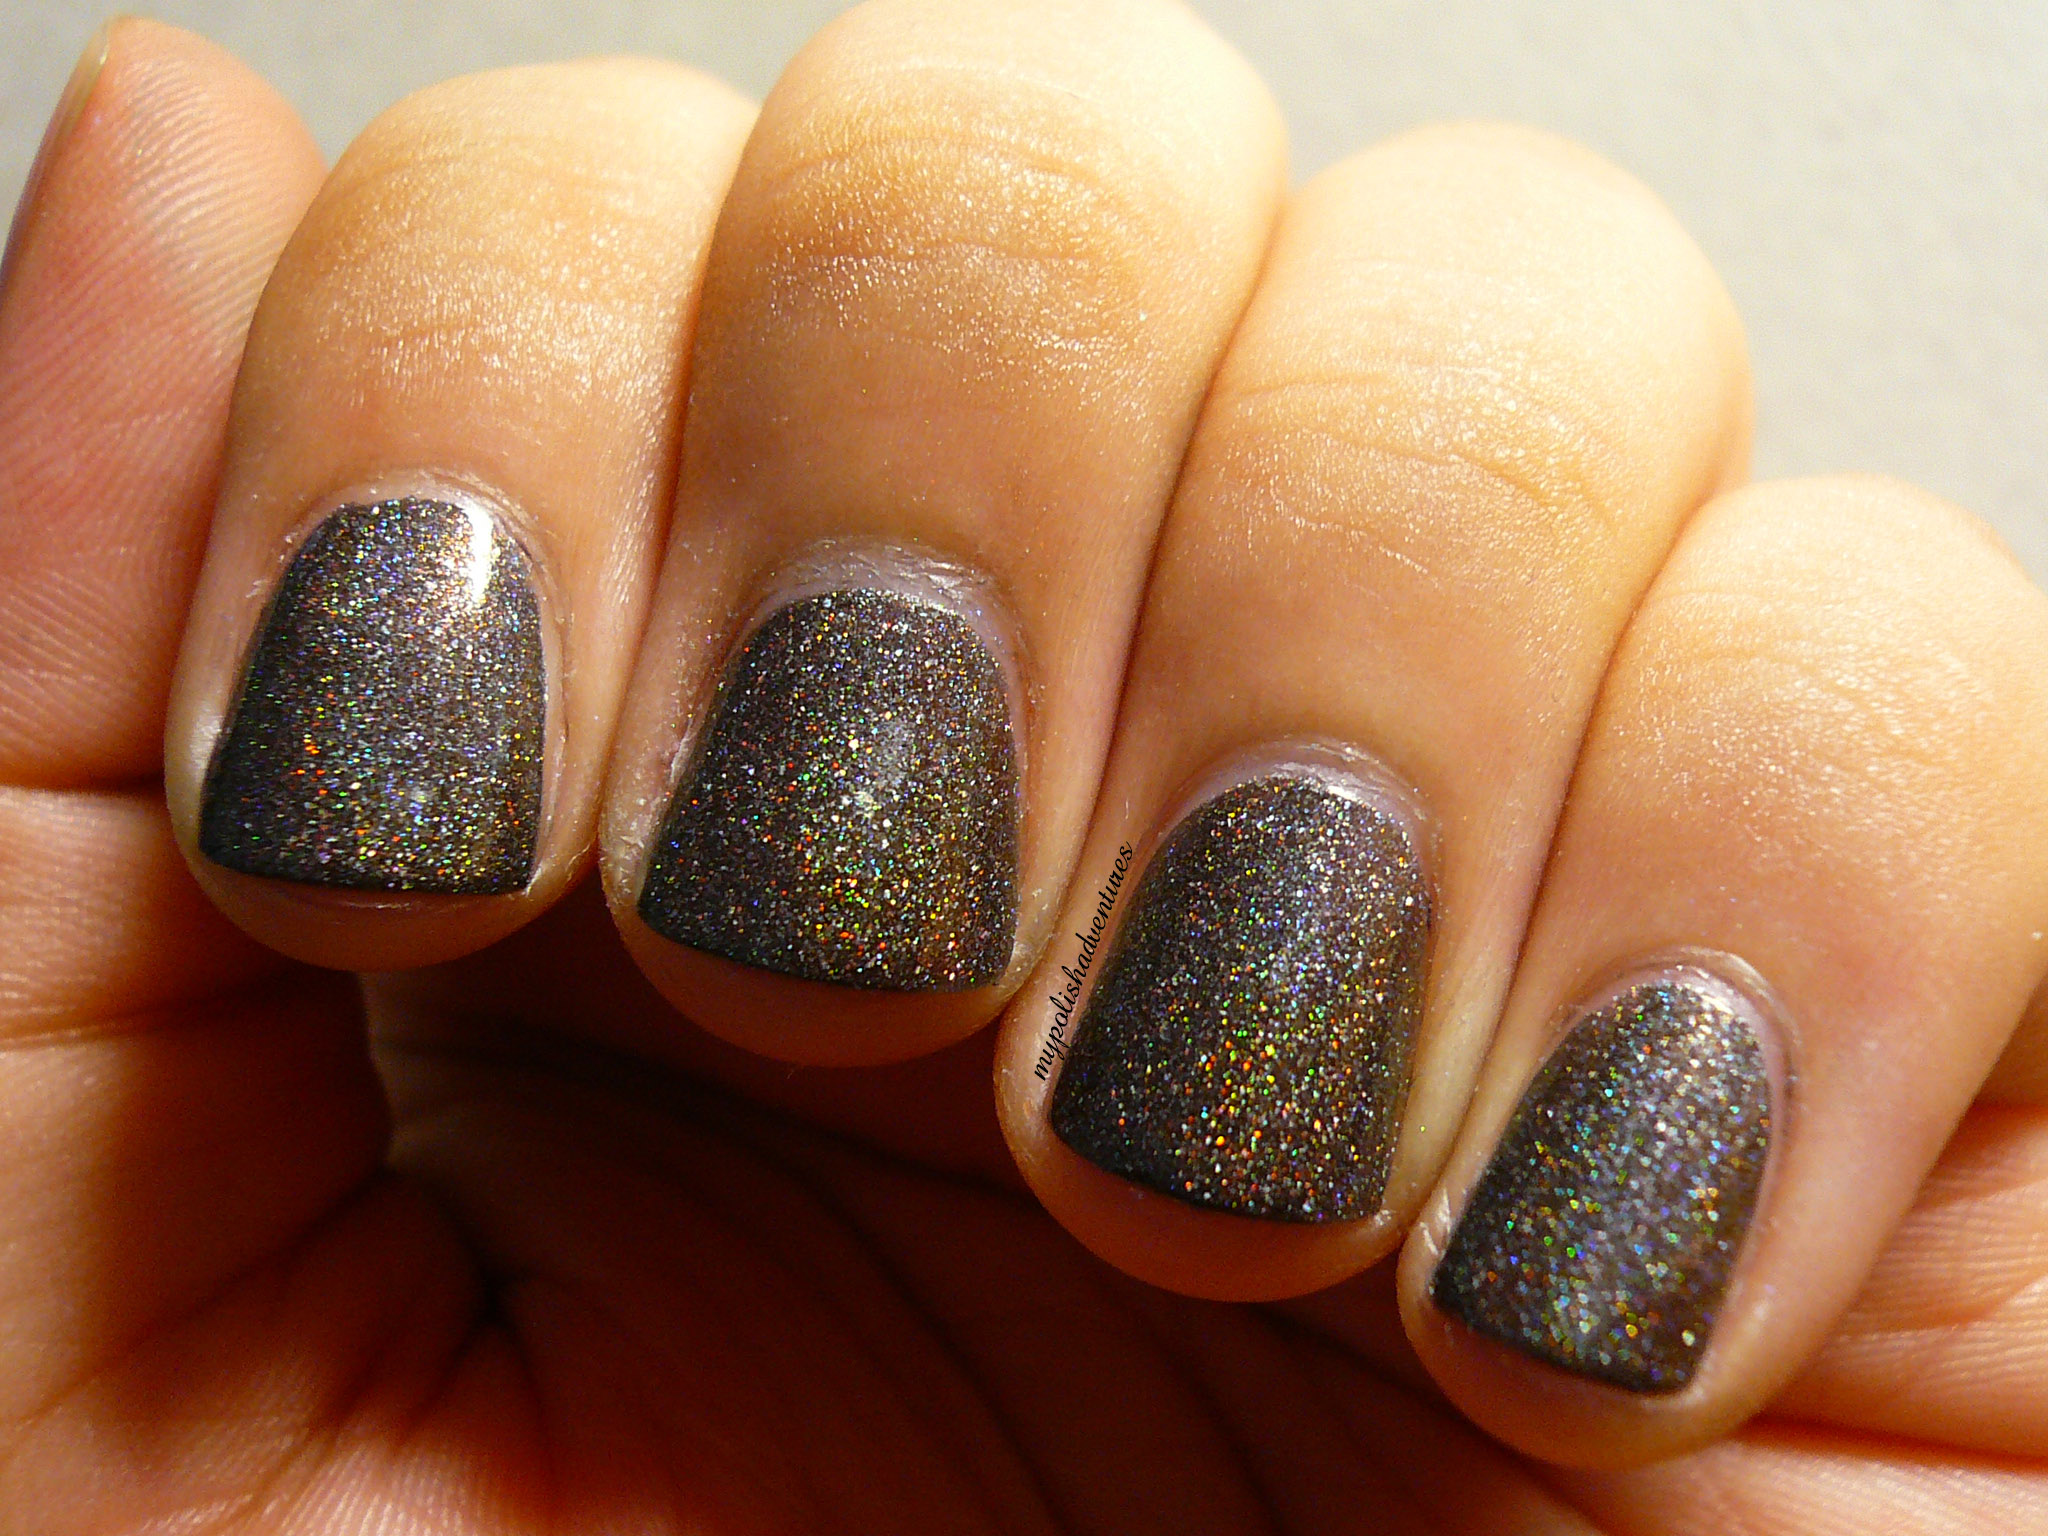
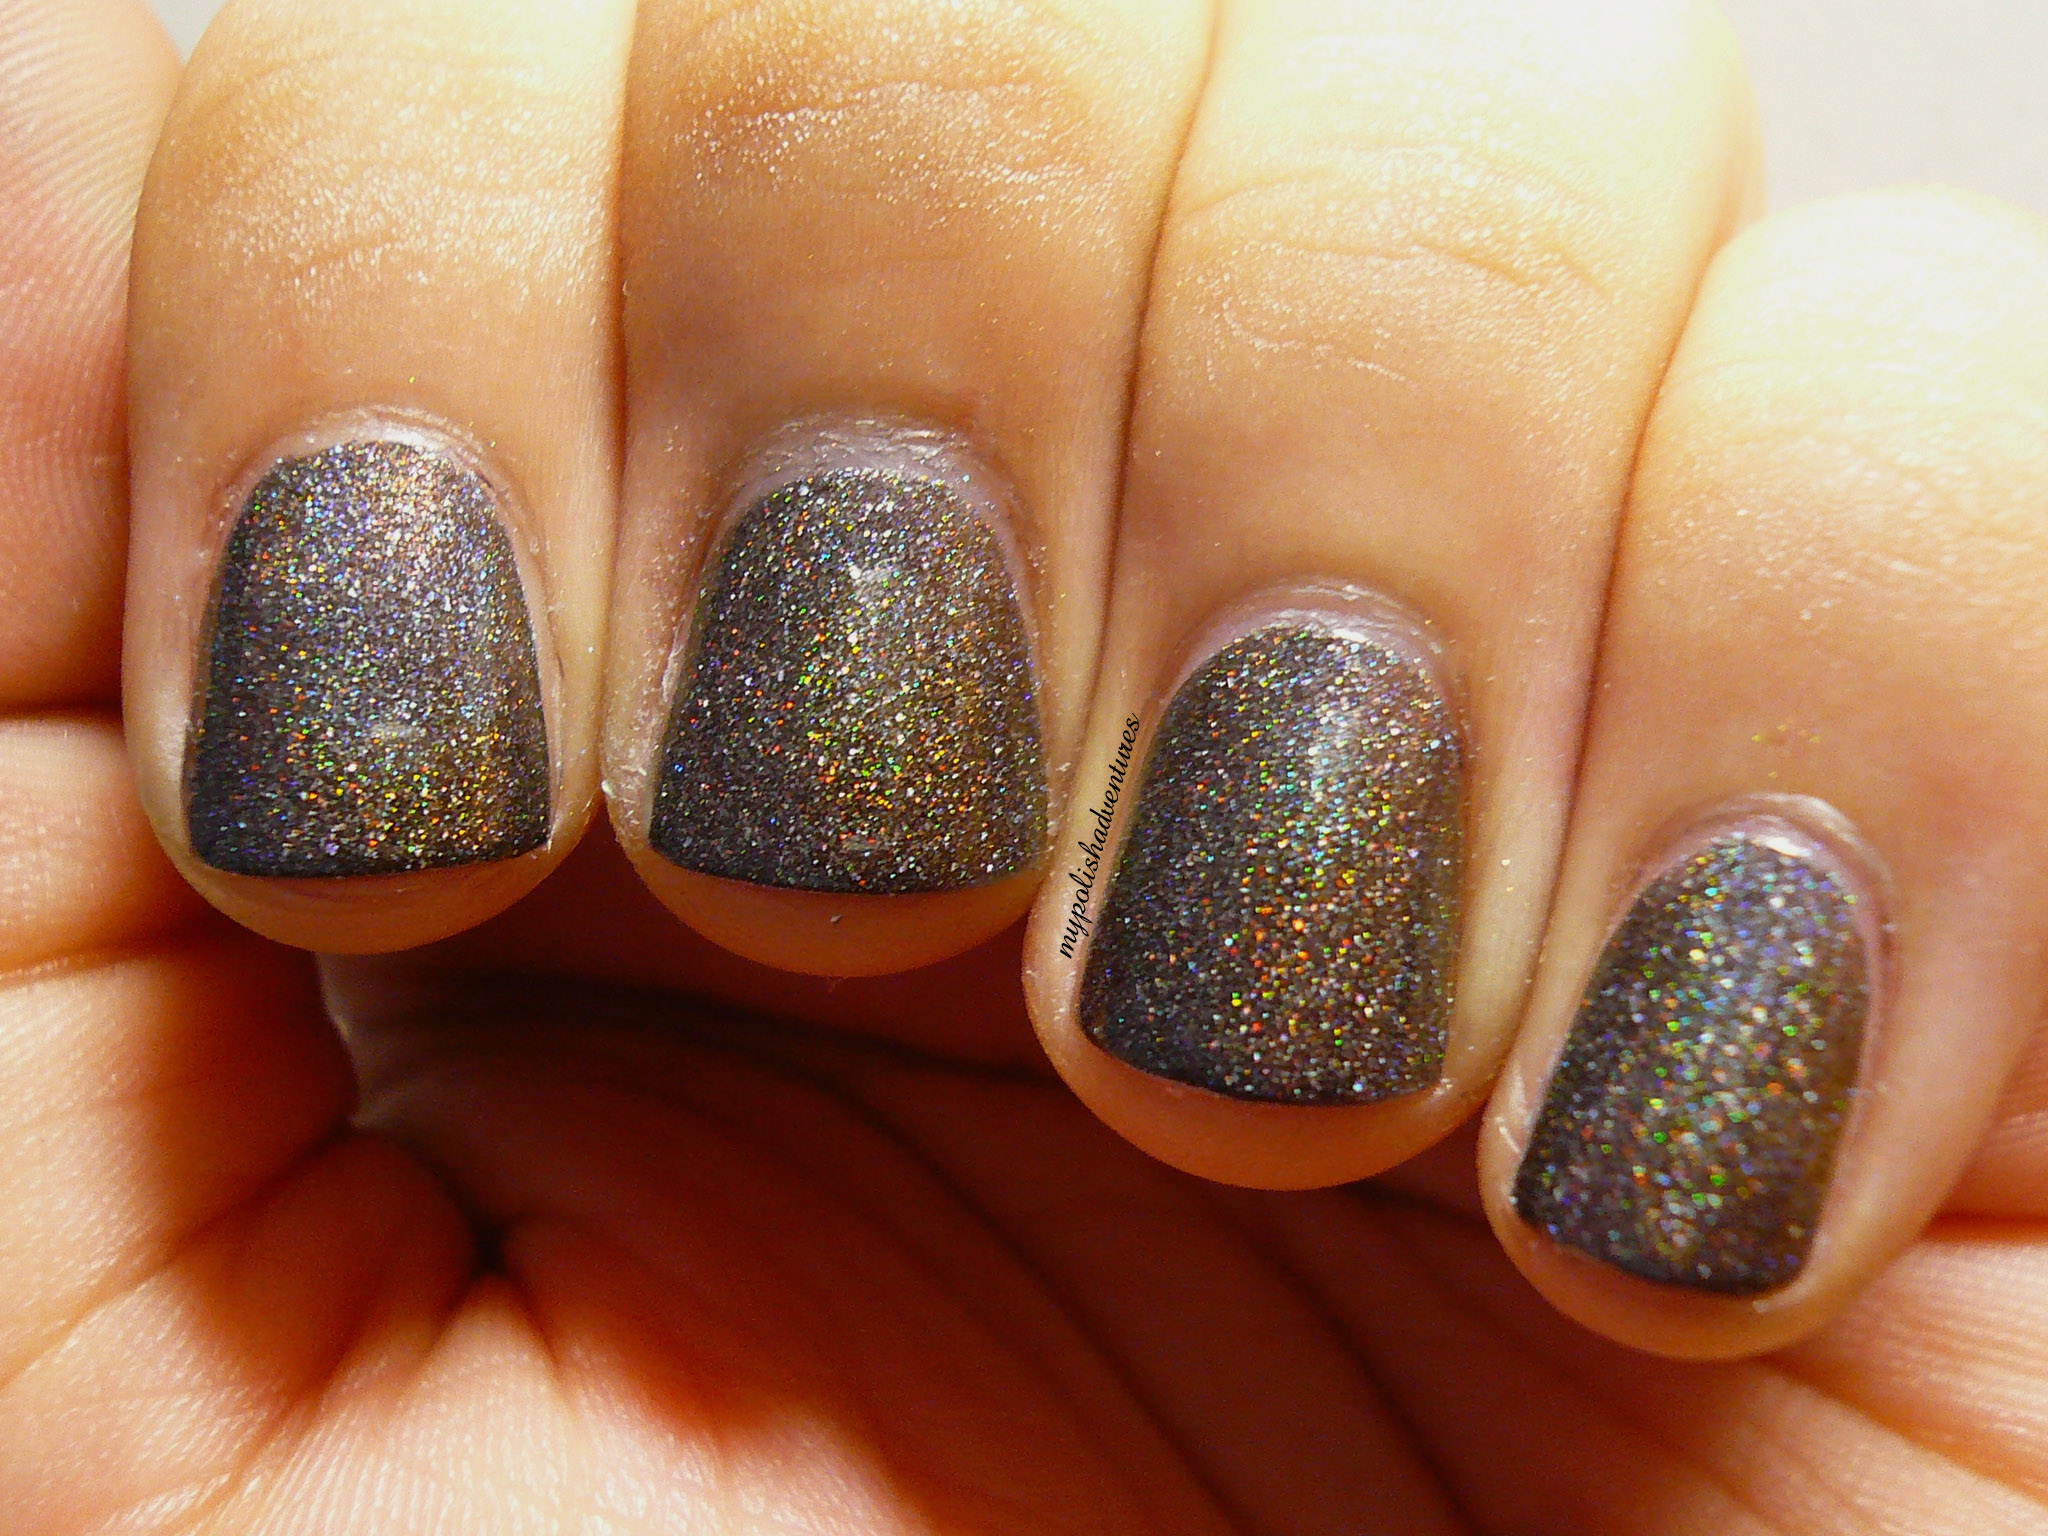
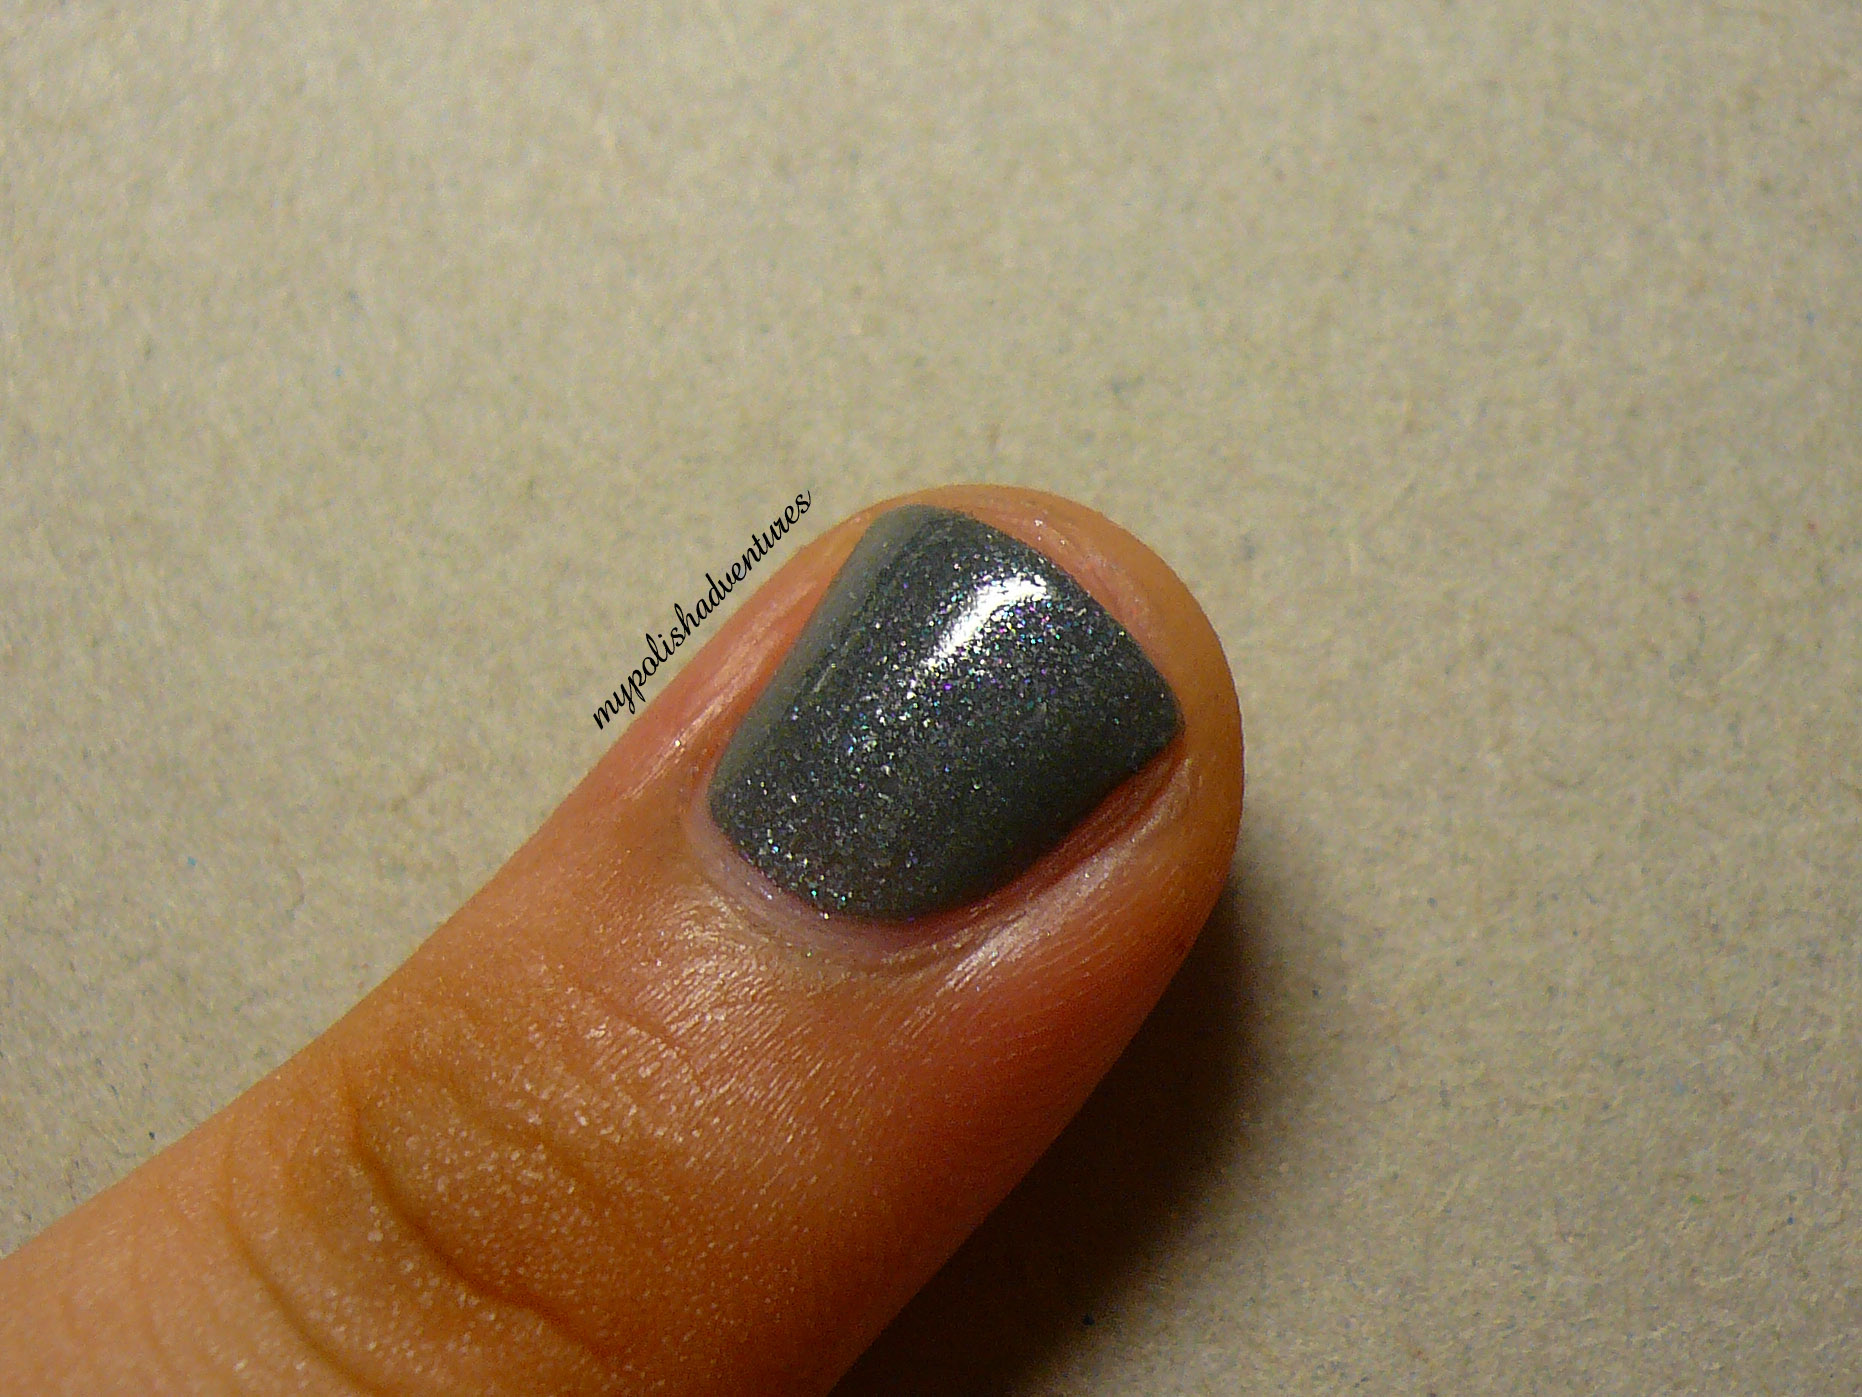
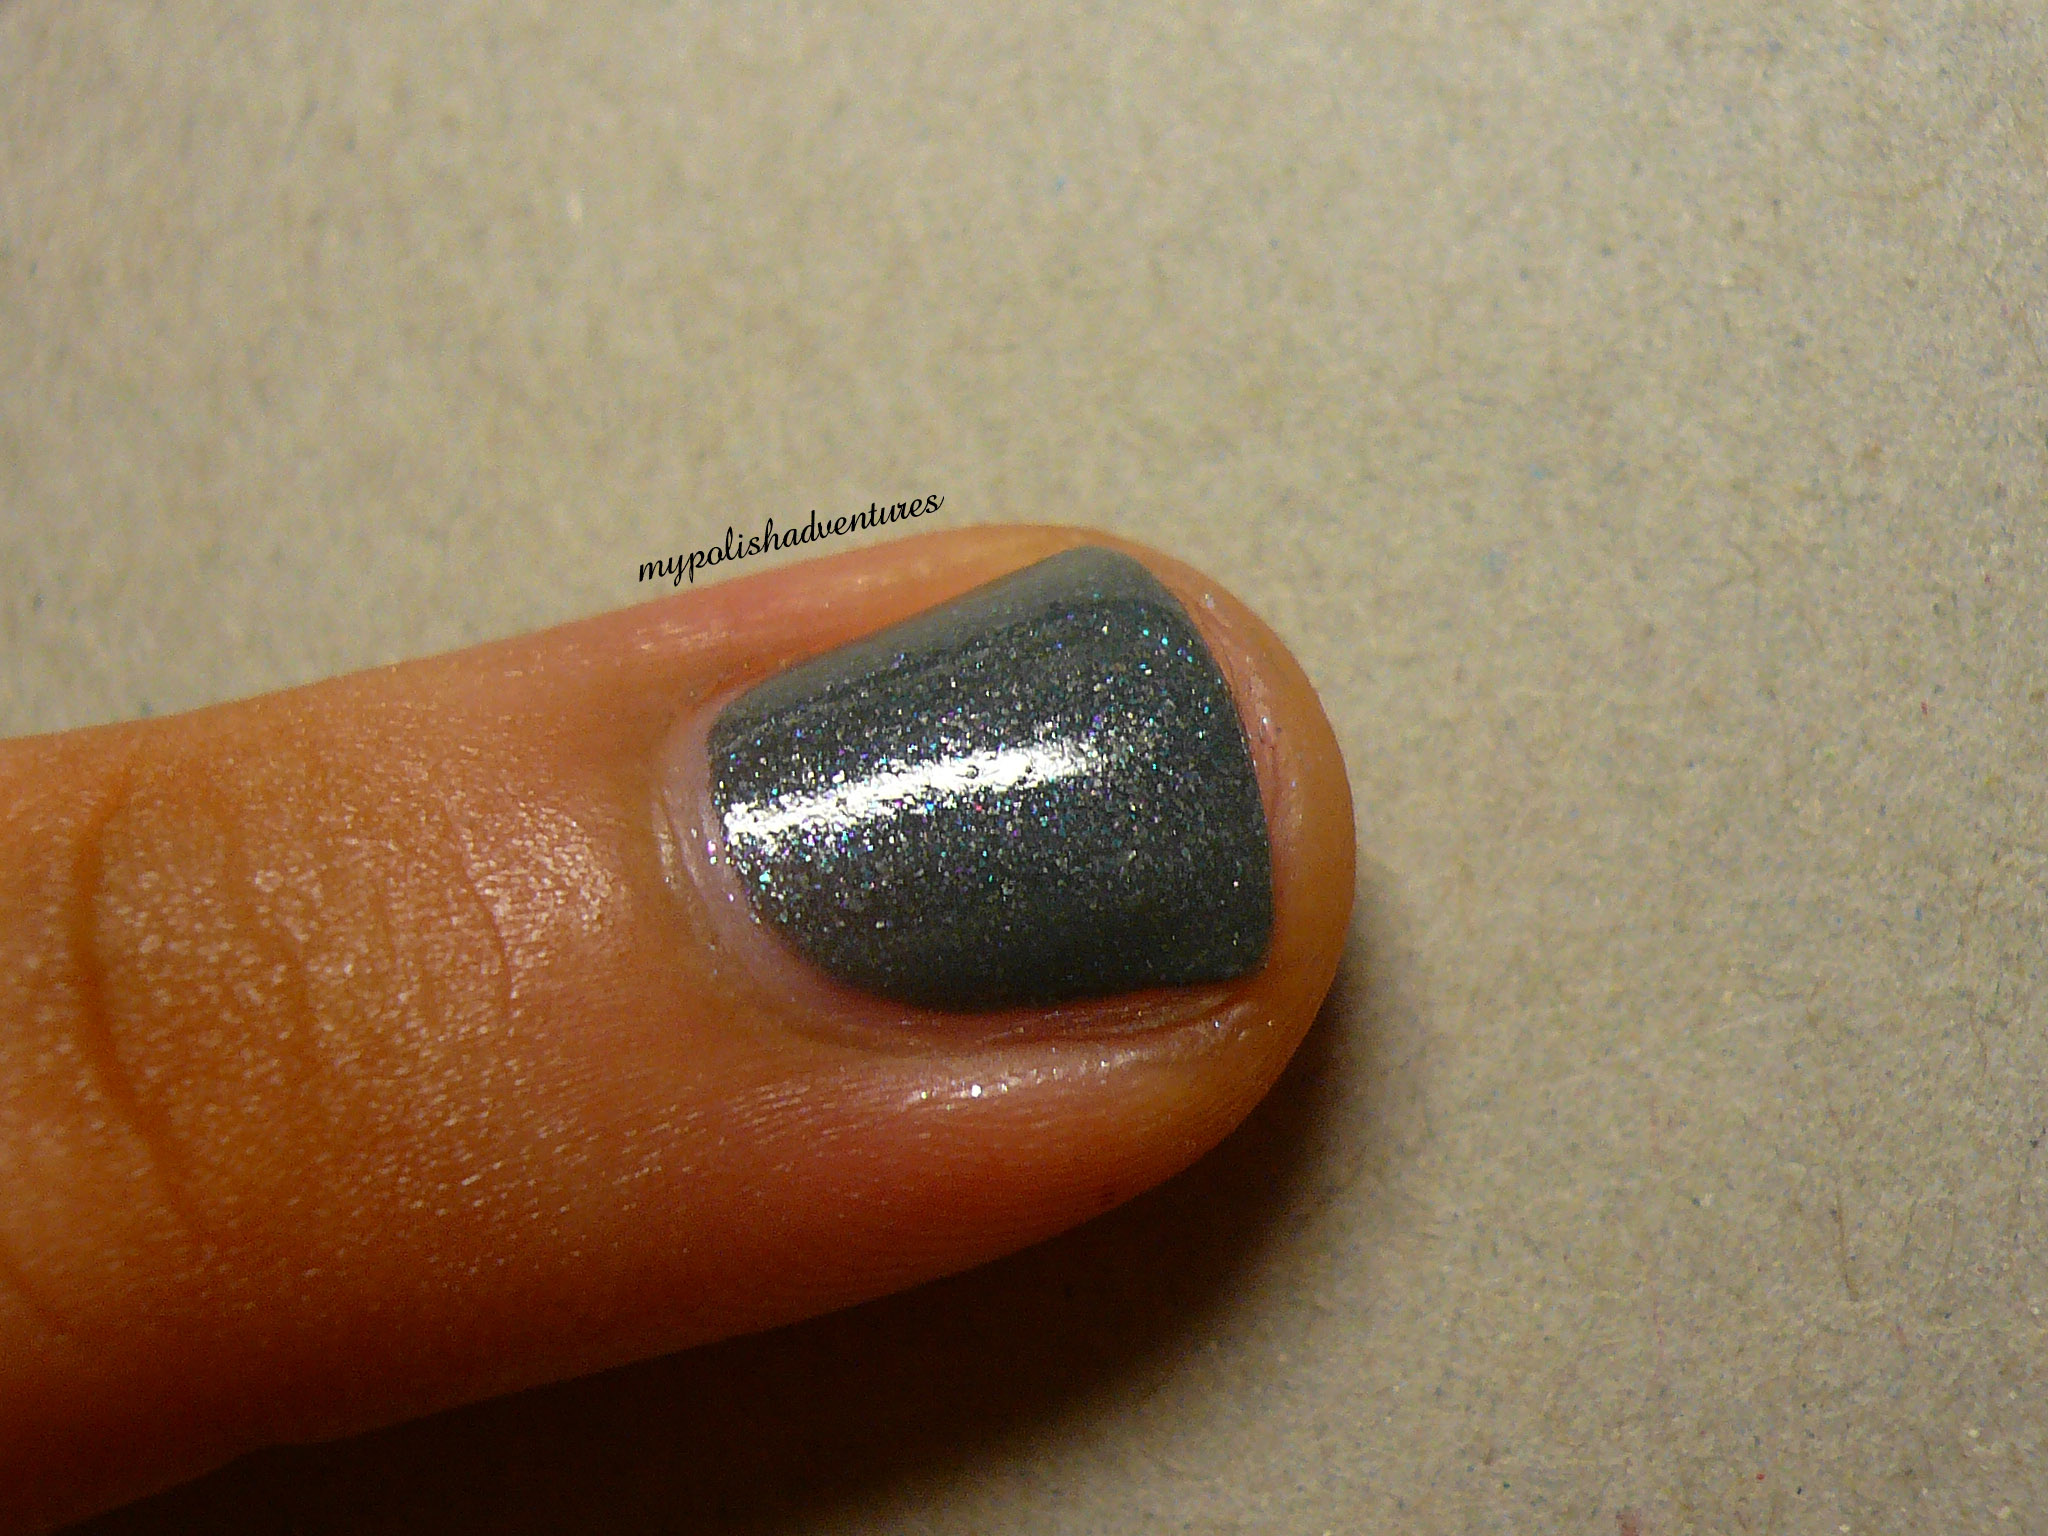
What can I say about Immortal? Boy, I wasn't expecting to LOVE this grey polish so much. The subtle blue and pink shimmers had me at the get-go!


Immortal seemed quite runny in the bottle but I managed to get it opaque in two coats. Perhaps it's because I barely have any white parts to my nails so the VNL isn't as obvious?


I don't own any shimmery grey polish so this one's a good addition to the family! :)


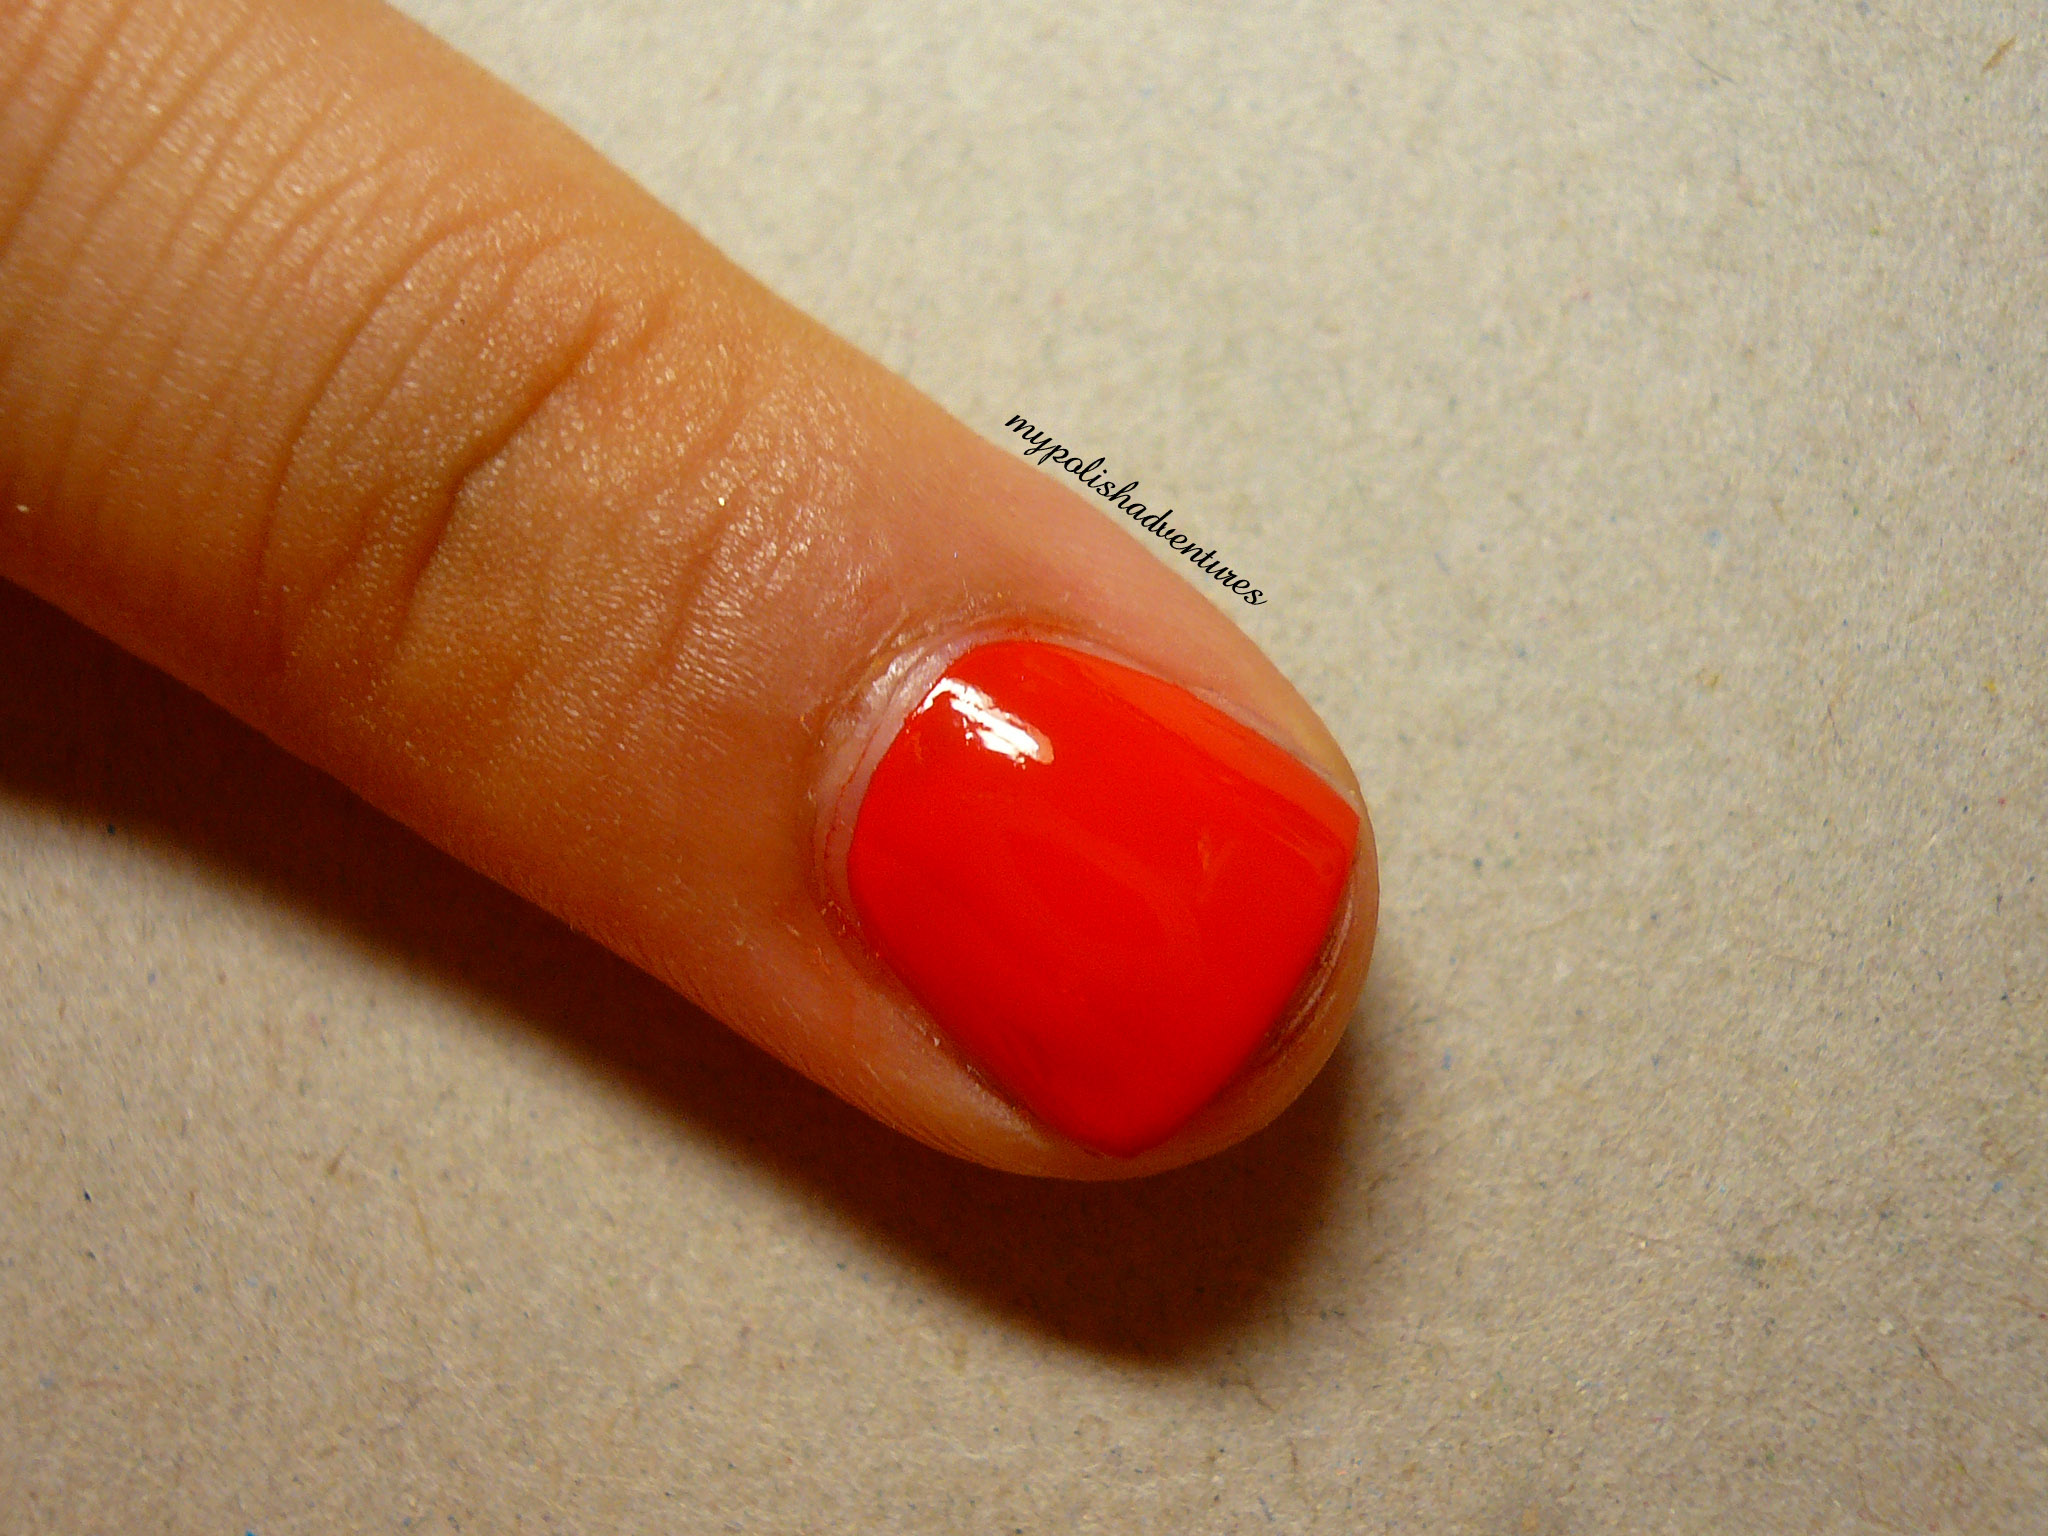
Moving on to the only creme of the entire collection, here we have Roguish Red, an extremely bright (read: almost screaming neon) orange.


Roguish Red was so bright it scared my camera a little. Formula-wise, this was my least favourite among the bunch. The first coat applied really nicely but somehow, upon applying the second coat, it got a little goopy and didn't self-level, which then called for a third coat to even things out. Colour-wise, this one does remind me of the orange polish from OPI's Holland collection, A Roll In The Hague.


GLITTER TIME! The moment I saw the promo pics for this collection, I thought to myself "Hmmmm, could this be a Spellbound dupe?"

Sadly, Glitter Goblin isn't a dupe for Spellbound but it's still a very pretty polish no less!


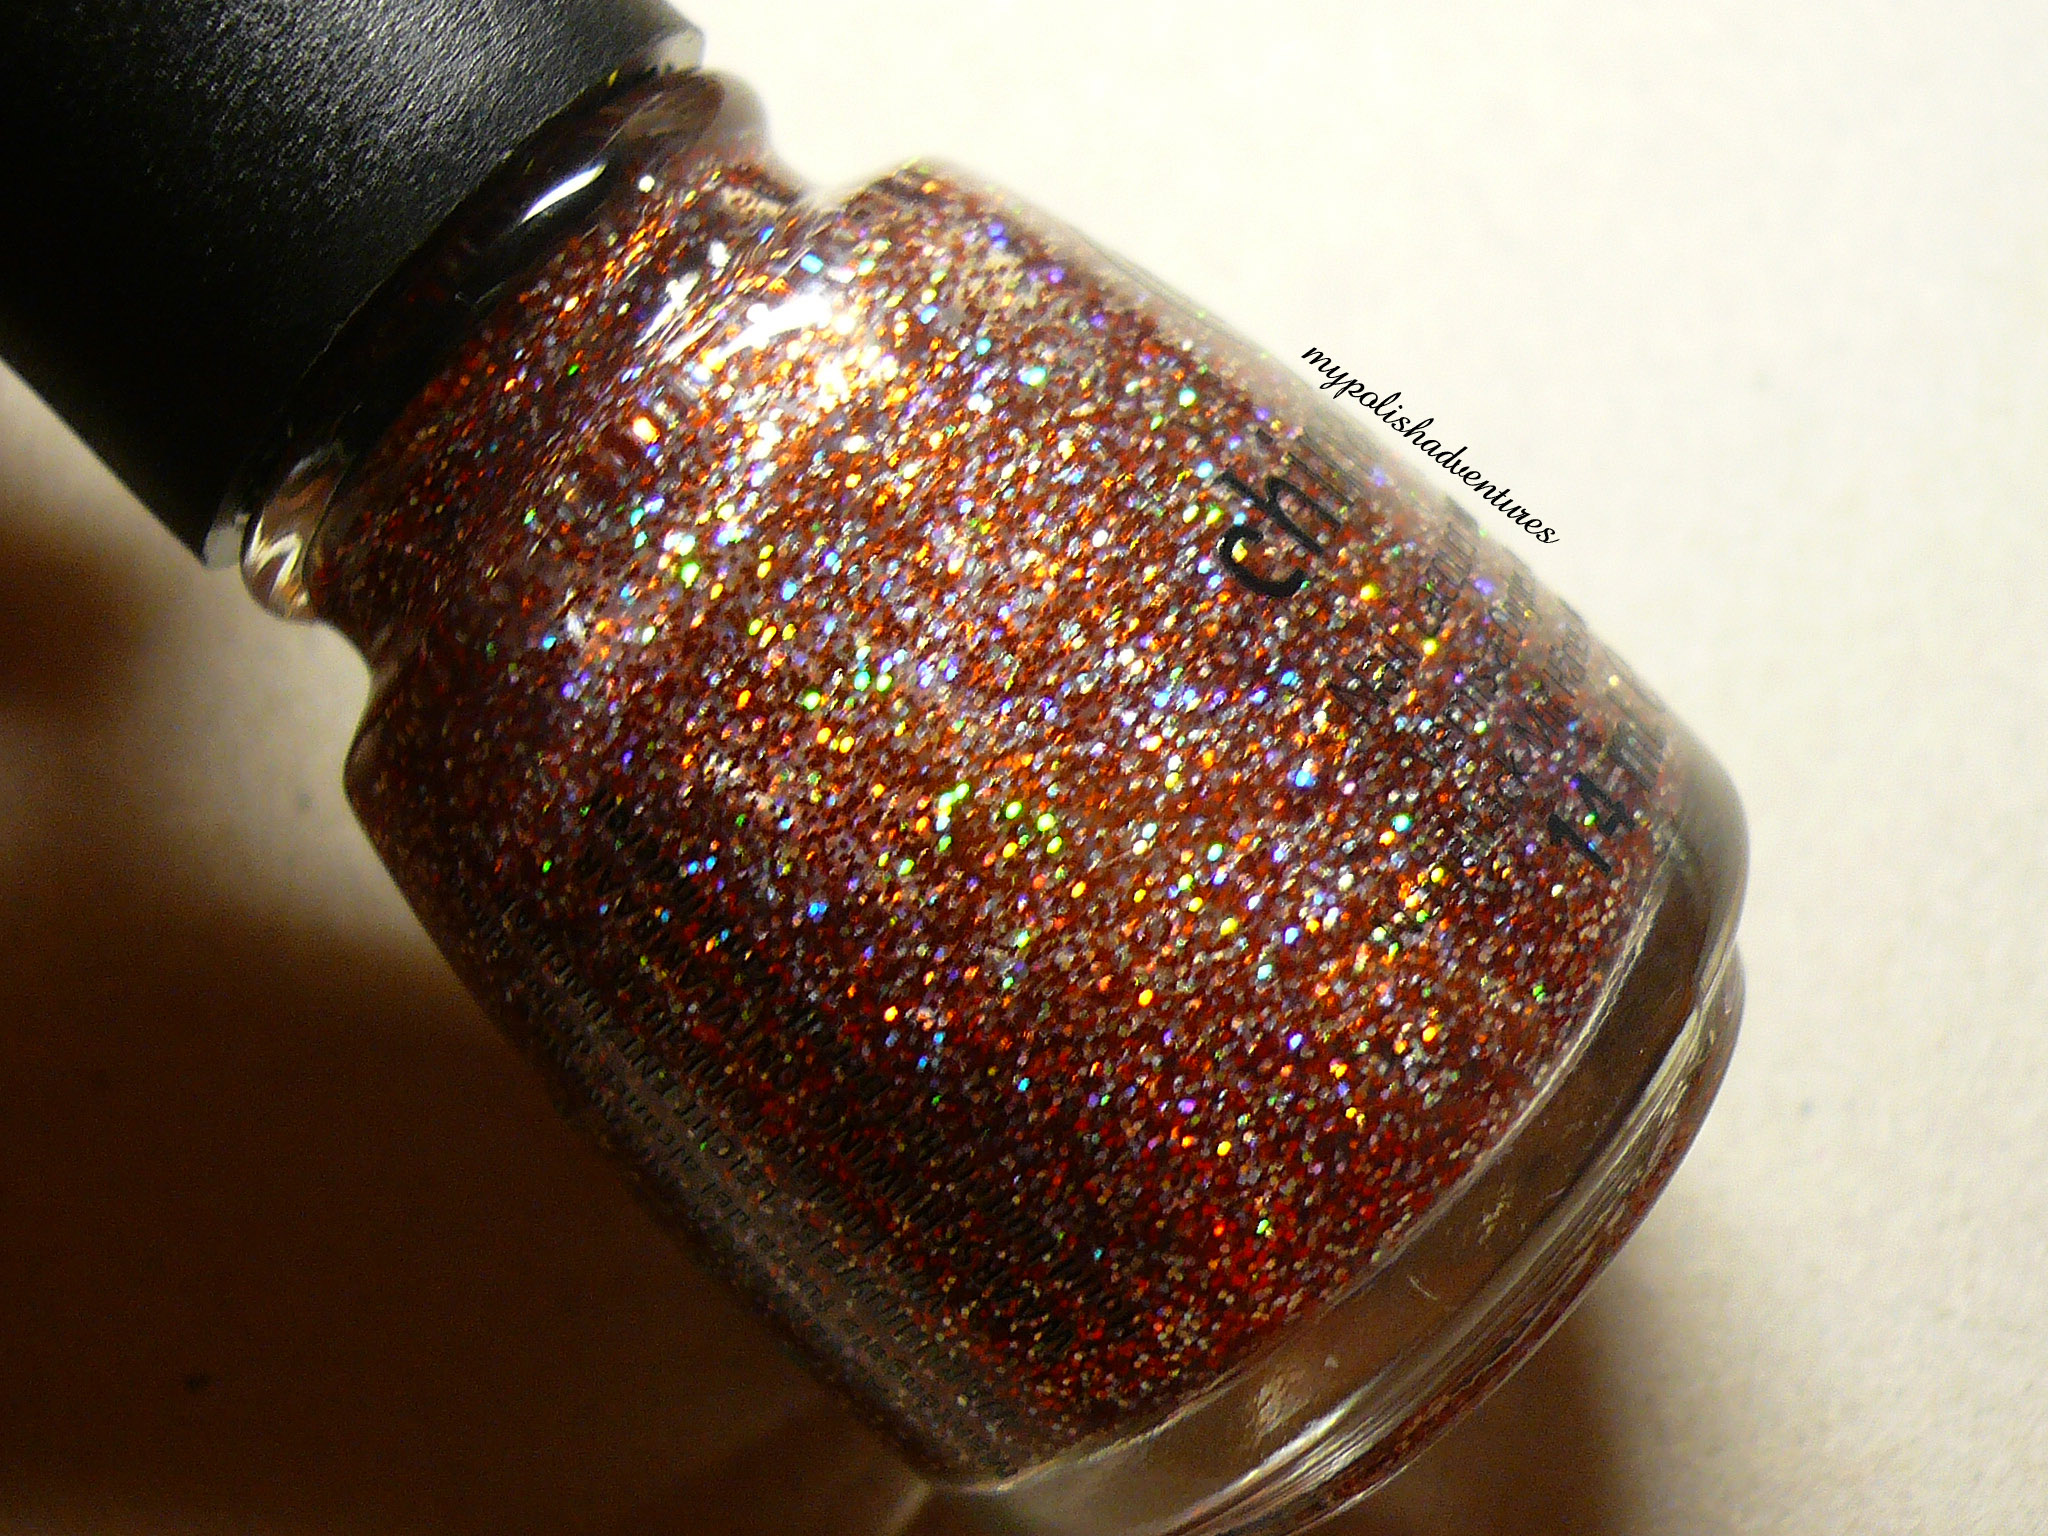
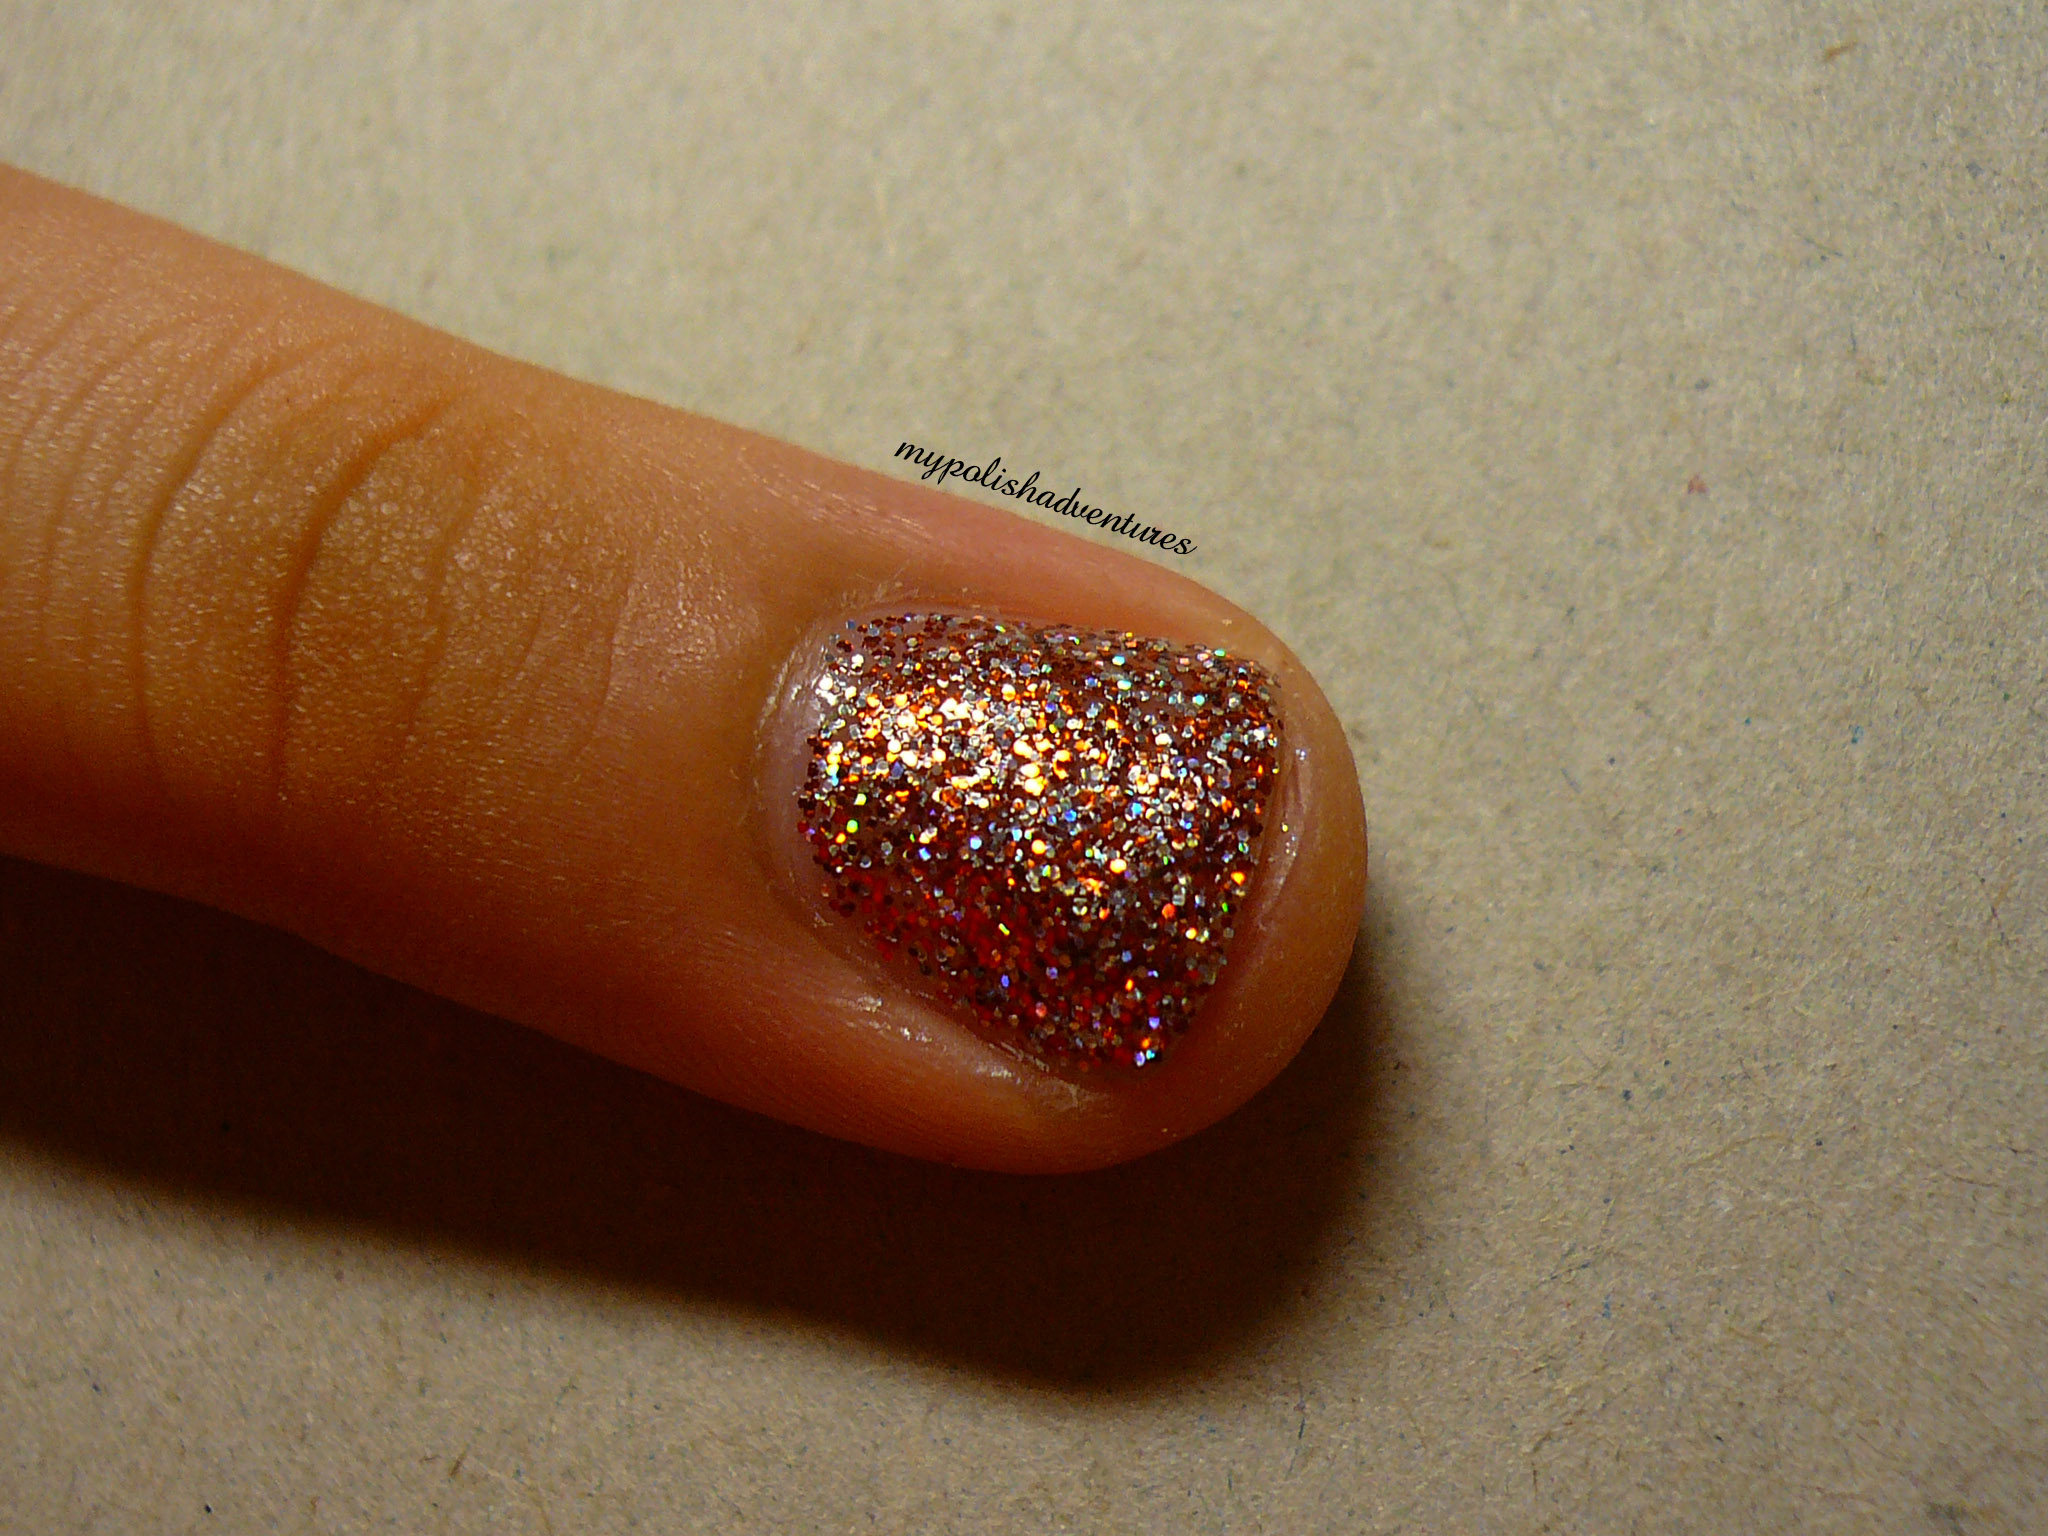
It has orange and silver holographic bits in it and you can cover your entire nail with three coats.


Glitter-packed polishes tend to be more goopy than regular polishes and this one is no execption. I'd suggest waiting a little longer between each coat for this polish to avoid making a mess.


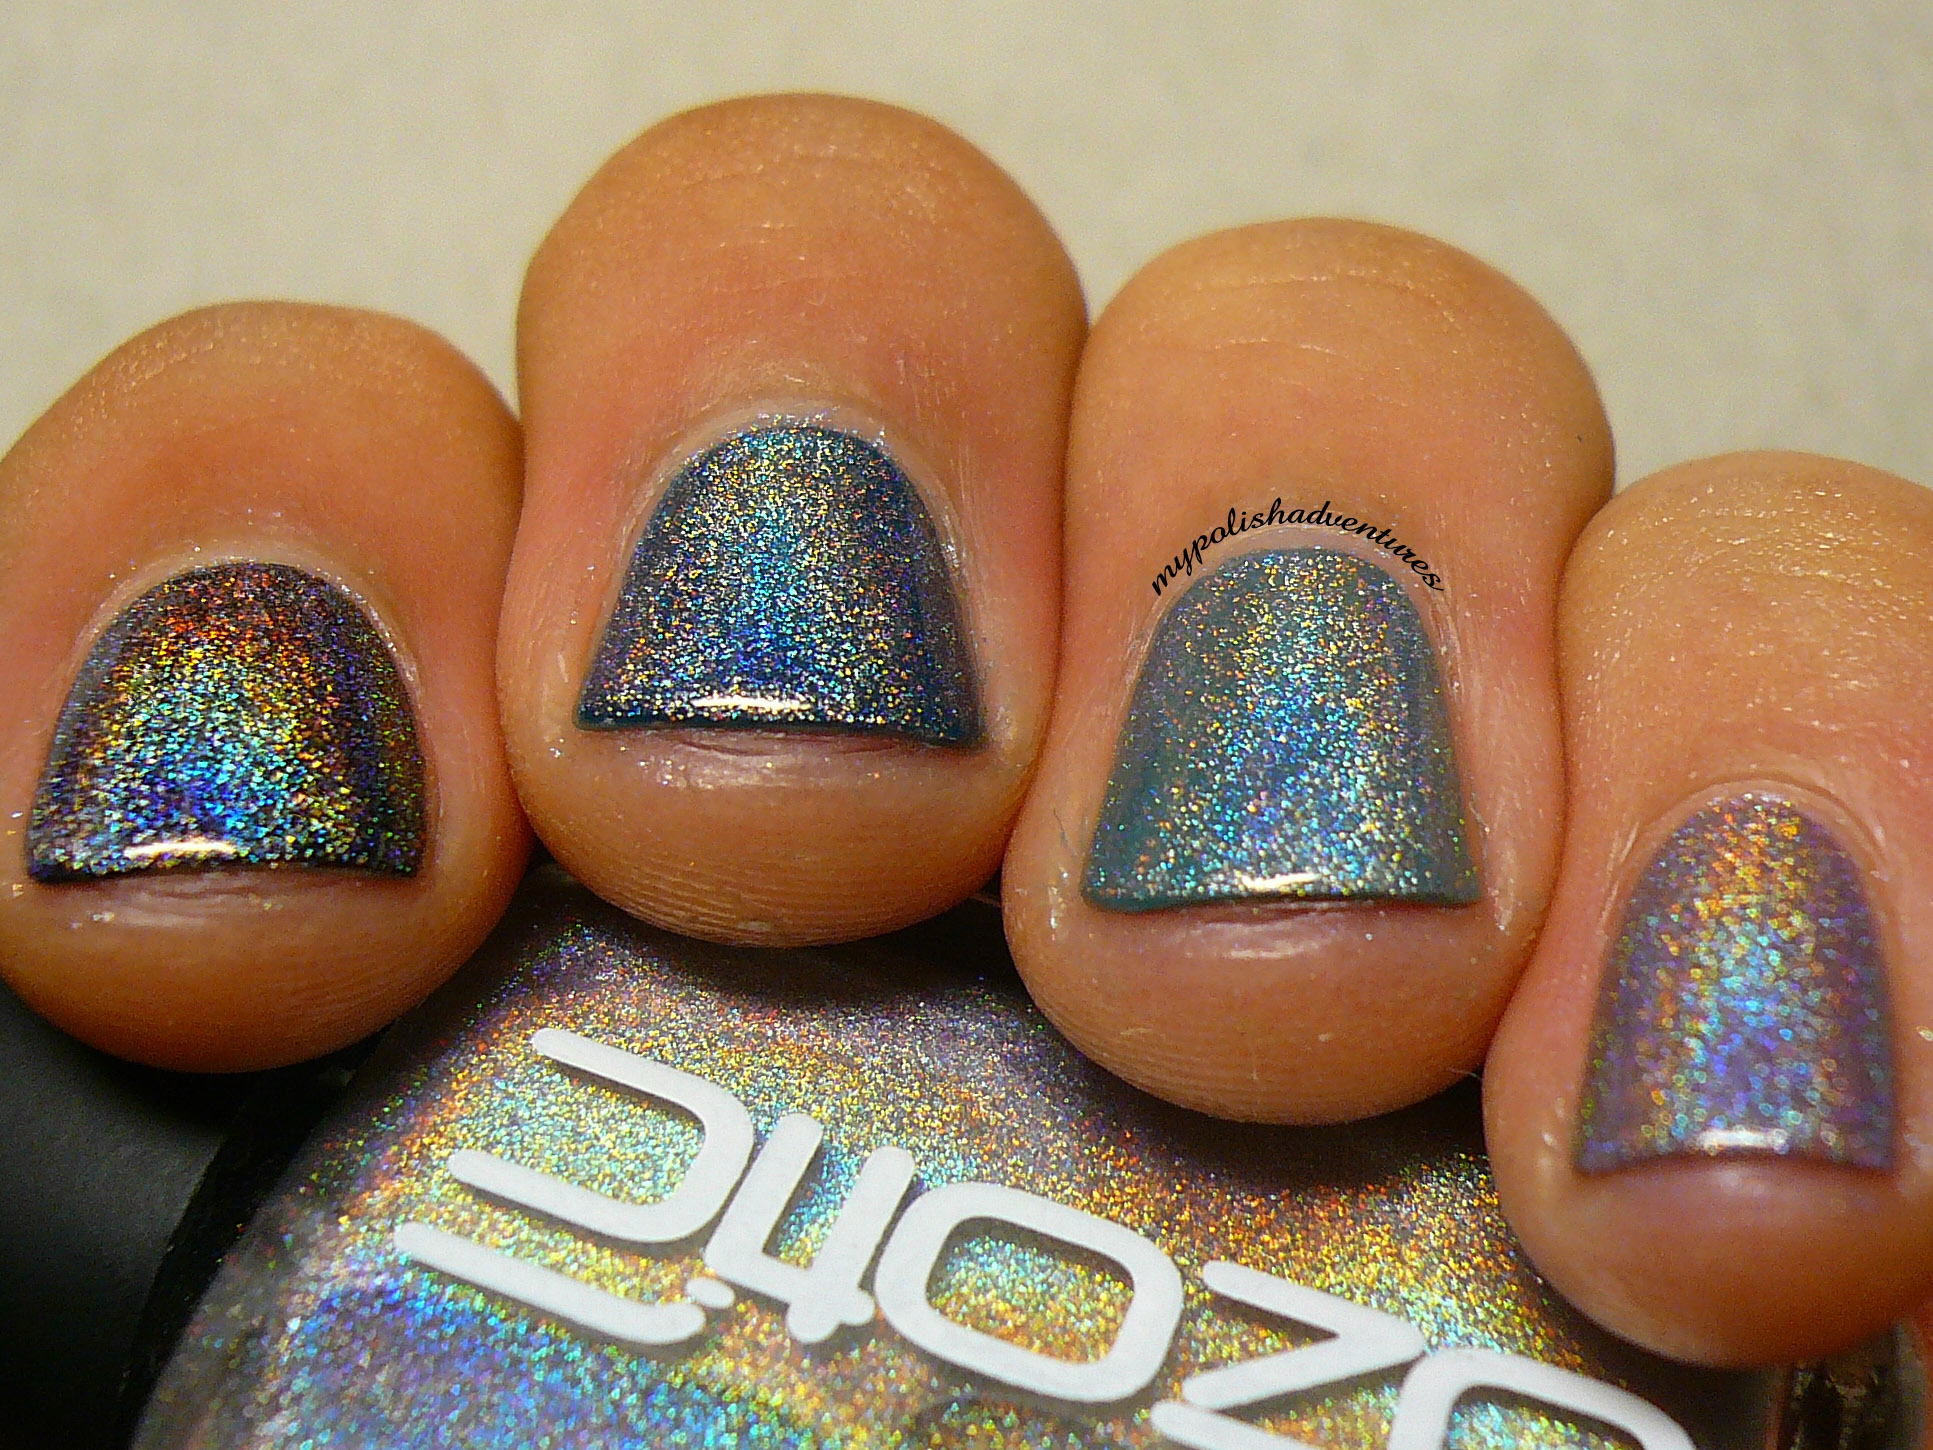
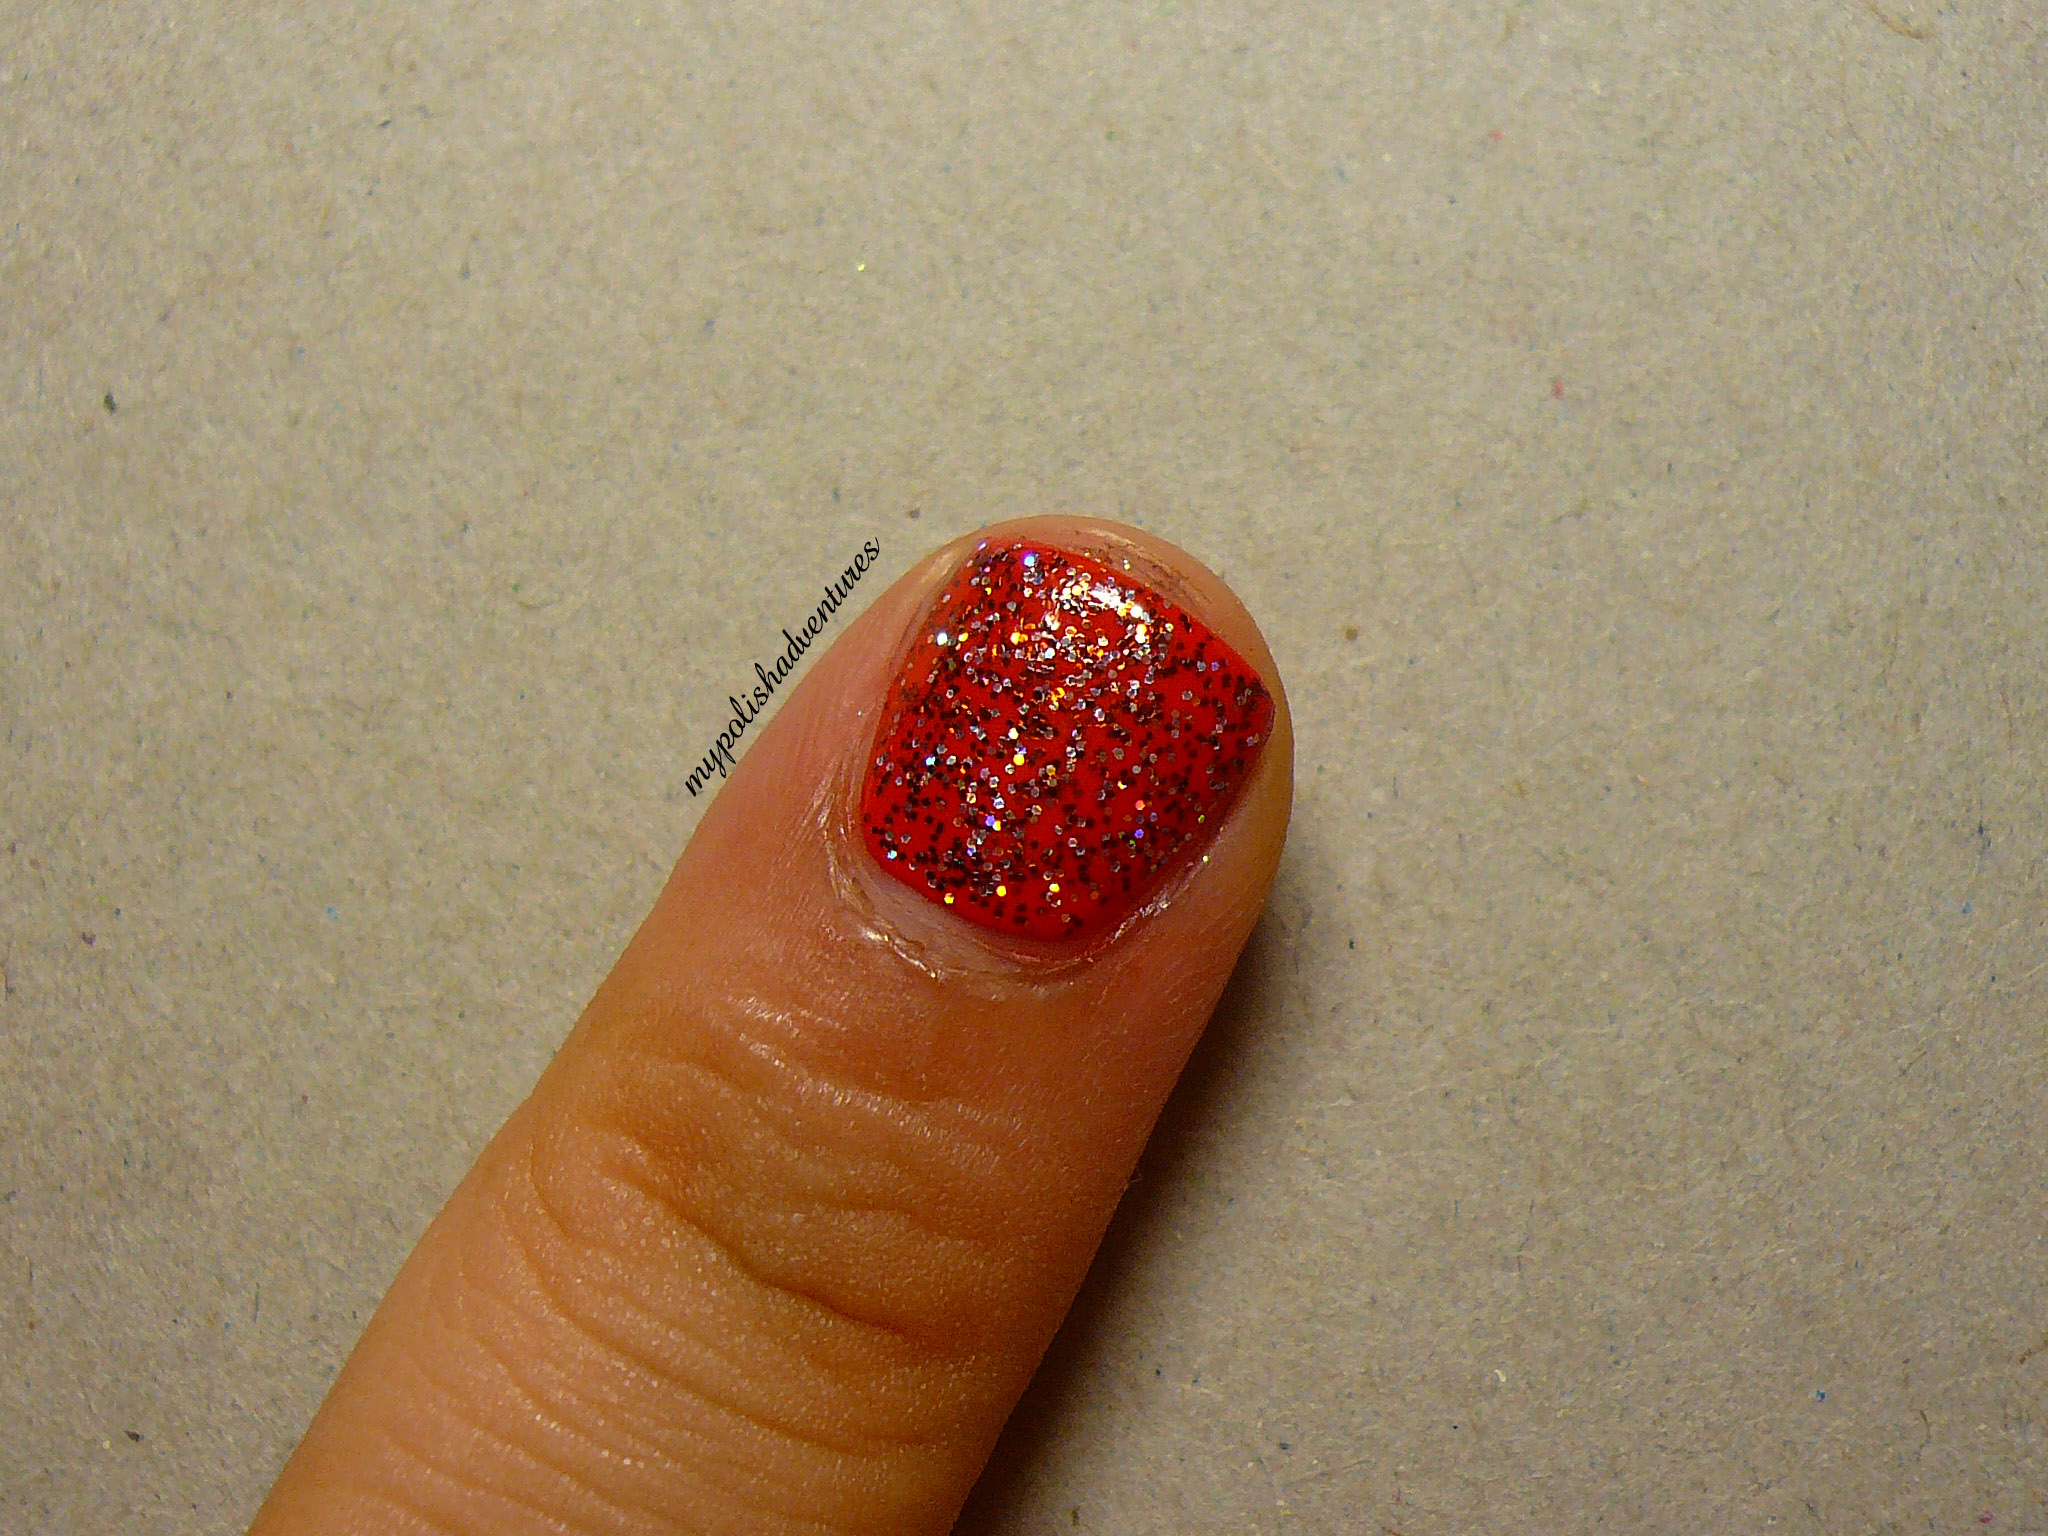
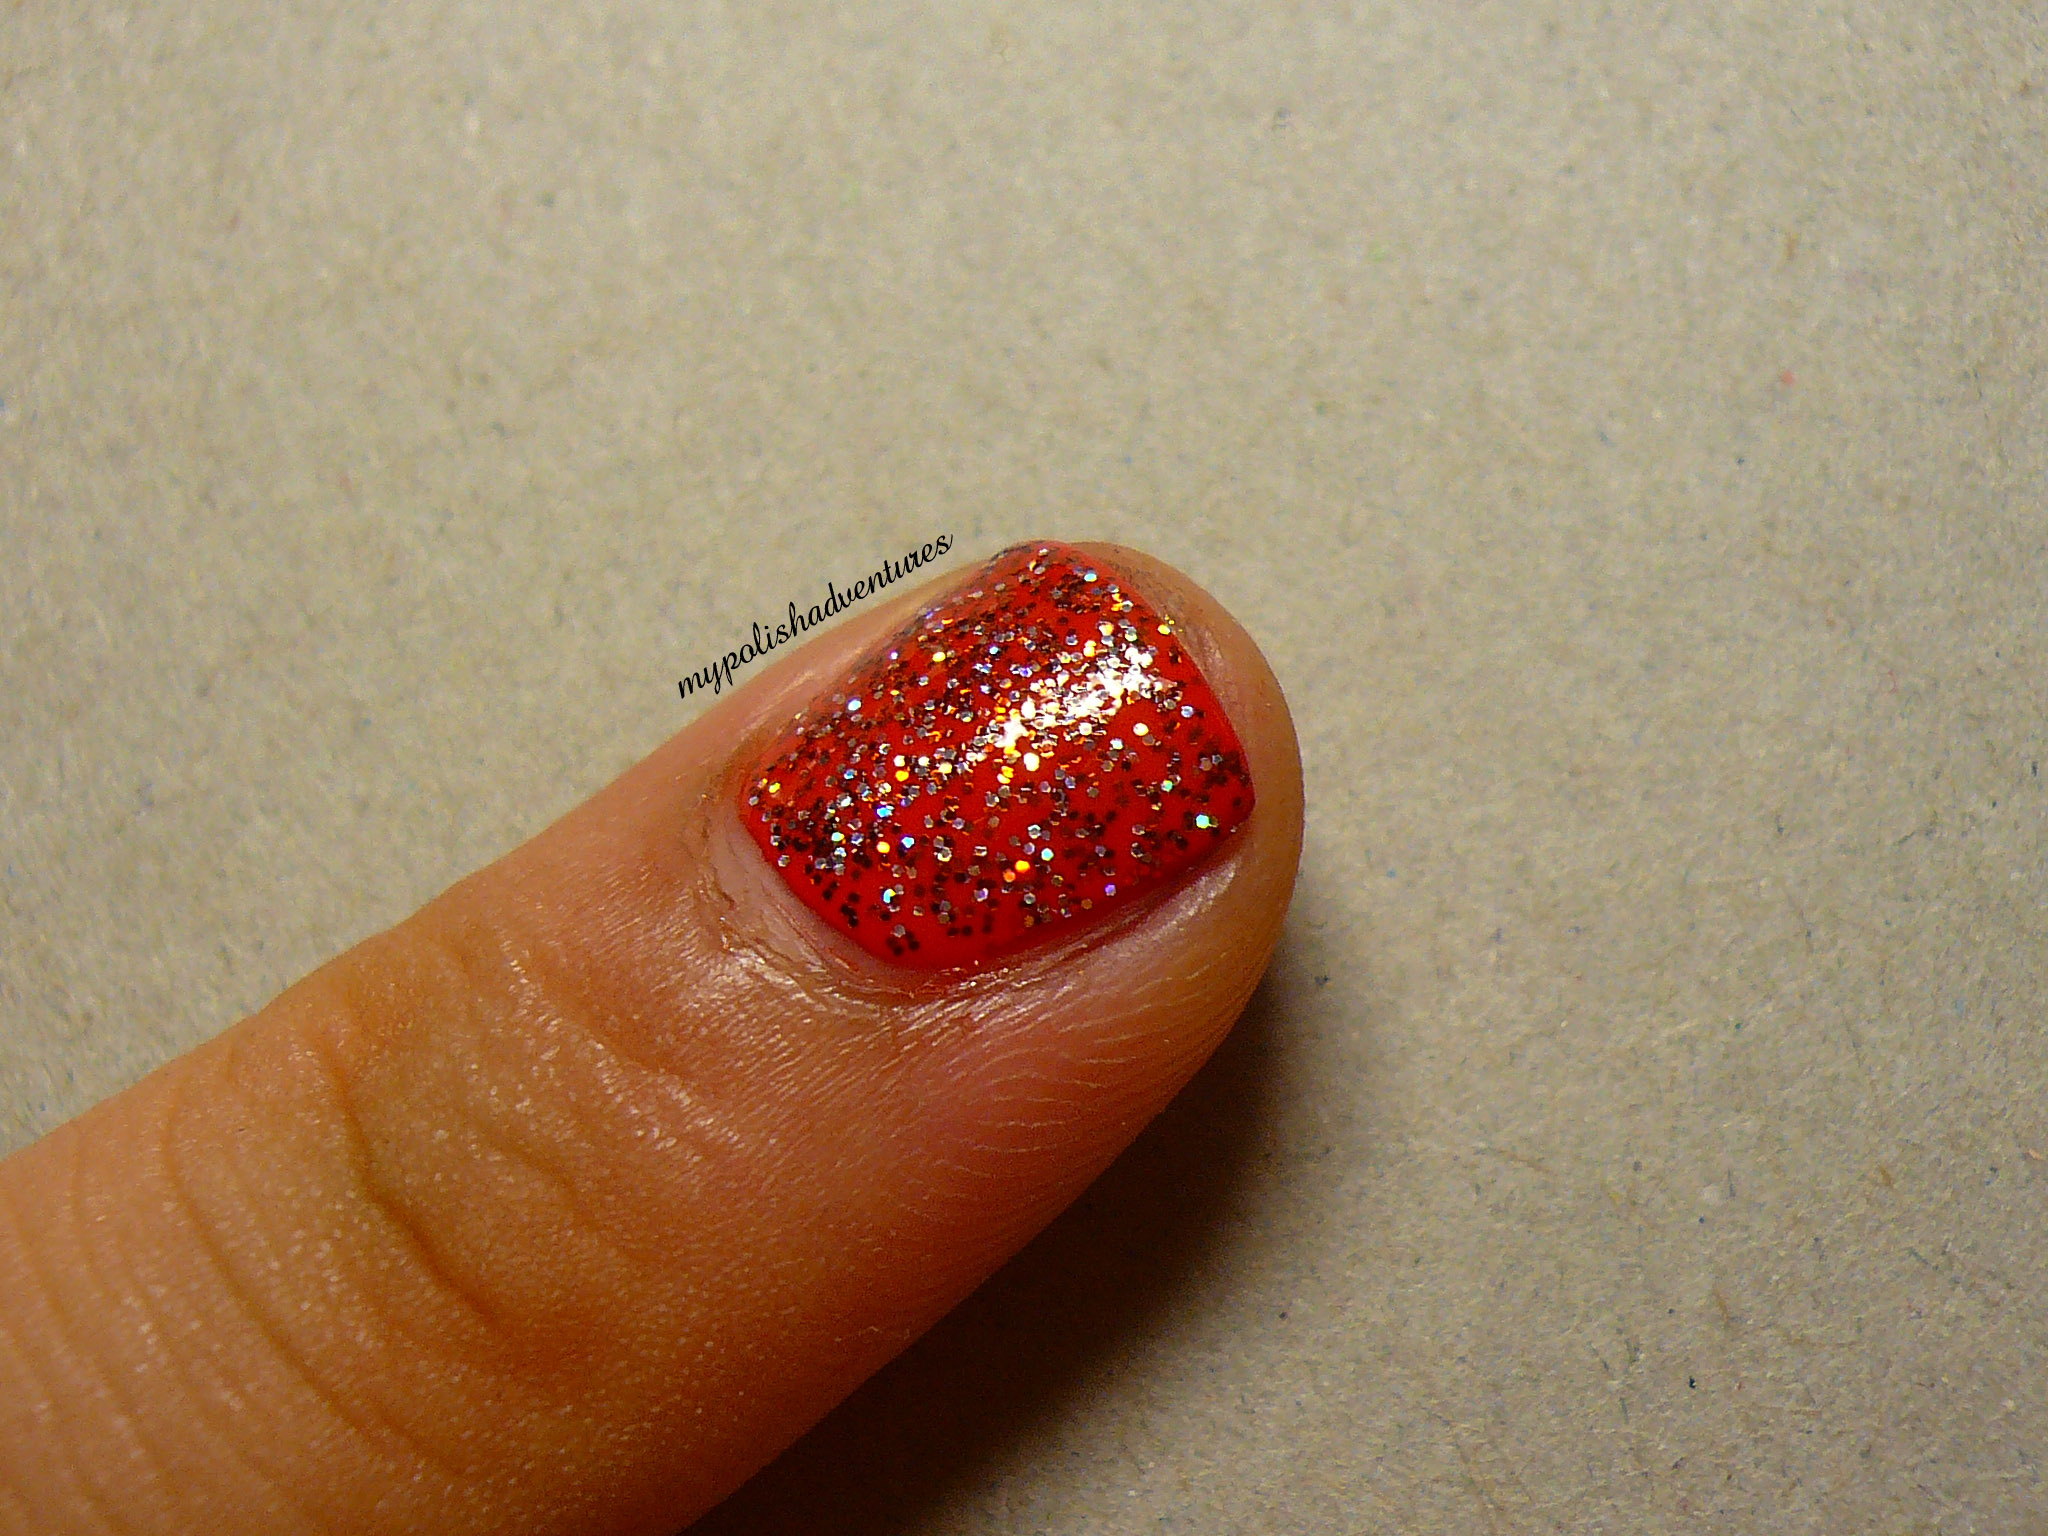
Here we have one coat of Glitter Goblin over Roguish Red. I love how this turned out!


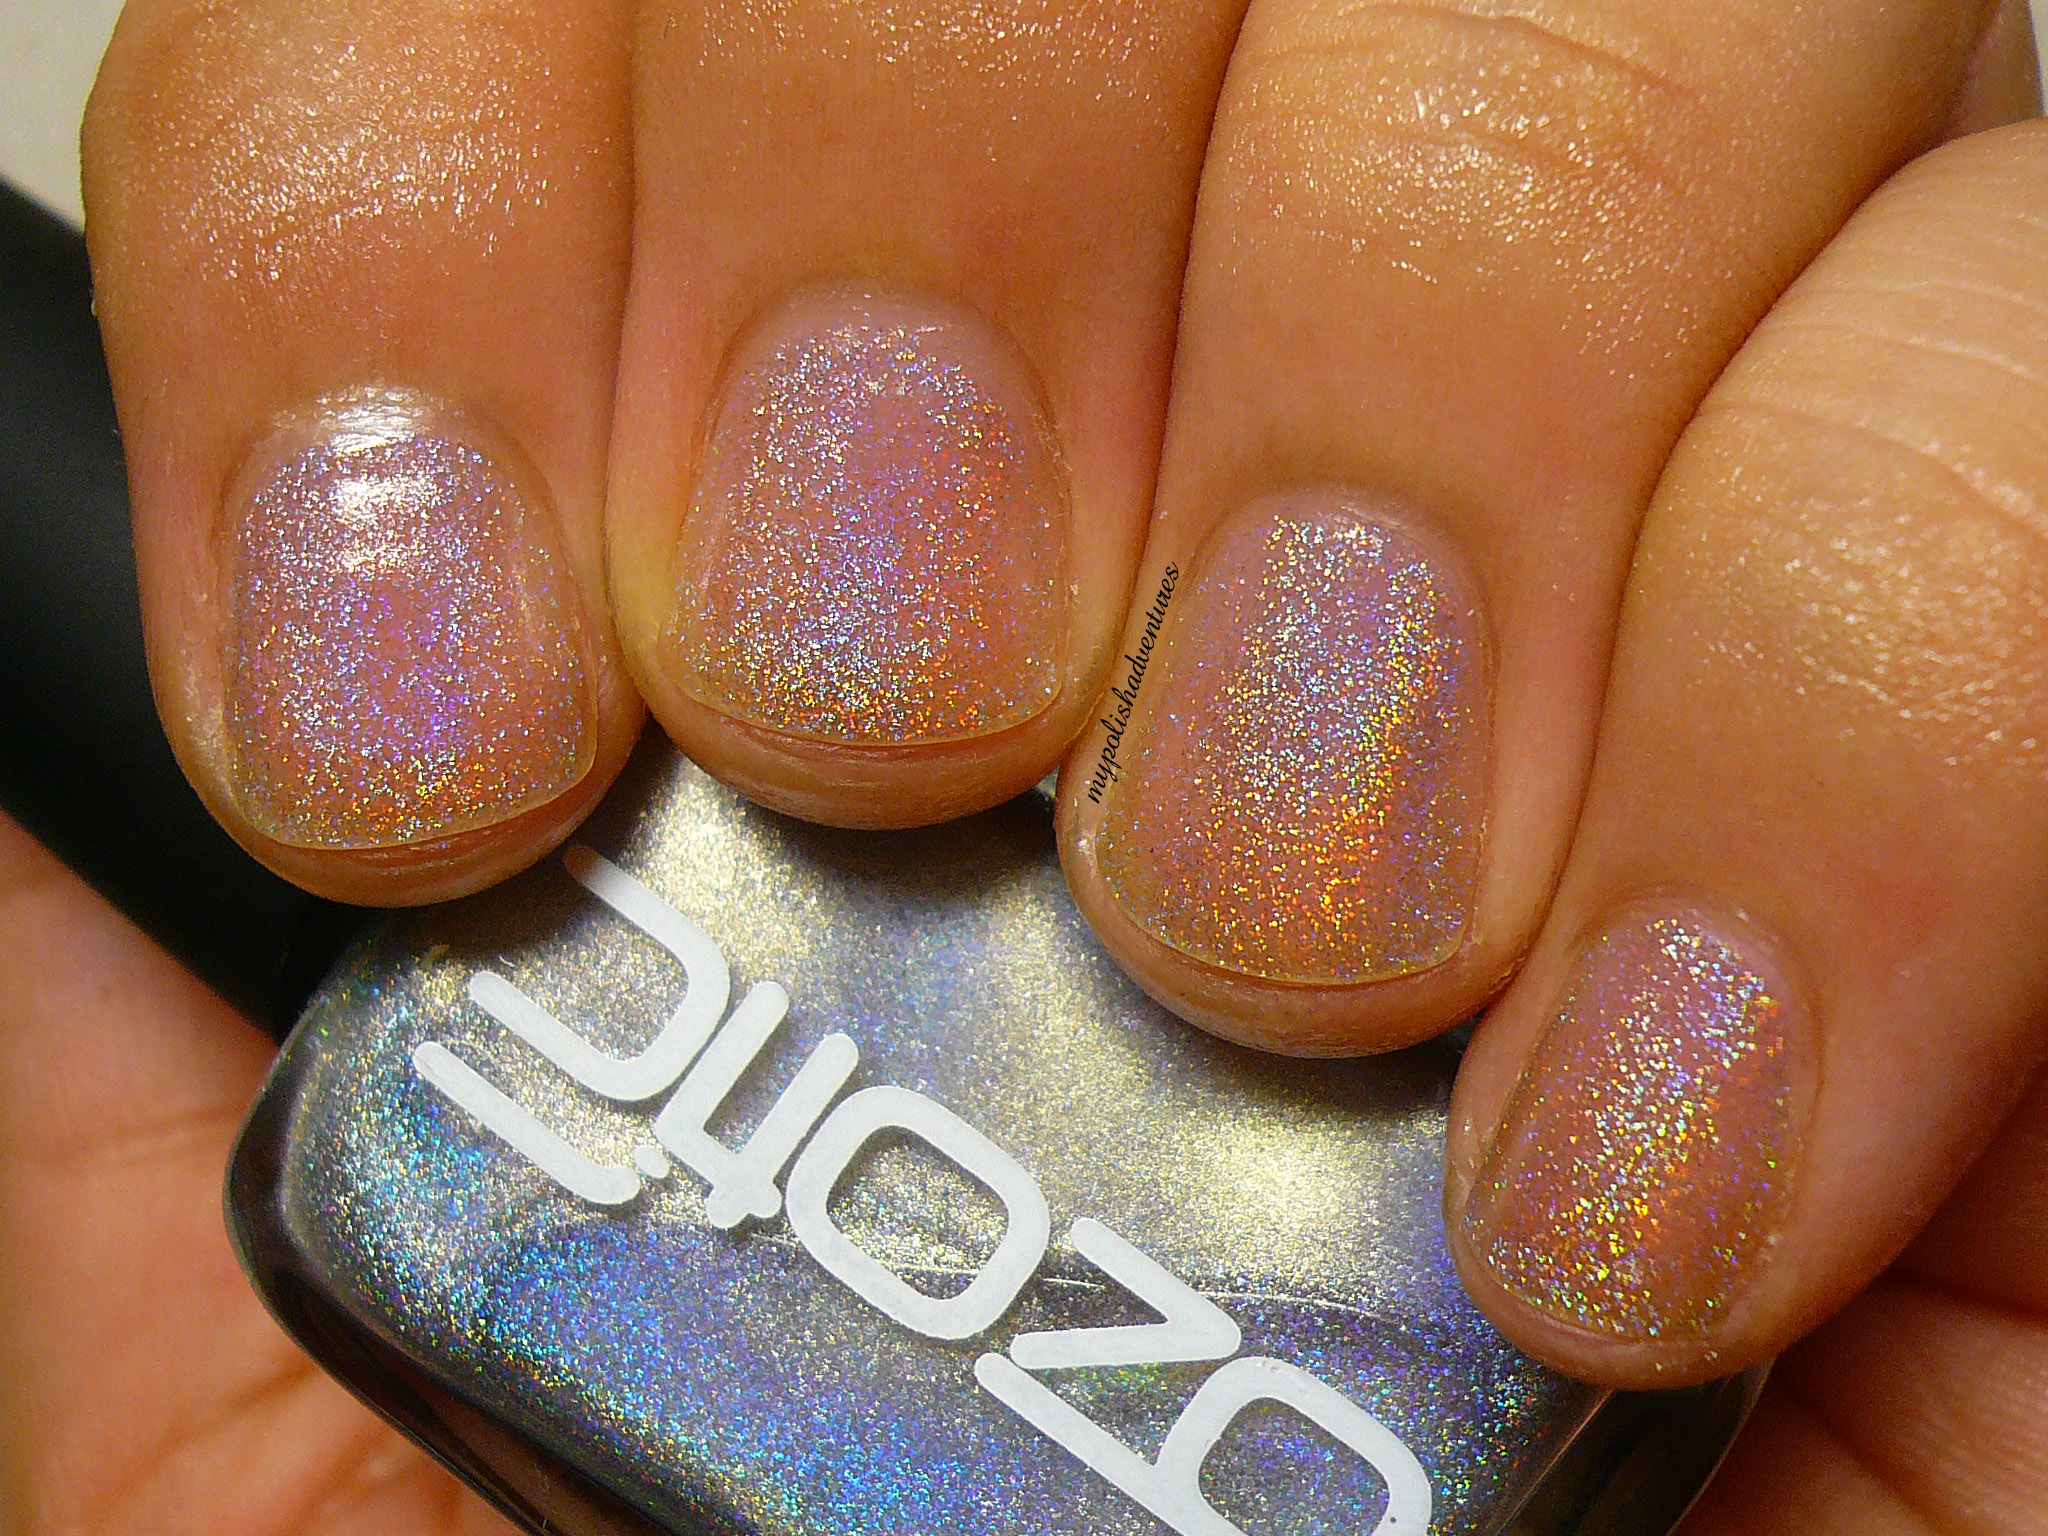
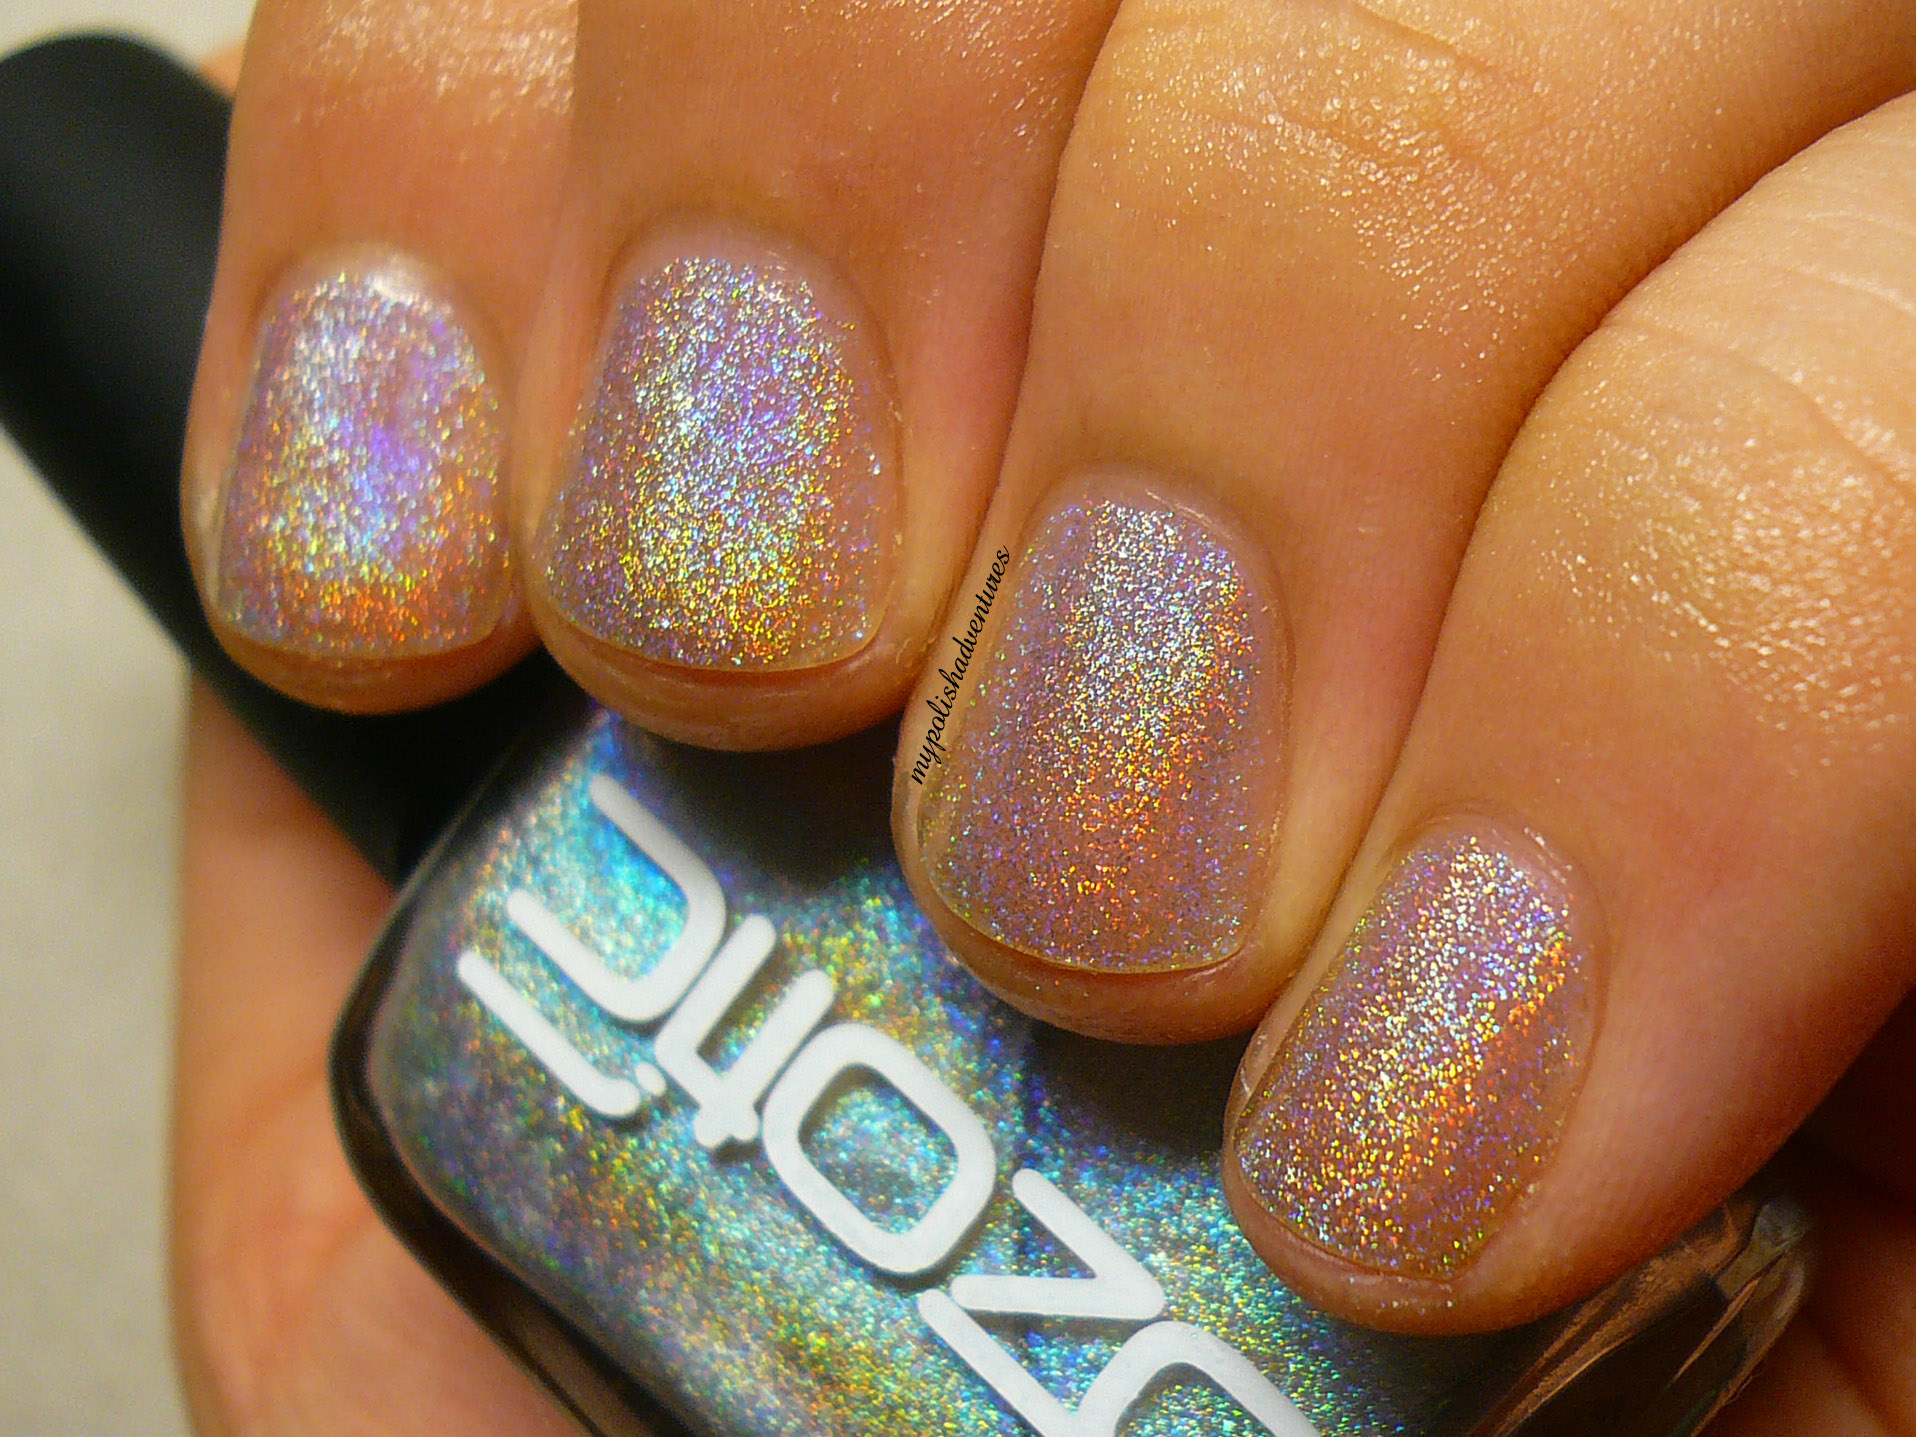
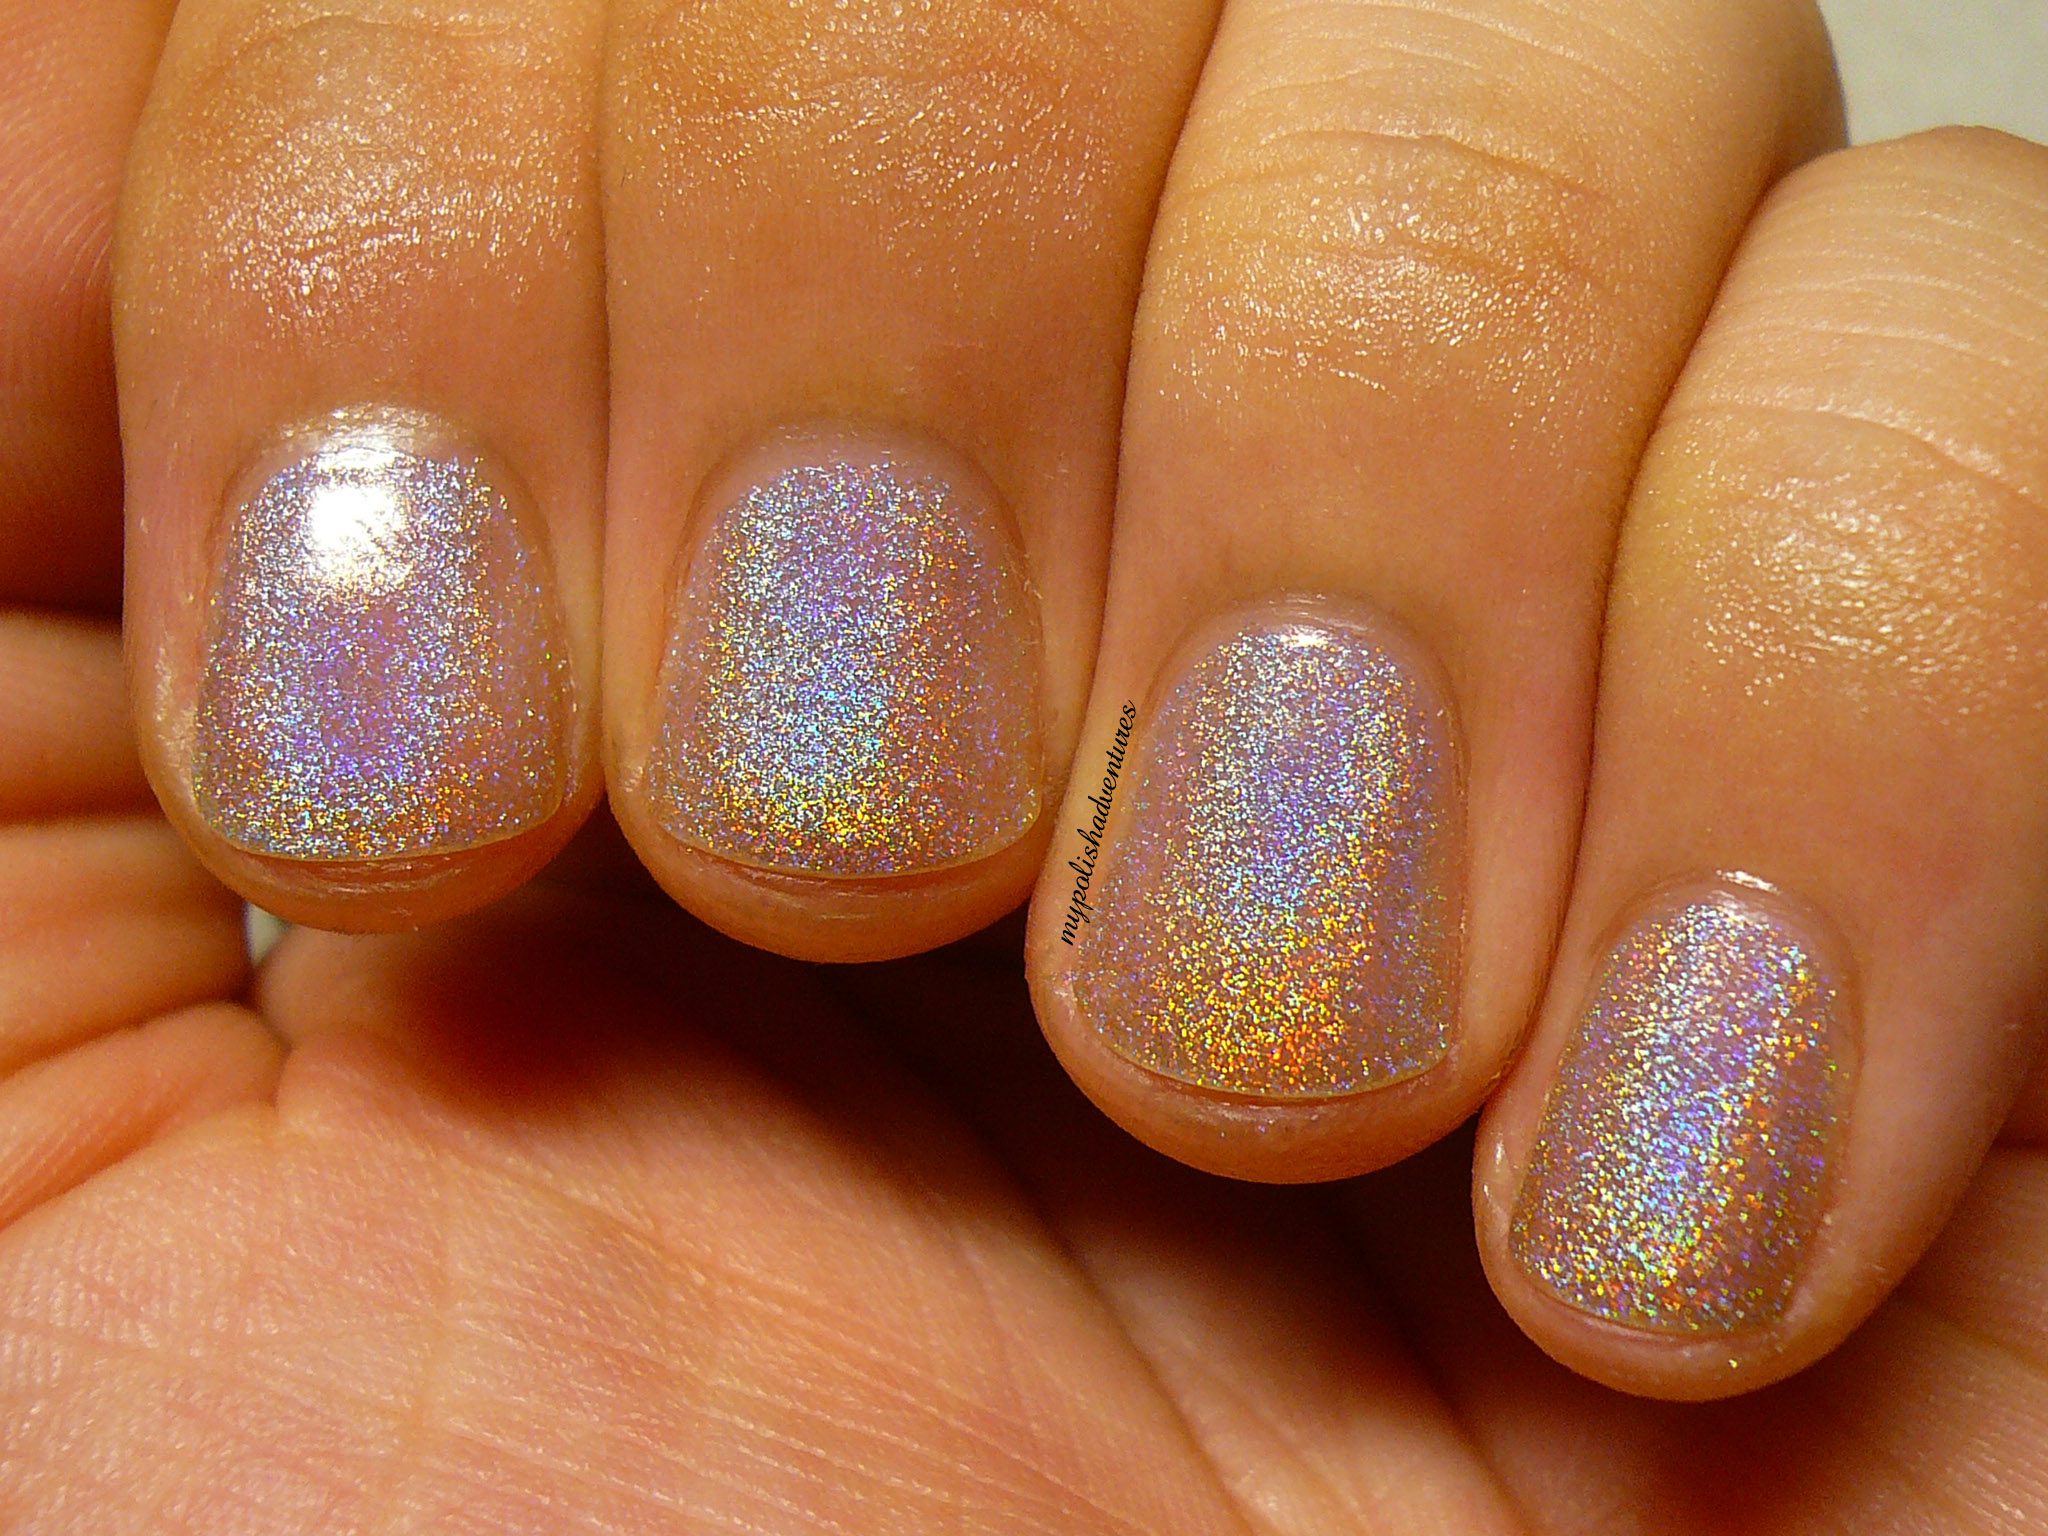
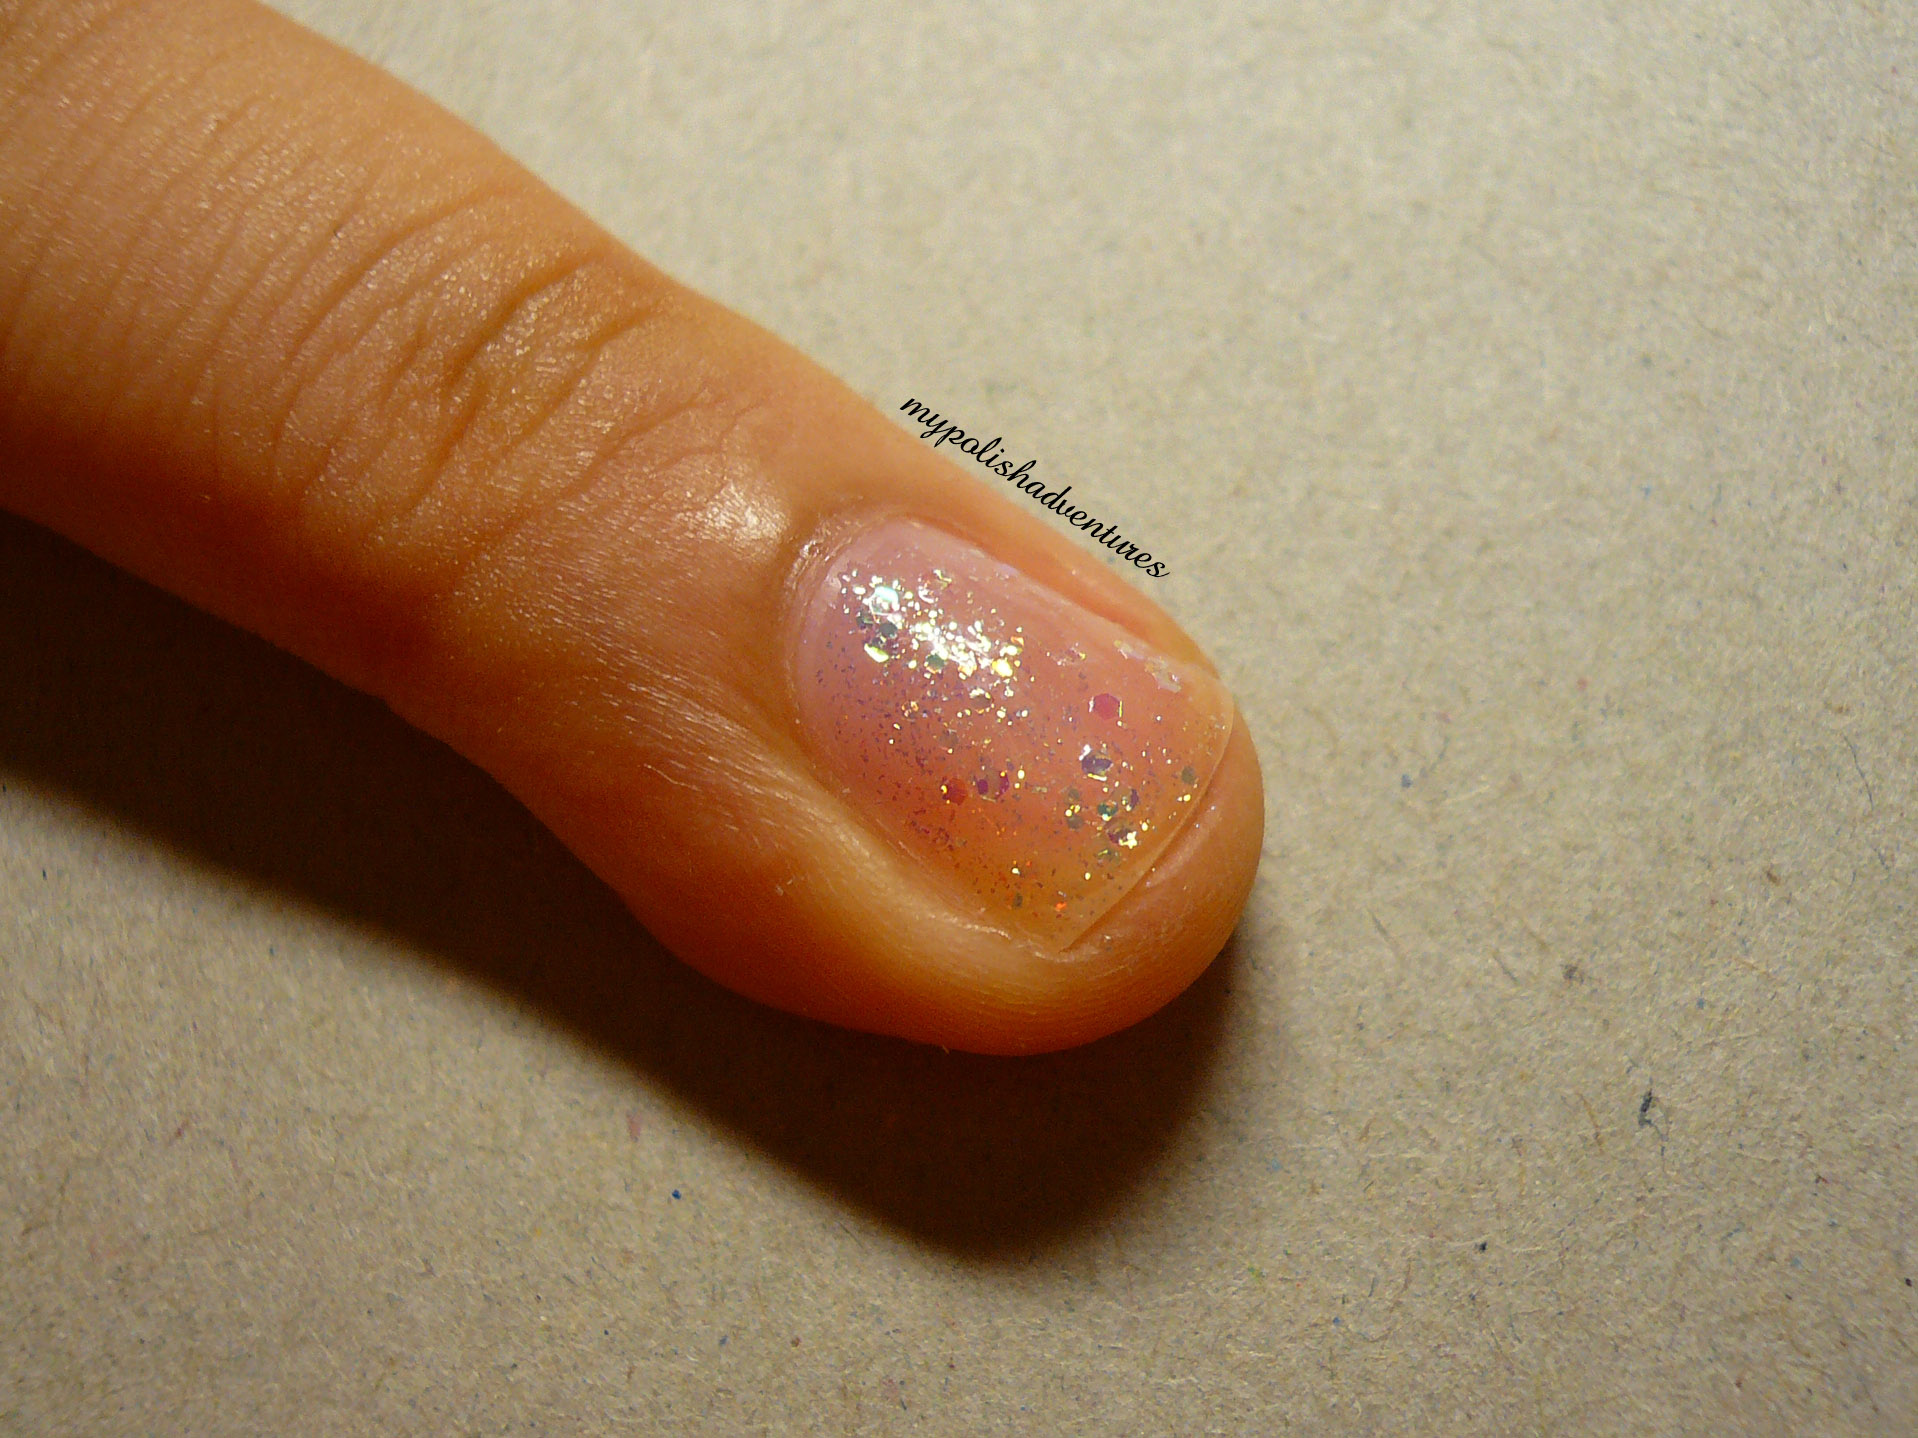
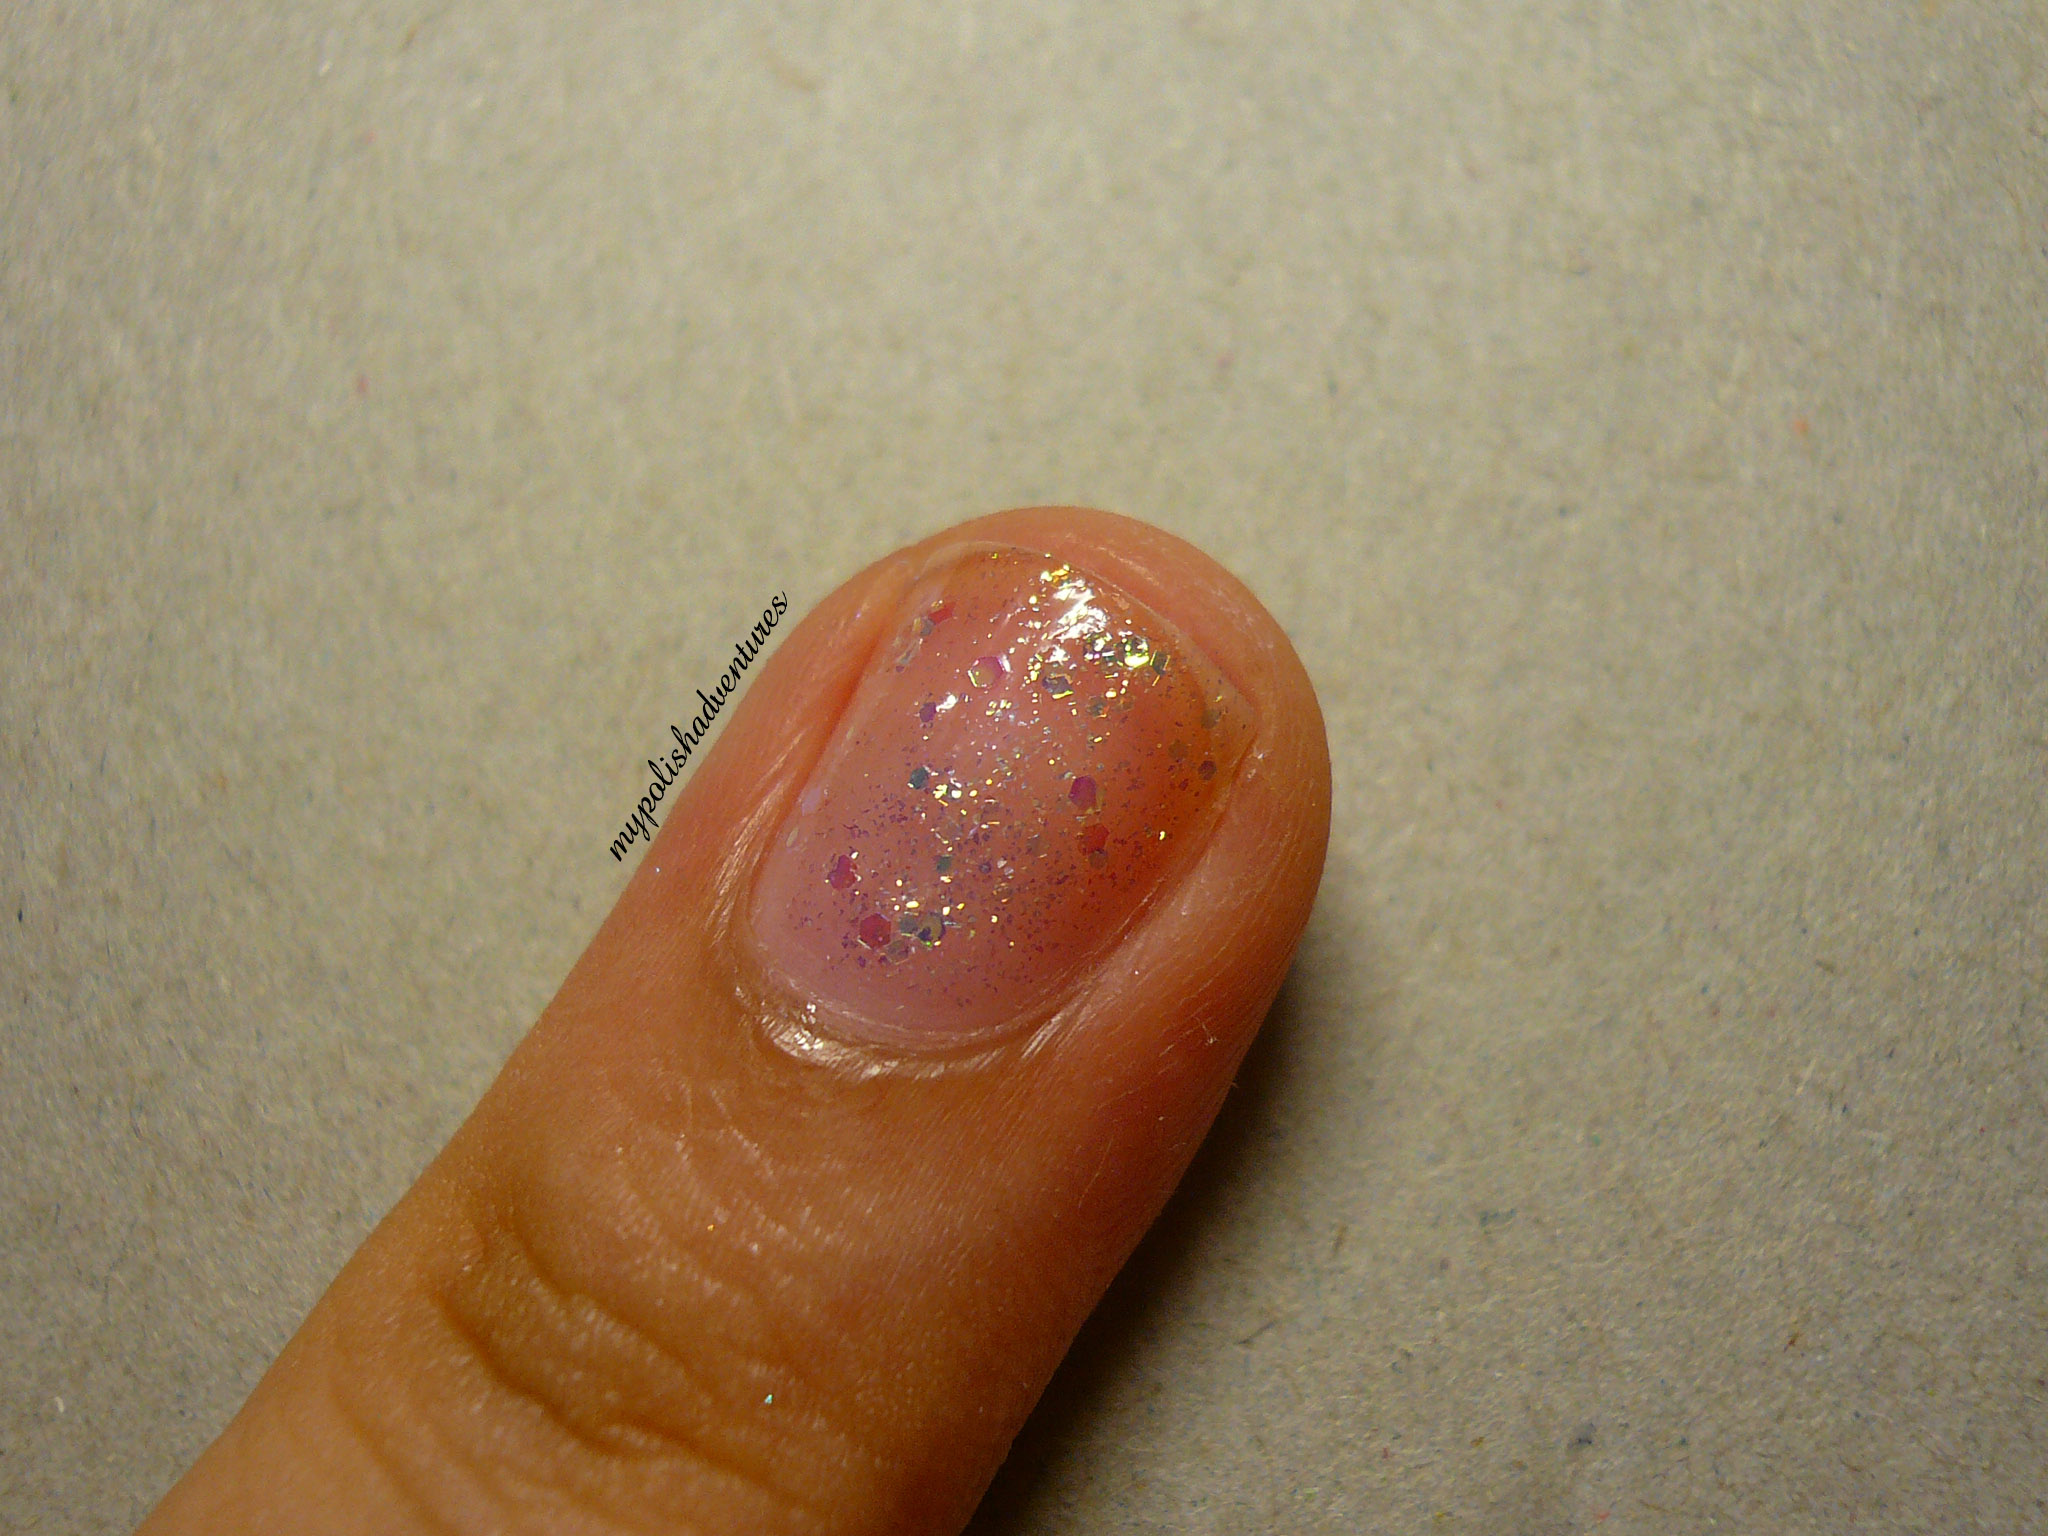
Last but not least, we have Make A Spectacle, a polish with irridescent glitters in a clear base. The way the irridescent bits shift to blue and purple reminds me of Nubar 2010!


Here it is on its own. This was three coats.


I love how the larger hexes and smaller glitter bits make the polish look more multi-dimensional!


Are you thinking what I'm thinking B1?

I think I am B2!

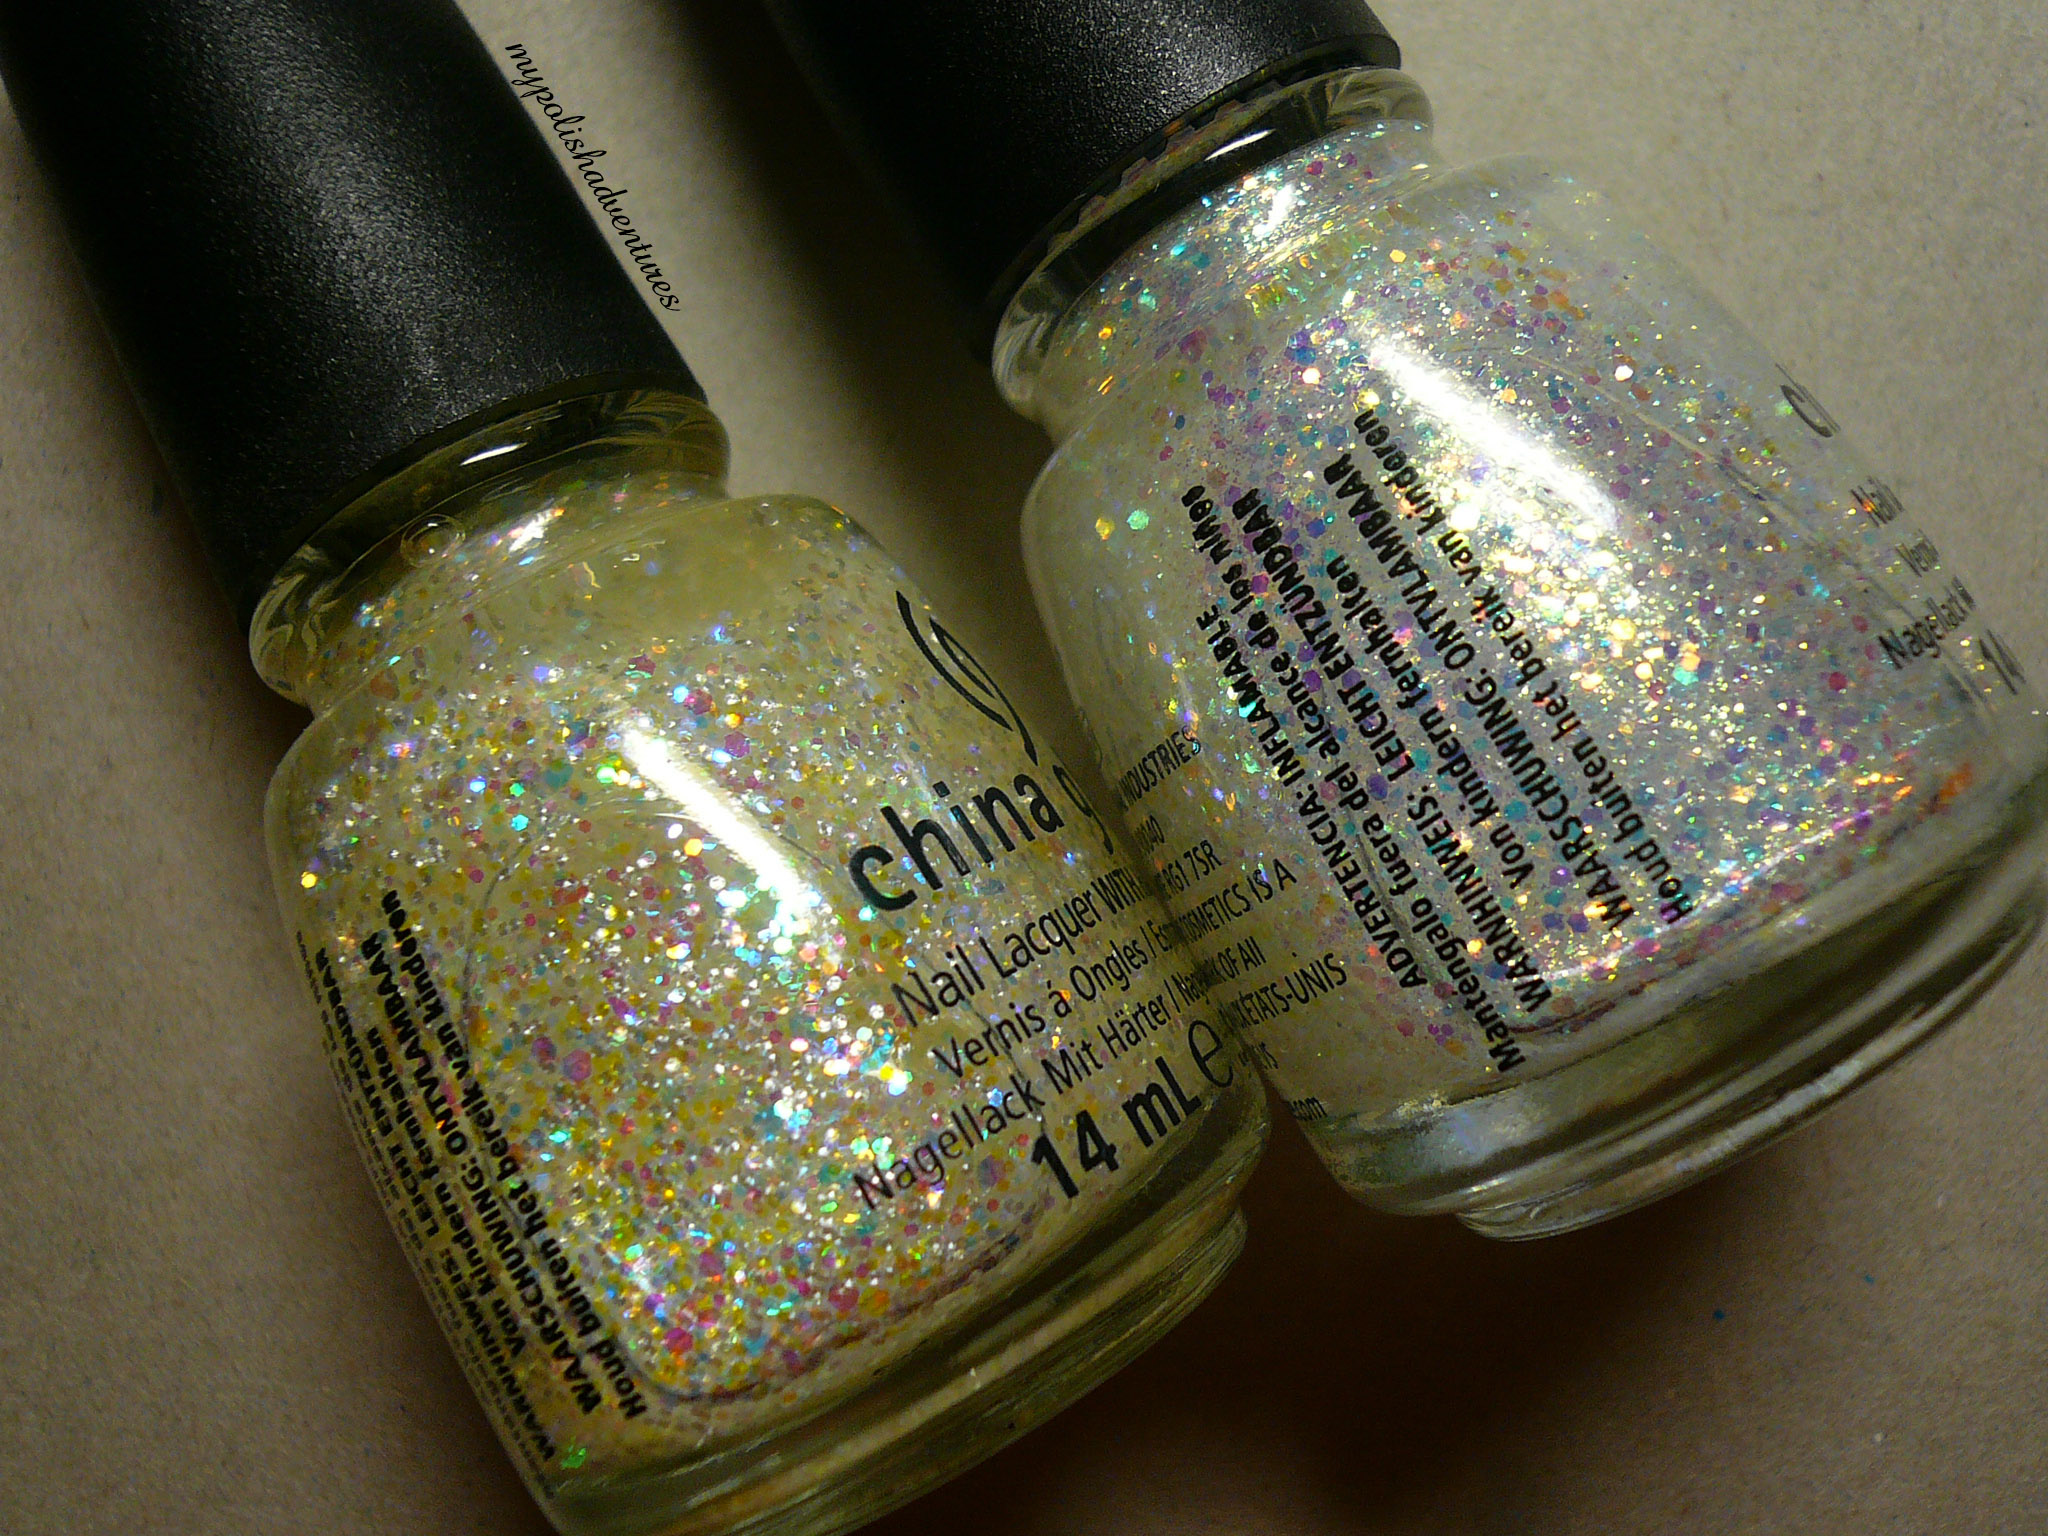
So before you ask, here's a bottle comparison of Snow Globe (left) and Make A Spectacle (right).


The first difference is that Snow Globe has a wamer base colour but seeing how we'd normally be layering these two over darker shades, this difference isn't gonna be that obvious.

What you should note is that Snow Globe's glitter particles are more similar in size whereas Make A Spectacle has the larger hex and way more smaller glitter bits. I can assure you that the two are very different on the nails. You can hop over to A Lacquered Affair's awesome and very detailed post to see a comparison swatch!

Final thoughts:
I have to say, Immortal really stole the show for me. I wasn't expecting it to be so pretty and despite it's slightly running formula, it still applied wonderfully!
So, do you guys have any favourites from this collection?
-----
Holo Month will resume as per normal after this post but since I'll be starting work tomorrow *SIGH*, I can't be updating this place every day as I did with the Layla Hologram series. I'll try to do around three posts a week so that another nine holo posts (at least) for the rest of HOLO MONTH!! :)

Friday, August 24, 2012

Holo Month Day 9: Layla Hologram Effect Nail Polish Swatches (and round up)


I finally manged to catch a glimpse of sunlight so here's a quick swatch of the eight Layla Hologram Effects in sunlight! I thought I'd also provide a brief "summary" of the Layla Holograms at the end. Read on for that.
All swatches were three coats of each polish and taken in direct sunlight.


From L-R: Mercury Twilight, Coral Glam, Retro Pink, Ultra Violet


From L-R: Jade Groove, Mermaid Spell, Ocean Rush and Flash Black


From L-R: Mercury Twilight, Coral Glam, Retro Pink, Ultra Violet


From L-R: Jade Groove, Mermaid Spell, Ocean Rush and Flash Black

They were already holo enough in artificial lighting and HOLY MOLY, THEY'RE ALL SO HOLO IN THE SUNLIGHT, I CAN DIE!

Application: I did three coats of all the Layla Holograms in all my swatches. I didn't use an aqua base as I normally would with such polishes because I don't feel it helps prolong the wear of the polish on my nails anyway. I did buff my nails to a shine before polishing though, as recommended on the Layla website. The polish does appear matte for the first few seconds they're on your nails but they dry extremely holographic so don't worry if that happens. I did experience some bald spots and some VNL, which was why I did three coats of polish to even things out as well as to bring out the true colour of the polish. But overall, application was pretty okay. The only suggestion I'd give is to wait for each coat to dry before painting on the next to reduce streaking/bald spots.

Wear: As with most super smooth holographic polishes (China Glaze OMG collection, Make Up Stores holos and Nfu Oh holos), I did encounter more significant tipwear with the Laylas holos than regular polish. This being said, the Laylas have held up the best so far among the bunch, considering I was wearing them sans base and top coat. I did take showers with the polish on and they lasted so that says A LOT about the staying power of the Laylas. I know it sounds lame for polish to chip so easily but I experienced chipping with Make Up Store Greta while I was sleeping.

Final thoughts: I LOVE THESE LAYLAS. I am a lover of holographic polishes and I was extremely excited to be able to grab such linear (and smooth) holo polishes at a decent price (compared to the crazy sky-high ebay price of China Glaze OMGs)! I love these so much that I'm already eyeing the next eight Layla Holograms. I need them all. I want to have a Layla Hologram family in my Helmer.
Hope you enjoyed the Layla Hologram series! Since I've got a couple more holos on their way, I've decided to do Holo Month here on My Polish Adventures. I think for the next month, this site should be renamed My Holo Polish Adventures! :D

Wednesday, August 22, 2012

Holo Month Day 8: Layla Flash Black (and comparison)

Hello Polish Lovers! Today I have here the last of the Layla hologram swatches for now (I say for now because I'm fully intending to get my hands on the latest 8 holograms soon)!

This is three coats of Flash Black. You could probably get away with two coats though. Man, is Flash Black blingtastic or what!


For today's comparison, I whipped out almost all of my charcoal holos. I never knew I had this many until I went searching through my Helmer! Yikes!

I'm wearing three coats of each polish and all the comparison shots were taken in sunlight.


The TFS and Daiso polishes refused to shine under my table lamp so I had to go chasing after the sun. Not surprisingly, Flash Black remains the undisputed Charcoal Holo Queen, with 10 to Midnight coming in second!


This last picture shows the holoness in the TFS and Daiso polishes just a little better. You can click on the pictures to enlarge them. I promise the holo looks even more glorious when the pictures are bigger!


So that's it for the proper Layla Hologram swatches for now. I did managed to catch some sun so I'll be showing you sunlight skittle shots of all the Holograms tomorrow! See you then! :)

Tuesday, August 21, 2012

Holo Month Day 7: Layla Ocean Rush (and comparison)

Hey there! Today, I have swatches of Layla Ocean Rush for you all. Ocean Rush is the darker of the two blues and it's also the most opaque polish in the Hologram collection. I was surprised I managed to get a good finish (with no bald spots) in just two coats!

This is two coats of Ocean Rush, taken under my table lamp.


Somehow I find that Ocean Rush seems too saturated and in a way caused the holographic effect of the polish to "blend" in with its colour, resulting in an ultra smooth finish. I'm not sure if I'm the only one who feels this way though.

For today's comparison, I have Ozotic 515, a medium blue holo, much like Ocean Spell, except it has a "rougher" holo effect than the Layla. However, 515 makes up for it by burning brighter, as it has a more vibrant holo rainbow and you can see the red and orange in the rainbow better.

Here is two coats of each polish, again taken under artificial lighting (i.e. my table lamp).


GOSH, blue holos really own a large chunk of my polish soul! I just can't get over how holo the Layla Hologram collection has been so far! Stay tuned for the last of the proper Layla swatches, where I'll be showing you Flash Black, the charcoal holo that's got everyone raving about.

By the way, do you notice anything different about my pictures? *Ahem* my new "watermark" *ahem* I've been considering placing a watermark on all my pictures for a very long time and decided it was too time and space consuming to do so in the past but seeing how I needed to photoshop most of my pictures (crop, colour correct and sometimes add in the occasional comparison texts), adding a phrase would only take up just a few more seconds.

Of course there's an issue of having two sets of the same pictures (the original and the edited versions) and the extra space that would require but I'll deal with that later. Any opinions from you girls about the new watermark or how I should deal with the two sets of pictures? Should I just save all the changes onto the original copy (instead of save-as) so I only keep one copy ultimately? Let me know! :)